Steinberg HALion Sonic SE 2 User manual
- Category
- DJ controllers
- Type
- User manual

1
Operation Manual

Matthias Klag, Michael Ruf
Revision and quality control: Cristina Bachmann, Heiko Bischoff, Christina Kaboth, Insa Mingers,
Sabine
Pfeifer, Kevin Quarshie, Benjamin Schütte
This PDF provides improved access for vision-impaired users. Please note that due to the complexity
and number of images in this document, it is not possible to include text descriptions of images.
The information in this document is subject to change without notice and does not represent a
commitment on the part of Steinberg Media Technologies GmbH. The software described by this
document is subject to a License Agreement and may not be copied to other media except as
specifically allowed in the License Agreement. No part of this publication may be copied, reproduced,
or otherwise transmitted or recorded, for any purpose, without prior written permission by Steinberg
Media Technologies GmbH. Registered licensees of the product described herein may print one
copy of this document for their personal use.
All product and company names are ™ or ® trademarks of their respective holders. For more
information, please visit www.steinberg.net/trademarks.
© Steinberg Media Technologies GmbH, 2013.
All rights reserved.

3
Table of Contents
4 Introduction
4 Window Overview
5 Instrument Track vs Instrument Rack
5 About Programs, Layers, Multis, Macro
Pages, and Presets
7 Common Editing Methods
7 Presets
9 Managing Your Sounds
9 Loading Programs
9 Multi Program Rack
10 Slot Context Menu
12 Editing Programs
12 Macro Page
14 Trip Macro Page
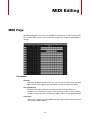
24 MIDI Editing
24 MIDI Page
25 Editing the Key Range
25 Editing the Velocity Range
25 Filtering Controllers
26 MIDI Controllers
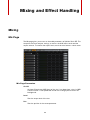
29 Mixing and Effect Handling
29 Mixing
30 Effect Handling
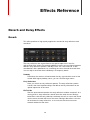
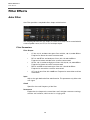
32 Effects Reference
32 Reverb and Delay Effects
36 EQ Effects
38 Filter Effects
43 Distortion Effects
46 Modulation Effects
56 Dynamics Effects
61 Panner Effects
62 HALion 3 Legacy Effects
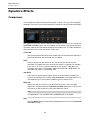
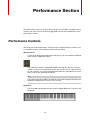
74 Performance Section
74 Performance Controls
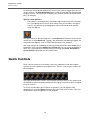
75 Quick Controls
76 Trigger Pads
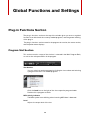
80 Global Functions and Settings
80 Plug-in Functions Section
82 The Plug-in Name and Steinberg Logo
82 Toolbars
83 Options Page
89 Index

4
Introduction
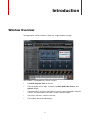
Window Overview
The application interface follows a fixed-size single window concept.
The window is subdivided into several sections:
• The Multi Program Rack on the left.
• The edit display on the right. It contains the Edit, MIDI, Mix, Effects, and
Options pages.
• The performance section at the bottom. It contains the trigger pads, the quick
controls, the performance controllers, and the sphere control.
• The plug-in functions section at the top.
• The toolbars above the edit display.

Introduction
Instrument Track vs Instrument Rack
5
View Options
You have 2 view options: the full-size editor view and the smaller player view. In the
player view, only the plug-in functions, the trigger pads, the quick controls, and the
performance controllers are visible.
•Click the p button in the toolbar above the edit display to switch between the
views. When the player view is active, the button changes to e, indicating that
clicking again lets you return to the editor view.
Instrument Track vs Instrument Rack
HALion Sonic SE can be used on an instrument track or it can be loaded into the
VST Instruments rack. In both cases, you can load up to 16 programs
simultaneously.
However, when you use HALion Sonic SE on an instrument track, all 16 slots are
routed to the main output. By setting multiple program slots to the same MIDI
channel, you can create split and layer sounds that can be used on an instrument
track.
About Programs, Layers, Multis, Macro Pages, and
Presets
Programs
A program is a complex instrument or sound that can consist of up to 4 layers.
Often, a program contains a single layer that comes with all necessary components,
such as the synthesis part or insert effects. Programs add the possibility of
combining different layers to build up more complex sounds, or to create
combinations of sounds that you want to load as a unit. A typical example is a
bass/piano split sound or a piano/string layer sound.
Multis
HALion Sonic SE is a multitimbral plug-in that can load up to 16 sounds (or
programs) and combine them. This combination is called a multi program, or multi
for short. You can use multis, to layer several programs or to create split sounds by
setting several programs to the same MIDI input channel, for example. However, the
most common usage is to create sound sets with different instruments set to
individual MIDI channels.
Presets
You can save and load all types of sounds as presets, that is, you can create presets
for single programs and for multis.

Introduction
About Programs, Layers, Multis, Macro Pages, and Presets
6
Content Files and Folder Structure
HALion Sonic SE is supplied with a huge amount of ready-to-use sound content.
This content, made up of hundreds of multis, programs, and layers, is
write-protected. This means that you can edit files while they are loaded, but you
cannot overwrite the factory content files to make your changes permanent.To save
any edits to the factory content, you must save the files under a new name and to a
predefined location. These files have the extension .vstpreset, and are referred to as
“user content”. You can categorize and search for them in the same way as with the
factory content.The user content is saved in a predefined folder structure on your
hard disk (the exact path depends on your operating system). You can create
subfolders within this structure, to facilitate moving or exchanging content.

7
Common Editing Methods
Presets
HALion Sonic SE offers two types of presets: section/module presets and VST
presets. VST presets contain all information necessary to restore the complete state
of the plug-in. Section and module presets store and recall the setup of a specific
component on the HALion Sonic SE panel.
During setup, the factory presets are installed in a dedicated folder and a user folder
is created for your own presets. The handling of presets is the same throughout the
program.
NOTE
Factory presets are write-protected, but may be overwritten when a software
update is executed. Presets in your user folder are never changed by the software.
Handling Section and Module Presets
The preset controls can be found throughout the program. The handling is always
the same.
• To save a preset, click the Save button (the disk icon).
NOTE
You cannot overwrite factory presets. If you want to save changes made to a factory
preset, save the preset under a new name or in a new location.
• To load a preset, click the arrow icon and select a preset from the list.
• To delete a preset, click the Delete button (the trash icon). Note that factory
presets cannot be deleted.

Common Editing Methods
Presets
8
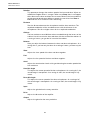
Handling VST Presets
Loading VST Presets
1) In the header of the plug-in panel, click the Preset management button next
to the preset name field and select Load Preset.
2) Select a preset to load it. Double-click a preset to load it and close the preset
loader.
Saving VST Presets
In the header of the plug-in panel, click the Preset management button next to the
preset name field and select Save Preset.
NOTE
For more information on VST presets, see the Cubase/Nuendo Operation Manual.

9
Managing Your Sounds
Loading Programs
There are several ways to load programs:
• Via drag & drop from the MediaBay or the Windows Explorer/Mac OS Finder.
• Via the slot context menu in the Multi Program Rack.
• By clicking the Load Program button at the right of the slot.
NOTE
Programs containing lots of sample data may take some time to load.
RELATED LINKS
Slot Context Menu on page 10
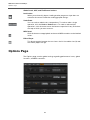
Multi Program Rack
The Multi Program Rack provides 16 slots. Each slot can contain a program.

Managing Your Sounds
Slot Context Menu
10
Each slot has a Mute button and a Solo button. You can mute and solo several
programs at the same time. The slot number to the left of the slot lights up if
incoming MIDI data is detected.
When you select a slot in the Multi Program Rack, the available settings and
parameters for this program are shown on the different pages of the edit display.
The trash button at the top right of the Multi Program Rack lets you remove all
currently loaded programs. This does not reset any parameters that are
independent of programs, such as effect or slot settings.
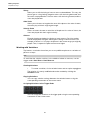
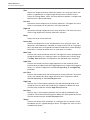
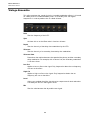
Slot Context Menu
The context menu provides a number of functions for managing programs.
Load Program
Opens the program loader. Double-click a program to load it into this slot.
Save Program
Saves the program. If you try to overwrite write-protected factory content, a
dialog opens that allows you to save the edited program under a new name.
Save Program As
Allows you to save the program under a new name.
Save All Programs
Allows you to save all programs as a VST preset.
Remove Program
Removes the program from the slot.
Revert to Last Saved Program
Discards any changes that you made to the program since the last time it was
saved.
Cut Program
Copies the program and removes it from the slot.
Copy Program
Copies the program.
Paste Program
Pastes the copied program into the slot. If the slot already contains a program,
it is replaced.
Rename Program
Allows you to rename the program.
Reset Slot
Resets the slot to the default values.

Managing Your Sounds
Slot Context Menu
11
Reset All Slots
Resets all slots to the default values.
NOTE
You can also cut, copy, and paste programs from one plug-in instance to another.

12
Editing Programs
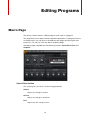
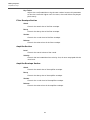
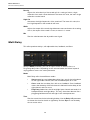
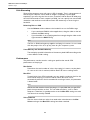
Macro Page
The factory content features a Macro page for each layer in a program.
This page allows you to adjust the most important parameters. If a program consists
of multiple layers, you can access the different layer pages by clicking the layer
buttons (L1, L2, L3, L4) in the title bar of the Macro page.
The Macro page is divided into the following sections: Voice/Pitch, Filter and
Amplifier.
Voice/Pitch Section
This section gives you access to the tuning parameters.
Octave
Adjusts the tuning in octaves.
Coarse
Adjusts the tuning in semitones.
Fine
Adjusts the fine tuning in cents.

Editing Programs
Macro Page
13
Pitchbend Up/Down
Sets the range for the modulation that is applied when you move the
pitchbend wheel.
Polyphony
Determines how many notes can be played at the same time.
Mono Mode
When Mono mode is active, you can only play one note at a time, and the
Polyphony control is not available.
Filter Section
This section allows you to adjust the filter settings. These parameters work as
offsets, that is, they raise or lower the actual values.
NOTE
This section is only available when a filter is used.
Cutoff
Adjusts the timbre of the layer.
Resonance
Emphasizes the frequencies around the cutoff frequency.
Attack
Increases or decreases the attack time of the filter envelope.
Release
Increases or decreases the release time of the filter envelope.
Amplifier Section
This section gives you access to the level and pan settings. Furthermore, you can
adjust the attack and release times of the amplifier envelopes individually.
Level
Adjusts the level of the layer.
Pan
Sets the position of the layer in the stereo panorama.
Attack
Offsets the attack time of the amplifier envelope. Positive values decrease and
negative values increase the attack time.
Decay
Offsets the decay time of the amplifier envelope. Positive values decrease and
negative values increase the decay time.

Editing Programs
Trip Macro Page
14
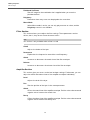
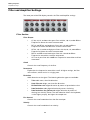
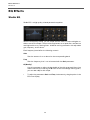
Trip Macro Page
Trip is a virtual analog synth that comes with three oscillators, a sub oscillator, a ring
modulator, and a noise generator.
Accompanied by a flexible filter section that offers 13 different filter shapes and 5
filter modes, Trip provides a highly flexible sound architecture while still being easy
to use. With the integrated arpeggiator and step sequencer that comes with 4
different pre-configured arpeggio styles per preset, Trip is a real source of
inspiration.
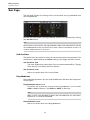
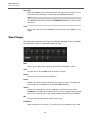
Oscillator Page
In addition to the classic synth wave shapes, such as sine, triangle, saw, and square,
the 3 oscillators provide additional sync versions with integrated master oscillators.
Activate the oscillators by clicking their On/Off buttons.
NOTE
Deactivate the oscillators when they are not needed, because they use CPU cycles
even if they are not heard, such as in a situation where the level is set to 0 %.

Editing Programs
Trip Macro Page
15
OSC 1/2/3 Type
The Oscillator Type defines the basic sound character of the oscillator. The
pop-up menu lists the wave shapes, followed by the type of algorithm. The
following algorithms are available:
• The PWM (pulse width modulation) algorithm is only supported by the
square wave shape. The Waveform parameter sets the ratio between
the high and low of the square wave. A setting of 50 % produces a pure
square wave. With settings below or above 50 %, the oscillator
produces rectangular waves.
• The Sync algorithm provides different hard-sync oscillators where each
is a combination of a master and slave oscillator. The wave shape of the
slave oscillator (sine, triangle, saw, or square) is reset with each full
wave cycle of the master oscillator. This means that a single oscillator
can already produce a rich sync sound without utilizing other oscillators
as slave or master. The waveform parameter adjusts the pitch of the
slave oscillator producing the typical sync sound.
Waveform
Modifies the sound of the oscillator algorithm. Its effect depends on the
selected oscillator type.
NOTE
This parameter is only available for oscillator types that allow waveform
modulation.
Filter Envelope Wave Amount
Specifies how much the modulation of the filter envelope influences the
oscillator waveform.
NOTE
This parameter is only available for oscillator types that allow waveform
modulation.
Level
Adjusts the output level of the oscillator.
Octave
Adjusts the pitch in octave steps.
Coarse
Adjusts the pitch in semitone steps.
Fine
Adjusts the pitch in cent steps.
Filter Envelope Pitch Amount
Here you can specify the modulation amount of the filter envelope on the
oscillator pitch.

Editing Programs
Trip Macro Page
16
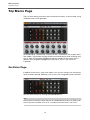
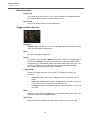
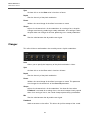
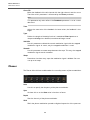
Sub Page
The Sub page contains the settings for the sub oscillator, the ring modulation and
the noise generator.
Activate the sub oscillator, the ring modulator, and the noise generator by clicking
their On/Off buttons.
NOTE
Deactivate the sub oscillator, the ring modulator, and the noise generator if they are
not needed, because they use CPU cycles even if they are not heard, such as in a
situation where the level is set to 0 %.
Sub Oscillator
The pitch of the sub oscillator is always one octave lower than the overall pitch. The
overall pitch is determined by the Octave setting in the Trigger and Pitch section.
Sub Oscillator Type
The wave shape of the sub oscillator. You can choose between Sine, Triangle,
Saw, Square, Pulse Wide, and Pulse Narrow.
Sub Oscillator Level
Adjusts the output level of the sub oscillator.
Ring Modulator
Ring modulation produces the sums and the differences between the frequencies
of two signals.
Ring Modulation Source 1/2
This allows you to select the sources for the ring modulation. You can select
OSC1 or Sub as Source 1 and OSC2 or OSC3 as Source 2.
NOTE
Make sure the corresponding oscillators are activated when you select them.
Otherwise, no sound can be heard.
Ring Modulation Level
Adjusts the output level of the Ring Modulation.

Editing Programs
Trip Macro Page
17
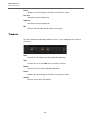
Noise Generator
Noise Type
The sound color of the noise. You can choose between standard and band
pass filtered (BPF) versions of white and pink noise.
Noise Level
Adjusts the output level of the noise generator.
Trigger and Pitch Section
Polyphony
If Mono mode is not active, you can use this parameter to specify how many
notes can be played simultaneously.
Mono
Activates monophonic playback.
Retrig
This option is only available if Mono is activated. It allows the retriggering of a
stolen note. If Retrig is activated, a note that was stolen by another note is
retriggered if you still hold the stolen note when releasing the new one. This
way, you can play trills by holding one note and quickly and repeatedly
pressing and releasing another note, for example.
Trigger Mode
Defines the trigger behavior for new notes. The following settings are
available:
•In Normal mode, a new note is triggered when the previous note is
stolen.
•In Resume mode, the envelope is retriggered, but resumes at the level
of the stolen note. The pitch is set to the new note.
•In Legato mode, the envelopes keep playing and the pitch is set to the
new note.
Glide
Allows you to bend the pitch between two notes that follow each other. You
achieve the best results in Mono mode.
Glide Time
Specifies the time needed to bend the pitch from one note to the other.

Editing Programs
Trip Macro Page
18
Fingered
Activate this parameter to glide the pitch only between notes that are played
legato.
Octave
Adjusts the pitch in octave steps.
Pitchbend Up/Down
Sets the range for the modulation that is applied when you move the
pitchbend wheel.
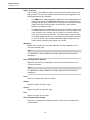
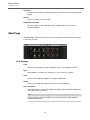
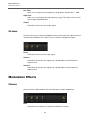
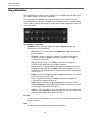
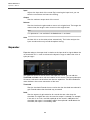
Mod Page
The Mod page contains the LFO settings in the upper section and vibrato settings
in the lower section.
LFO Settings
Freq
Controls the frequency of the modulation, that is, the speed of the LFO.
Sync
When Sync is activated, the frequency is set in fractions of beats.
Pitch
Controls the modulation depth of the pitch modulation.
Cutoff
Controls the modulation depth of the filter cutoff modulation.
Osc1/2/3 Wave
These parameters control the modulation depth of the waveform modulation
of the three main oscillators.
NOTE
These controls are only available if the selected oscillator type supports
waveform modulation.

Editing Programs
Trip Macro Page
19
Vibrato Parameters
Vib Freq
Controls the frequency of the second LFO that is used for pitch modulation
(vibrato).
Vib Depth
Controls the depth of the vibrato modulation.
Cutoff
Controls the influence of the mod wheel on the filter cutoff.
Osc1/2/3 Wave
These parameters control the influence of the mod wheel on the waveform of
the three main oscillators. These controls are only available if the selected
oscillator type supports waveform modulation.
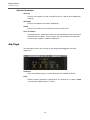
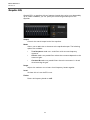
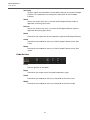
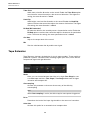
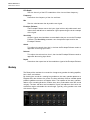
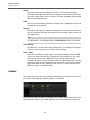
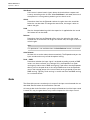
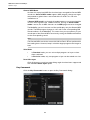
Arp Page
The Arp page contains the settings for the integrated arpeggiator and step
sequencer.
Variations
Click the variation buttons to switch between the available variations.
Loop
Defines whether the phrase is played once or continuously in a loop. If Loop
is activated, the phrase plays in a loop.

Editing Programs
Trip Macro Page
20
Hold Mode
With this parameter, you can prevent the phrase from stopping or changing
when the keys are released. In addition, the Gated mode plays silently in the
background when you release the keys, and resumes playback at the current
position when you press the keys again. You can select one of the following
options:
•If you select Off, the phrase changes immediately when you release a
key. The phrase stops immediately when all keys are released.
•If you select On, the phrase plays to end even when the keys are
released. If Loop is activated, the phrase plays continuously in a cycle.
•If Gated is selected, the phrase starts playback with the first key that is
played. It plays silently in the background even when the keys are
released, and resumes playback at the current position when you press
any of the keys again. This way, you can gate the playback of the phrase.
Trigger Mode
This parameter defines when the arpeggiator scans for new keys that you play
on the keyboard.
•If Immediately is selected, the arpeggiator scans for new keys all the
time. The phrase changes immediately in reaction to your playing.
•If Next Beat is selected, the arpeggiator scans for new keys upon new
beats. The phrase changes in reaction to your playing on each new
beat.
•If Next Measure is selected, the arpeggiator scans for new keys upon
new measures. The phrase changes in reaction to your playing on each
new measure.
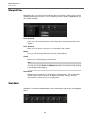
Restart Mode
Depending on the selected Restart Mode and your playing, you can restart
playback from the beginning of the phrase.
•If Off is selected, the phrase runs continuously and does not restart
upon chord or note changes.
•If New Chord is selected, the phrase restarts on new chords. However,
the phrase will not restart upon notes that are played legato, for
example, if you play additional notes to a chord you are holding already.
•If New Note is selected, the phrase restarts with each new note you
play. Here, the phrase also restarts upon notes that are played legato.
•If Sync to Host is selected, the phrase aligns with the beats and
measures of your host application, each time you start the transport.
Tempo Scale
Defines the rate at which notes are triggered, that is, the speed at which the
phrase is running. You can specify a value in fractions of beats. You can also
set dotted and triplet note values.
Page is loading ...
Page is loading ...
Page is loading ...
Page is loading ...
Page is loading ...
Page is loading ...
Page is loading ...
Page is loading ...
Page is loading ...
Page is loading ...
Page is loading ...
Page is loading ...
Page is loading ...
Page is loading ...
Page is loading ...
Page is loading ...
Page is loading ...
Page is loading ...
Page is loading ...
Page is loading ...
Page is loading ...
Page is loading ...
Page is loading ...
Page is loading ...
Page is loading ...
Page is loading ...
Page is loading ...
Page is loading ...
Page is loading ...
Page is loading ...
Page is loading ...
Page is loading ...
Page is loading ...
Page is loading ...
Page is loading ...
Page is loading ...
Page is loading ...
Page is loading ...
Page is loading ...
Page is loading ...
Page is loading ...
Page is loading ...
Page is loading ...
Page is loading ...
Page is loading ...
Page is loading ...
Page is loading ...
Page is loading ...
Page is loading ...
Page is loading ...
Page is loading ...
Page is loading ...
Page is loading ...
Page is loading ...
Page is loading ...
Page is loading ...
Page is loading ...
Page is loading ...
Page is loading ...
Page is loading ...
Page is loading ...
Page is loading ...
Page is loading ...
Page is loading ...
Page is loading ...
Page is loading ...
Page is loading ...
Page is loading ...
Page is loading ...
-
 1
1
-
 2
2
-
 3
3
-
 4
4
-
 5
5
-
 6
6
-
 7
7
-
 8
8
-
 9
9
-
 10
10
-
 11
11
-
 12
12
-
 13
13
-
 14
14
-
 15
15
-
 16
16
-
 17
17
-
 18
18
-
 19
19
-
 20
20
-
 21
21
-
 22
22
-
 23
23
-
 24
24
-
 25
25
-
 26
26
-
 27
27
-
 28
28
-
 29
29
-
 30
30
-
 31
31
-
 32
32
-
 33
33
-
 34
34
-
 35
35
-
 36
36
-
 37
37
-
 38
38
-
 39
39
-
 40
40
-
 41
41
-
 42
42
-
 43
43
-
 44
44
-
 45
45
-
 46
46
-
 47
47
-
 48
48
-
 49
49
-
 50
50
-
 51
51
-
 52
52
-
 53
53
-
 54
54
-
 55
55
-
 56
56
-
 57
57
-
 58
58
-
 59
59
-
 60
60
-
 61
61
-
 62
62
-
 63
63
-
 64
64
-
 65
65
-
 66
66
-
 67
67
-
 68
68
-
 69
69
-
 70
70
-
 71
71
-
 72
72
-
 73
73
-
 74
74
-
 75
75
-
 76
76
-
 77
77
-
 78
78
-
 79
79
-
 80
80
-
 81
81
-
 82
82
-
 83
83
-
 84
84
-
 85
85
-
 86
86
-
 87
87
-
 88
88
-
 89
89


Steinberg HALion Sonic SE 2 User manual
- Category
- DJ controllers
- Type
- User manual
Ask a question and I''ll find the answer in the document
Finding information in a document is now easier with AI
Related papers
-
Steinberg HALion Sonic 3 Operating instructions
-
-
-
-
-
-
-
-
-
Other documents
-
TC Electronic SHAKER MINI VIBRATO Quick start guide
-
Kustom HV 100THD User manual
-
Native Instruments LO-FI GLOW Owner's manual
-
 E-Mu Vintage Keys Operating instructions
-
 E-Mu Vintage Keys Operating instructions
-
 Earthquaker Devices EQDSPAT User manual
-
Novation V-Station User guide
-
Akai MINIAK Owner's manual
-
-
Waldorf 2-Pole Owner's manual


