Page is loading ...

User’s Guide
Dolphin
®
7600 Series
Microsoft® Windows® CE 5.0

Disclaimer
Hand Held Products, Inc. (“Hand Held Products”) reserves the right to make changes in specifications and other information
contained in this document without prior notice, and the reader should in all cases consult Hand Held Products to determine
whether any such changes have been made. The information in this publication does not represent a commitment on the part
of Hand Held Products.
Hand Held Products shall not be liable for technical or editorial errors or omissions contained herein; nor for incidental or
consequential damages resulting from the furnishing, performance, or use of this material.
This document contains proprietary information that is protected by copyright. All rights are reserved. No part of this document
may be photocopied, reproduced, or translated into another language without the prior written consent of Hand Held Products.
2007 Hand Held Products, Inc. All rights reserved.
Web Address: www.handheld.com
Trademarks
Dolphin, Dolphin RF, HomeBase, Mobile Base, and QuadCharger are trademarks or registered trademarks of Hand Held
Products, Inc.
Microsoft, Windows, Windows Mobile, Windows CE, Windows NT, Windows 2000, Windows ME, Windows XP, ActiveSync,
Outlook, and the Windows logo are trademarks or registered trademarks of Microsoft Corporation.
Other product names mentioned in this manual may be trademarks or registered trademarks of their respective companies and
are the property of their respective owners.
The Bluetooth trademarks are owned by Bluetooth SIG, Inc., U.S.A. and licensed to Hand Held Products.
Chapter 7 contains copyrighted information from Meetinghouse Corporation. Meetinghouse, the Meetinghouse logo, and all
other Meetinghouse trademarks/service marks contained herein are trademarks or registered trademarks of Meetinghouse.

Dolphin® 7600 Series User’s Guide Rev B iii
Chapter 1 - Agency Approvals
Label Locations................................................................................................................................... 1-1
Regulatory and Safety Approvals for all Dolphin Terminals
............................................................ 1-2
FCC Compliance................................................................................................................................. 1-3
Chapter 2 - Getting Started
Out of the Box..................................................................................................................................... 2-1
Desktop ............................................................................................................................................... 2-2
Command Bar ..................................................................................................................................... 2-2
Icons in the Command Bar ........................................................................................................... 2-3
Chapter 3 - Terminal Hardware Overview
Standard Terminal Configurations...................................................................................................... 3-1
Front Panel Features............................................................................................................................ 3-2
Display Backlight ......................................................................................................................... 3-3
Back Panel Features ............................................................................................................................ 3-4
Side Panel Features ............................................................................................................................. 3-5
Top Panel Features ............................................................................................................................. 3-6
Installing Memory Cards .............................................................................................................. 3-6
Bottom Panel Features ........................................................................................................................ 3-8
Using the Accessory Attachment ........................................................................................................ 3-9
Attaching a Belt Clip .................................................................................................................... 3-9
Attaching the Hand Strap ............................................................................................................. 3-9
Dolphin 7600 Peripherals.................................................................................................................. 3-10
Dolphin 7600 Accessories................................................................................................................. 3-10
Battery Power.................................................................................................................................... 3-11
Main Battery Pack ...................................................................................................................... 3-11
Internal Backup Battery.............................................................................................................. 3-13
Resetting the Terminal ...................................................................................................................... 3-14
Soft Reset (Warm Boot) ............................................................................................................. 3-14
Hard Reset (Cold Boot) .............................................................................................................. 3-14
Suspend Mode................................................................................................................................... 3-14
Changing the Memory Allocation..................................................................................................... 3-15
Dolphin 7600 Terminal Technical Specifications............................................................................. 3-16
Chapter 4 - Using the 29-Key Keyboard
Overview ............................................................................................................................................. 4-1
Hardware Application Buttons............................................................................................................ 4-2
Function Keys ..................................................................................................................................... 4-3
Navigation Keys ................................................................................................................................. 4-3
Modifier Keys ..................................................................................................................................... 4-4
Toggling Between Alpha and Numeric Modes................................................................................... 4-5
Blue Key Combinations ...................................................................................................................... 4-6
Red Key Combinations ....................................................................................................................... 4-7
Table of Contents

iv Rev B Dolphin® 7600 Series User’s Guide
Chapter 5 - Using the Image Engine
Overview .............................................................................................................................................5-1
Available Image Engines.....................................................................................................................5-1
Depth of Field ...............................................................................................................................5-1
Supported Bar Code Symbologies.......................................................................................................5-2
Activating the Engine ..........................................................................................................................5-3
Decoding..............................................................................................................................................5-3
Capturing Images.................................................................................................................................5-5
Chapter 6 - Communication
Communication Options......................................................................................................................6-1
Installing Additional Software.............................................................................................................6-1
Connecting the USB Cable..................................................................................................................6-2
ActiveSync Communication................................................................................................................6-3
Connecting the Terminal to a Wireless Network ................................................................................6-6
Adding Programs From the Internet....................................................................................................6-6
Infrared Communication......................................................................................................................6-7
Using ActiveSync for IrDA Communication................................................................................6-8
Chapter 7 - Managing the 802.11b/g Radio
Overview .............................................................................................................................................7-1
Activating the 802.11b/g Radio...........................................................................................................7-1
Configuring the 802.11b/g Radio ........................................................................................................7-2
Opening the Client...............................................................................................................................7-2
Main Window ......................................................................................................................................7-3
Setup Windows....................................................................................................................................7-6
Configuring a Port ...............................................................................................................................7-7
Configuring a Network Profile ............................................................................................................7-9
Configuring Client Authentication ....................................................................................................7-12
WEP Encryption Without 802.1X Authentication ............................................................................7-16
Associating With Open APs ..............................................................................................................7-16
Certificates.........................................................................................................................................7-17
Installing Certificates with the Meetinghouse Certificate Installer ............................................7-17
Installing a Root Certificate ........................................................................................................7-17
Advice and Workarounds ..................................................................................................................7-19
Checking Radio Status.......................................................................................................................7-20
Chapter 8 - Bluetooth Manager
Overview .............................................................................................................................................8-1
Enabling the Bluetooth Radio..............................................................................................................8-1
Setting Tab...........................................................................................................................................8-2
BT Service Tab....................................................................................................................................8-2
Serial Port Tab .....................................................................................................................................8-3
Connecting to Bluetooth Printers ........................................................................................................8-4
Connecting to Bluetooth Devices Other Than Printers .......................................................................8-7
Scan Device Window....................................................................................................................8-8
Popup Menu ..................................................................................................................................8-9
Bluetooth ActiveSync........................................................................................................................8-10

Dolphin® 7600 Series User’s Guide Rev B v
Chapter 9 - Dolphin HomeBase
Overview .............................................................................................................................................9-1
Front Panel ..........................................................................................................................................9-2
Back Panel ..........................................................................................................................................9-3
Powering the Dolphin HomeBase .......................................................................................................9-3
Charging the Main Battery ..................................................................................................................9-4
Mounting the Dolphin HomeBase.......................................................................................................9-5
Back Panel Dimensions ................................................................................................................9-5
Mounting Guidelines.....................................................................................................................9-5
Bottom Panel Dimensions ...................................................................................................................9-6
Dolphin HomeBase Technical Specifications .....................................................................................9-7
Chapter 10 - Dolphin QuadCharger
Overview ...........................................................................................................................................10-1
Front Panel ........................................................................................................................................10-1
Back Panel .........................................................................................................................................10-2
Supplying Power to the QuadCharger ...............................................................................................10-2
Battery Charging................................................................................................................................10-3
Recommendations for Storing Batteries............................................................................................10-3
Mounting the QuadCharger ...............................................................................................................10-4
Bottom Panel Mounting Dimensions..........................................................................................10-4
Mounting Guidelines...................................................................................................................10-4
Troubleshooting.................................................................................................................................10-5
Dolphin QuadCharger Technical Specifications ...............................................................................10-6
Chapter 11 - Customer Support
Product Service and Repair ...............................................................................................................11-1
Online Product Service and Repair Assistance...........................................................................11-1
Technical Assistance .........................................................................................................................11-2
Online Technical Assistance.......................................................................................................11-2
Limited Warranty ..............................................................................................................................11-3


Dolphin® 7600 Series User’s Guide Rev B
1/17/2007
1 - 1
1
Agency Approvals
Label Locations
Dolphin 7600 mobile computers meet or exceed the requirements of all applicable standards organizations for safe operation.
However, as with any electrical equipment, the best way to ensure safe operation is to operate them according to the agency
guidelines that follow. Please read these guidelines carefully before using your Dolphin mobile computer.
Molded-in Text
Dolphin 7600 Terminals with 802.11b/g and/or Bluetooth
Dolphin 7600 RF terminals are designed to comply with the most current applicable standards on safe levels of RF energy
developed by the Institute of Electrical and Electronics Engineers (IEEE) and the American National Standards Institute (ANSI)
and has been recommended for adoption by the Federal Communications Commission (FCC).
Compliance Label
The required safety labels that appears on the back of Dolphin 7600 terminals equipped with the following radios are as follows:
802.11b/g and/or Bluetooth
Compliance Label (see page 1-1)
Molded-in Text
(see page 1-1)
hs a s i t D c
Cm i t
T
iCl s B D gi al evi e o pl es
wi h
Cnd
iI -00
e
aai m ua a an CES 3. Ct p
pre
l
nu eriq e
d l C s e B es con e
a a orm
ea la
s t form l n e
00 u n
aNMB-
3
dCaa
d
.
!
See
Manual
Hand Held Product , Incs.
LASER LIGHT. DO NOT STARE INTO BEAM
1.0 mW MAX OUTPUT: 650nM
IEC60825-1:1993+A1+A2
CLASS 2 LASER PRODUCT
Complies with 21 CFR 1040.10 and 1040.11
except for deviations pursuant to Laser
Notice No. 50, dated July 26, 2001.
!
FCC ID: HD5760002
IC: 1693B-7602
Adaptus 5.0
N1041
0
www.handheld.com
7
D
21
E153740

1 - 2 Rev B
1/17/2007
Dolphin® 7600 Series User’s Guide
Regulatory and Safety Approvals for all Dolphin Terminals
The CE Mark on the product indicates that the system has been tested to and conforms with the provisions noted within
the 89/336/EEC Electromagnetic Compatibility Directive and the 73/23/EEC and 93/68/EEC Low Voltage Directive.
For further information, please contact:
Hand Held Products, Inc.
Nijverheidsweg 9
5627 BT Eindhoven
The Netherlands
Hand Held Products shall not be liable for use of our product with equipment (i.e., power supplies, personal computers, etc.) that
is not CE marked and does not comply with the Low Voltage Directive.
Laser Safety Label
If the following label is attached to your product, it indicates the product contains a laser
engine or laser aimer:
Laser Eye Safety Statement: This device has been tested in accordance with and
complies with IEC60825-1: 1993+A1+A2 and 21 CFR 1040.10 and 1040.11, except for
deviations pursuant to Laser Notice No. 50, dated July 26, 2001. LASER LIGHT, DO
NOT STARE INTO BEAM, CLASS 2 LASER PRODUCT, 1.0 mW MAX OUTPUT:
650nM.
Caution - use of controls or adjustments or performance of procedures other than those specified herein may result in hazardous
radiation exposure.
LED Safety Statement
This device has been tested in accordance with IEC60825-1 LED safety, and has been certified to be under the limits of a Class
1 LED device.
CB Scheme
Certified to CB Scheme IEC 60950-1.
Parameter Specification
U.S.A
Canada
European Community
FCC Part 15, Class B
ICES-003
EN 55022 (CISPR 22) Class B
EN60950:2000
EN60825-1:1994 + A11 + A2
EN55024:1998
LASER LIGHT. DO NOT STARE INTO BEAM
1.0 mW MAX OUTPUT: 650nM
IEC60825-1:1993+A1+A2
CLASS 2 LASER PRODUCT
Complies with 21 CFR 1040.10 and 1040.1 1
except for deviations pursuant to Laser
Notice No. 50, dated July 26, 2001.

Dolphin® 7600 Series User’s Guide Rev B
1/17/2007
1 - 3
FCC Compliance
Dolphin terminals meet or exceed all applicable standards and have been manufactured to the highest level of quality.
Dolphin Batch Terminal
Dolphin Batch terminals comply with part 15 of the FCC rules. Operation is subject to the following two conditions: (1) this device
may not cause harmful interference, and (2) this device must accept any interference received, including interference that may
cause undesired operation.
Dolphin RF Terminal—802.11b/g and/or Bluetooth
This device complies with Part 15 of the FCC Rules. Operation is subject to the following two conditions: (1) this device may not
cause harmful interference, and (2) this device must accept any interference received, including interference that may cause
undesired operation.
This equipment has been tested and found to comply with the limits for a Class B digital device pursuant to Part 15 of the FCC
Rules. These limits are designed to provide reasonable protection against harmful interference in a residential installation. This
equipment generates, uses, and can radiate radio frequency energy and, if not installed and used in accordance with the
instructions, may cause harmful interference to radio communications. If this equipment does cause harmful interference to radio
or television reception, which can be determined by turning the equipment off and on, the user is encouraged to try to correct the
interference by one or more of the following measures:
• Reorient or relocate the receiving antenna.
• Increase the separation between the equipment and receiver.
• Connect the equipment into an outlet on a circuit different from that to which the receiver is connected.
• Consult the dealer or an experienced radio/TV technician for help.
If necessary, the user should consult the dealer or an experienced radio/television technician for additional suggestions. The user
may find the following booklet helpful: “Something About Interference.” This is available at FCC local regional offices. Our
company is not responsible for any radio or television interference caused by unauthorized modifications of this equipment or the
substitution or attachment of connecting cables and equipment other than those specified by our company. The correction is the
responsibility of the user. Use only shielded data cables with this system.
In accordance with FCC 15.21, changes or modifications not expressly approved by the party responsible for compliance could
void the user’s authority to operate the equipment.
This device and its antenna must not be co-located or operating in conjunction with any other antenna or
transmitter. To maintain compliance with FCC RF exposure guidelines for body-worn operation, do not use
accessories that contain metallic components.
When using accessories where the terminal is worn on the body, the terminal’s touch screen must face away from the body.
CAUTION! Any changes or modifications not expressly approved by the grantee of this device could void the user's authority
to operate the equipment.
FCC RF Radiation Exposure Statement
This equipment complies with FCC RF radiation exposure limits set forth for an uncontrolled environment.
Max.SAR Measurement (1g)
• 802.11b: 0.234w/kg
• 802.11g: 0.234w/kg
!

1 - 4 Rev B
1/17/2007
Dolphin® 7600 Series User’s Guide
RF, Regulatory, and Safety Agency Approvals—802.11b/g and/or Bluetooth
R&TTE Compliance Statement—802.11b/g and/or Bluetooth
Dolphin RF terminals are in conformity with all essential requirements of the R&TTE Directive (1999/5/EC). This equipment has
been assessed to the following standards as applicable:
This product is marked with in accordance with the Class II product requirements specified in the R&TTE Directive, 1999/
5/EC.
The equipment is intended for use throughout the European Community. Its authorization for use in France is restricted as
follows:
PAN European Frequency Range: 2.402–2.480 GHz.
Restrictions in France are as follows:
• Indoor use - Maximum power (EIRP*) of 100 mW for the entire 2.4–2.4835 GHz
• Outdoor use - Maximum power (EIRP*) of 100 mW for the 2.400–2.454 GHz band and maximum power (EIRP*) of 10 mW for the 2.454–
2.483 GHz band.
Canadian Compliance
This Class B digital apparatus complies with Canadian ICES-003. Operation is subject to the following two conditions: (1) this
device may not cause harmful interference, and (2) this device must accept any interference received, including interference that
may cause undesired operation.
To prevent radio interference to the licensed service, this device is intended to be operated indoors and away from windows to
provide maximum shielding. Equipment (or its transmit antenna) installed outdoors is subject to licensing.
Cet appareil numérique de la Classe B est conforme à la norme NMB-003 du Canada.
For European Community Users
Hand Held Products complies with Directive 2002/69/EC OF THE EUROPEAN PARLIAMENT AND OF THE COUNCIL of 27
January 2003 on waste electrical and electronic equipment (WEEE).
Waste Electrical and Electronic Equipment Information
This product has required the extraction and use of natural resources for its production. It may contain hazardous substances
that could impact health and the environment, if not properly disposed.
In order to avoid the dissemination of those substances in our environment and to diminish the pressure on the natural resources,
we encourage you to use the appropriate take-back systems for product disposal. Those systems will reuse or recycle most of
the materials of the product you are disposing in a sound way.
Parameter Specification
RF Approvals
U.S.A
Canada
FCC Part 15.247
RSS 210
Parameter Specification
R&TTE EN 300 328-2:2000
EN 301 489-1 (2002-08)
EN 301 489-17 (2002-08)
EN 60950:2000
EN 50361:2001

Dolphin® 7600 Series User’s Guide Rev B
1/17/2007
1 - 5
The crossed out wheeled bin symbol informs you that the product should not be disposed of along with municipal waste
and invites you to use the appropriate separate take-back systems for product disposal.
If you need more information on the collection, reuse, and recycling systems, please contact your local or regional waste
administration.
You may also contact your supplier for more information on the environmental performances of this product.
Pacemakers, Hearing Aids and Other Electrically Powered Devices
Most manufacturers of medical devices adhere to the IEC 601-1-2 standard. This standard requires devices to operate properly
in an EM Field with a strength of 3V/m over a frequency range of 26 to 1000MHz. The maximum allowable field strength emitted
by the Dolphin is 0.3V/m according to Subpart B of Part 1 of the FCC rules. Therefore, the Dolphin RF has no effect on medical
devices that meet the IEC specification.
Microwaves
The radio in the Dolphin RF terminal operates on the same frequency band as a microwave oven. Therefore, if you use a
microwave within range of the Dolphin RF terminal you may notice performance degradation in your wireless network. However,
both your microwave and your wireless network will continue to function. The Dolphin Batch terminal does not contain a radio,
and therefore, is not affected by microwave ovens.


Dolphin® 7600 Series User’s Guide Rev B
1/17/2007
2 - 1
2
Getting Started
Out of the Box
Verify that your carton contains the following items:
• Dolphin 7600 mobile computer (the terminal)
• Main battery pack (3.7v, Li-ion)
• AC power supply
• Localized plug adapters
•User CD
Note: Be sure to keep the original packaging in case you need to return the Dolphin terminal for service; see Product Service
and Repair on page 11-1.
Step 1. Install the Main Battery
Use only the Li-ion battery packs provided by Hand Held Products. The use of any battery pack not sold/manufactured by Hand Held Products
in a Dolphin terminal will void your warranty and may result in damage to the Dolphin terminal or bat
Step 2. Charge the Batteries
Use only the peripherals, power cables, and power adapters from Hand Held Products. Use of peripherals, cables, or
power adapters not sold/manufactured by Hand Held Products will void the warranty and may damage the terminal.
!
2
1
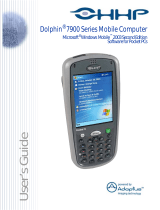
Dolphin terminals ship with both the main battery pack and
internal backup battery significantly discharged of power.
Charge the main battery pack with the Dolphin charging cable
for a minimum of four hours before initial use.
1. Attach the appropriate plug adapter to the plug of the
power cable.
2. Plug the *Dolphin power cable into the DC Power Jack
(see page 3-5) on the left side.
3. Insert the plug into the appropriate power source.
*This power cable can also be used to power the Dolphin
HomeBase (see page 9-1).
Dolphin Power Cable
!

2 - 2 Rev B
1/17/2007
Dolphin® 7600 Series User’s Guide
Step 3. Boot the Terminal
Windows CE
The terminal begins booting as soon as power is applied and runs by itself. Do NOT press any keys or interrupt the boot process.
When the boot process is complete, the Desktop (see page 2-2) appears and the terminal is ready for use.
Windows Mobile
The terminal begins booting as soon as power is applied and runs by itself. Do NOT press any keys or interrupt the boot process.
Only tap the screen when prompted.
When the boot process is complete, the Desktop (see page 2-2) appears and the terminal is ready for use.
Desktop
System resets (see Resetting the Terminal on page 3-14) complete on the Desktop.
Note: You can access the Desktop any time by tapping the Desktop icon in the command bar and selecting Desktop on the
popup menu.
Command Bar
Located at the bottom of application screens, the command bar includes application menus, buttons, and provides access to the
Input Panel.
Tap to open the keyboard
Tap to change the date and time
Tap to return to the Desktop or
toggle between open applications.
This area displays various icons that
access applications running on the
device. Use the right and left arrows
to navigate through these icons.
Tap to access the Start menu.

Dolphin® 7600 Series User’s Guide Rev B
1/17/2007
2 - 3
Icons in the Command Bar
The Command Bar (see page 2-2) contains a number of icons that indicate the status of various functions on the terminal.
Using the Stylus
The terminal comes with a stylus inserted into the Stylus Slot (see page 3-4), Use this stylus (or your finger) to select or enter
information on the touch screen. The stylus functions as a mouse; generally, a tap is the same as a click.
Tap Tap the touch screen once to open menu items and select options.
Drag Hold the stylus on the screen and drag across the screen to select text and images.
Tap & hold Tap and hold the stylus on an item and a pop-up menu appears. On the pop-up menu, tap the action
of the task you want to perform.
Use of other objects other than the stylus, such as paper clips, pencils, or ink pens can damage the touch screen and will
void the warranty.
For more information about the touch screen see Touch Screen Display on page 3-2.
Selecting Programs
Tap Start > Programs. To open a program, tap the icon on the menu.
Status Icon Meaning
Opens the Start menu.
Icons Between the Arrows
Because there may be more icons than the device can display, use the left and right arrows to scroll through the icons.
Accesses the Bluetooth radio.
Single-tap this icon to open the Bluetooth Manager (see page 8-1).
Accesses the 802.11b/g radio.
Single-tap this icon to open the WLAN Manager (802.11b/g) (see page 7-1).
Accesses the Meetinghouse Client for the 802.11b/g radio.
Single-tap this icon to open the Meetinghouse Client.
The USB communication cable is connected.
Indicates the status of battery power. This icon means that the battery is low.
Double-tap this icon to open the Power control panel setting.
Indicates that the device is running on external power.
Double-tap this icon to open the Power control panel setting.
Indicates that the keyboard is in numeric or alpha mode.
Displays the current time.
Double-tap to change the time and date.
Tap this icon to open the soft input panel (SIP) manually.
This icon appears when the SIP is open, whether the SIP was opened manually or automatically popped up
on an application screen.
Tap this icon and select Hide Input Panel on the menu that pops up when you want to close the SIP.
!

2 - 4 Rev B
1/17/2007
Dolphin® 7600 Series User’s Guide
Pop-Up Menus
With pop-up menus, you can quickly choose an action for an item.
1. Tap and hold the stylus on the item name. The pop-up menu appears.
2. Lift the stylus, and tap the action you want to perform.
The contents of pop-up menus change according to the program you’re in.
Using Windows Explorer
Use Windows Explorer to navigate through the files on your system. On the desktop, double-tap the My Device icon and
Windows Explorer opens to the root level,
Move files by tapping and holding on the file, then tapping Cut, Copy or Paste on the pop-up menus that appear.

Dolphin® 7600 Series User’s Guide Rev B
1/17/2007
3 - 1
3
Terminal Hardware Overview
The Dolphin 7600 includes a number of standard terminal configurations as well as charging and communication peripherals and
accessories to maximize the efficiency of your application setting.
Standard Terminal Configurations
There are two standard Dolphin 7600 configurations:
Dolphin 7600 WPAN Dolphin 7600 WPAN/WLAN
• Microsoft Windows CE 5.0
• Samsung 2440 400 MHz
• 64MB RAM X 128 MB (non-volatile) Memory
• 29-key numeric keyboard
• 2.8” 1/4 VGA TFT color display
• Li-ion battery: 3.7V / 2200 mAh / 8.1 Wh
• 5300SR image engine
• Bluetooth radio
• Dolphin power cable (each Dolphin 7600 device comes
with this power cable in the box)
• Microsoft Windows CE 5.0
• Samsung 2440 400 MHz
• 128MB RAM X 128 MB (non-volatile) Memory
• 29-key numeric keyboard
• 2.8” 1/4 VGA TFT color display
• Li-ion battery: 3.7V / 3240 mAh / 12.0 Wh
• 5300SR image engine
• Bluetooth and 802.11b/g radio
• Dolphin power cable (each Dolphin 7600 device comes
with this power cable in the box)

3 - 2 Rev B
1/17/2007
Dolphin® 7600 Series User’s Guide
Front Panel Features
Decode and Scan LEDs
The Scan LED lights red when you press the Scan trigger in scanning applications.
The Decode LED lights green when a scanned bar code is successfully decoded.
Note: Both LEDs are user-programmable.
Hardware Application Buttons
These hardware buttons can be programmed to perform software functions in the Buttons setting. For more
information, see Hardware Application Buttons on page 4-2.
Keyboard
The 29-key keyboard is recessed within the housing to increase durability. For complete information about the
keyboard (including the Scan key called out here), see Using the 29-Key Keyboard on page 4-1.
Microphone
The integrated microphone can be used for voice-recording and reply.
Touch Screen Display
The display is a 65,536-color LCD (Liquid Crystal Display) covered by a touch screen lens. The 2.8” (1/4) VGA
(Video Graphic Array) is TFT (Thin Film Transistor) color, backlit, and the resolution is 240 x 320.
Dolphin 7600 devices ship with a screen protector already installed over the touch screen lens to help prevent
damage to the touch screen. Do NOT remove this screen protector before initial use. Hand Held Products
recommends using screen protectors, especially for applications that require high-volume interfacing with the
touch screen.
For touch screen input, use the stylus included with the terminal or your finger. The method you choose depends
on which one is most appropriate for your application. While there is a great deal of variation in different applications,
for buttons or icons that are close together, you generally achieve greater accuracy with the stylus; see Using the
Stylus on page 2-3.
Use of objects, such as paper clips, pencils, or ink pens on the touch screen can damage the input panel and
will void the warranty.
Decode LED
Scan LED
1/4 VGA Touch
Screen Display
Keyboard
Scan key
Microphone
Hardware
Application
Buttons
!
!

Dolphin® 7600 Series User’s Guide Rev B
1/17/2007
3 - 3
Display Backlight
The touch screen display has a backlight that is programmed to turn off after a specified period of time that the device is idle.
To change the default timeout parameters, tap Start > Settings > Control Panel > Display > Backlight tab.
To adjust the intensity of the backlight, tap Start > Settings > Control Panel > double-tap Backlight .
Move the slider to adjust the backlight.

3 - 4 Rev B
1/17/2007
Dolphin® 7600 Series User’s Guide
Back Panel Features
Accessory Attachment
This button can be used with various accessories; see Using the Accessory Attachment on page 3-9.
Finger Saddle
This is a slightly depressed and angled area of the back panel that is designed to cradle or “saddle” your pointer
finger while holding the terminal. This unique ergonomic design makes the terminal comfortable to hold and helps
prevent you from accidentally dropping the terminal.
Installed Battery
The back of the battery pack conforms to the back panel.
For information about installing the battery, see Changing the Main Battery Pack on page 3-11.
For information about battery power, see Battery Power on page 3-11.
Speaker
The integrated speaker sounds audio signals as you scan bar code labels and enter data but emits no ambient noise
on system activity (i.e. processor, memory access, radio traffic, etc.).
The speaker can also be used for playing
sounds (e.g., WAV or MP3 files).
The speaker meets the following SPL levels at 40cm:
• 500Hz–67db
• 1KHz–72db
• 4KHz–72db
Stylus Slot
Dolphin 7600 terminals ship with a stylus inserted. Store the stylus in this slot when you’re not using it; see Using
the Stylus on page 2-3.
Speaker
Stylus Slot
Installed
Battery
Finger Saddle
Accessory Attachment
Image Engine Window
I/O Connector
/