Page is loading ...

PURE 2.0 OPERATING INSTRUCTIONS
08/21/19 4211-1430 Page 1 of 4
Amerec’s PURE 2.0 control for the AX steamer is a touch controlled unit intended to be mounted on
a wall, generally in or near the steam bath. It may be mounted directly on the wall surface either inside or outside
the steam room. The PURE 2.0 control may be used with another PURE 2.0 or with an Elite control, such as
when using one control inside the steam room and another outside it. You may use a total of 1 to 3 controls with
an AX steamer
Using the PURE 2.0, you set or adjust the steam bath duration and temperature and control a room light. Delayed
start settings allow you to have a steam bath ready to use in a few hours or on a regular schedule.
To reduce the risk of damage to the steamer or controls and to ensure the controls connect properly with the
steamer, always turn power off to the steamer before connecting or disconnecting a control.
Navigating the PURE 2.0
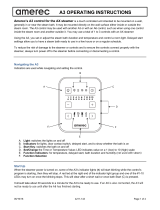
Indicators are used while navigating and setting the control.
A. Light: switches the lights on and off
B. Indicators for lights, door contact switch, delayed start, and to show whether the bath is on
C. Start Key: switches the bath on and off
D. Set/Change the Time or Temperature Value; LED indicates value on a 1 (low) to 10 (high) scale
E. Function Indicators: for temperature, delayed start, bath duration and humidity (not used with steam)
F. Function Selection
NOTE: the Pure 2.0’s LED display show room temperature only.
Start Up
When the steamer power is turned on, some of the PURE 2.0’s indicator lights (B) will start blinking while the
control’s program is starting, then they will stop. A red led at the right end of the indicator light group and one of
the #1-10 LEDs may turn on once the blinking stops. This will clear after a short wait or once bath Start (C) is
pressed.
It should take about 30 seconds to a minute for the PURE 2.0 to be ready to use. If an Elite is also connected, the
PURE 2.0 will not be ready to use until after the Elite has finished starting.
A
C
D
E
F
F
B
D

PURE 2.0 OPERATING INSTRUCTIONS
08/21/19 4211-1430 Page 2 of 4
Initial Set-up
If you are using an Elite with your PURE 2.0, you may use all the PURE 2.0 functions with the Elite but the Elite
set-up should be done first. If you are using only a PURE 2.0, there are no set-ups required. The PURE 2.0 starts
with the bath temperature set at 125°F (55°C) and the bath duration set at 60 minutes.
If using only PURE 2.0s to control your bath, you will be allowed to set the bath temperature from 86°F to 125°F
(30°C to 52°C and bath time from 6 to 60 minutes.
Using the PURE 2.0
The Light key may be used to turn a light on or off while the bath is off. The light will turn on automatically
when a bath is started; this key can then be used to turn the light off again. Note: the light will remain on
for 10 minutes after the bath stops unless switched off by the user.
The Start key is pressed to start or stop the steam bath.
The Change keys move your selection higher or lower on the 1-10 LED scale while making
adjustments.
The Function Select keys move your selection left or right through the function selections. Highlight
the function you want to adjust, then uses the Change keys to move through the LED range to
select your new value. The humidity function is not available for steam baths.
Setting the bath temperature (may be done with the bath off or on)
Touch a key on the PURE 2.0 to light the keyboard, if necessary. The Temperature function LED should be lit
and the current temperature setting should be indicated on the 1-10 LED scale. To change this setting, use the
Change keys to select the LED corresponding to the bath temperature you prefer. Turn the bath on then off to
save the new setting. See the approximate settings below:
LED #
1
2
3
4
5
6
7
8
9
10
°F
86 91 95 98 104 107 111 116 120 125
°C
30 33 35 37 40 42 44 47 49 52
Setting the bath duration (must be done with the bath off)
Touch a key on the PURE 2.0 to light the keyboard, if necessary. Use the Function Select keys to select the
Duration function (its LED is lit). The current bath Duration setting should be indicated on the 1-10 LED scale. To
change this setting, use the Change keys to select the LED corresponding to the bath duration you prefer. This is
the time limit where the bath will automatically shut off. Turn the bath on then off to save the new setting. See the
approximate settings below:
LED #
1
2
3
4
5
6
7
8
9
10
minutes
6 12 18 24 30 36 42 48 54 60
Setting delayed start (must be done with the bath off)
You can set the steam bath to start at a later time, such as setting it before bed at night so it is on and ready when
you get up in the morning.
Touch a key on the PURE 2.0 to light the keyboard, if necessary. Use the Function Select keys to select the
Delayed Start function (its LED is lit. Use the Change keys to select the LED corresponding to the start delay you
prefer. The delay can be up to 10 hours in one hour increments (the LEDs represent from 1 to 10 hours). At that
time, the bath will start automatically and run for the duration time already set. Press the bath Start key to save
your setting.

PURE 2.0 OPERATING INSTRUCTIONS
08/21/19 4211-1430 Page 3 of 4
When the delay is set, the Delay Indicator LED at the top of the screen will light green and the delay time LED will
flash slowly
Note: if a bath is started after the Delay Start is set, the delay setting will be deleted.
Having a steam bath
To start a steam bath, simply press the Start key. The bath on LED should light a steady green, the
room light should turn on (the Light LED should light a steady blue), a number 1-10 LED should light a steady
blue and the Temperature setting LED should light a steady blue. A blinking 1-10 LED indicates the actual bath
temperature and a steady LED indicates the set temperature. Once the room reaches the set temperature, only
the set point LED will be lit.
While the bath is on, you may select the Duration function and a blinking 1-10 LED will indicate the time remaining
before the bath automatically shuts down.
Installing the control
Turn off power to the steamer. The PURE 2.0 connects to the AX steamer with a 50 ft (15,2 m) cable. The control
cable must be plugged directly into the steamer circuit board using one of the four jacks in the middle of the circuit
board.
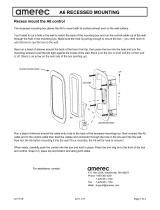
Before turning on power to the generator, make sure the configuration switch is set correctly:
a) If the generator has an electronic AutoDrain installed: If the generator will use an
electronic AutoDrain, verify the switch in the middle of the right hand circuit board is set
as shown at left (#2 and #5 down, all other up.
b) If the generator has only a manual drain installed: If the generator will not use an
electronic AutoDrain, verify the switch in the middle of the right hand circuit board is set
as shown at left (#2, #4 and #6 down, all other up.
CONNECT CONTROL CABLES TO ONE OF THESE 4 JACKS
ON
1
2 3 4
5
6
ON
1
2 3 4
5
6
CONFIGURATION SWITCH
AX STEAMER – RIGHT HAND END

PURE 2.0 OPERATING INSTRUCTIONS
08/21/19 4211-1430 Page 4 of 4
Mounting the Control
Install the PURE 2.0 control inside or outside the steam room using the control cable previously
installed If mounting to a smooth, flat wall, the adhesive pad provided will work well to mount the
control and seal the cable hole. The adhesive will stick to the wall quickly so be sure to accurately
place
and level the control before attaching it to the wall!
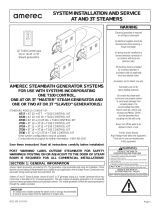
If the surface is uneven or has grout lines, we recommend using a small amount of silicone
to mount the PURE 2.0 control. If using silicone, run a bead around the control’s cable end
and another bead around the back of the control as shown here. Then tape in place
on the wall until the silicone has set up.
Connect the cable to the control’s cable end, slide the cable
into the wall, and mount the control.
Be sure to carefully level the control while mounting!
Troubleshooting
The PURE 2.0 has error displays to assist with troubleshooting. If an error should occur in the steamer or other
equipment (PURE 2.0 control, temperature sensor, etc.) an error message will be shown using LED indicators.
The indicator LEDs will flash while one LED on the 1-10 scale is continuously lit or flashing. The lit 1-10 LED
indicates the error: steady = #1 -10, flashing indicates #11-20. Some errors are not applicable to steam and are
not listed here.
Error messages:
1 Temperature sensor not connected or faulty. Check the sensor and sensor cable for loose/bad connections or
damage.
3 Steamer circuit board overheated
6 Contact between heater and control lost. Check the control cable for loose/bad connections or damage.
12 Level sensing faulty. Check level probe wiring; clean level probe.
14 Temperature sensor faulty. Check the sensor and sensor cable for loose/bad connections or damage.
15 Communication problem with steamer. Check the control cable for loose/bad connections or damage.
For some errors, turning off power to the steamer for a brief period and then turning it back on again may correct
the error. This mostly concerns problems that have occurred with communication between the steamer and
control.
In the event of error number 3, the steam bath will be automatically switched off. When the circuit board
temperature has dropped approx. 68°F (20°C), the steam bath can be restarted. Always investigate why the
steamer overheated. It can be the result of insufficient ventilation or too high a temperature around the steam
generator.
Some errors will cause the Door indicator or Start indicator to light or blink red. Make sure water is getting
in to the steamer and that the drain is working well.
Contact technical support for other error codes or if an error cannot be corrected according to the above.
For further assistance, contact
ADHESIVE
SILICONE
OR
P.O. Box 2258, Woodinville, WA 98072
Phone 1-800-363-0251
1-425-951-1120
Fax 1-425-951-1130
eMail Support@amerec.com
/