Page is loading ...

4211-1901 07/13/18
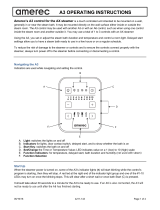
DIAGRAM 1
AX Chromatherapy-White Light Kit
Installation and Operating Instructions
The AX Chromatherapy-White LED Kit is designed to be used with the AX model steam generators. The LED lights should
be mounted in the ceiling of the room and the transformer should be in a convenient dry location. The AX's bath control
switch is used to change the LED light colors and patterns.
Light
Assemblies
Power
Transformer
General Installation
Determine locations suitable for mounting the Chroma-White system’s components:
• The steam bath control is used to turn the lights on during the steam bath and to momentarily turn the LED lights off
then on again in order to change their colors and patterns.
• The LED light assemblies are to be mounted in the ceiling of the steam room. The LED’s 8' power wires are connect-
ed to the white wire from the transformer and to a wire from the steamer's option terminal block. The Transformer's
black connects to the matching location at the steamer's option terminal block. Note: one option terminal block loca-
tion is dedicated to controlling a steam room light with an A3 or A6. Three additional options are available on the A6
control to allow connecting other devices, such as using one option set for color chroma lights and a second option
set for white lights.
• The 120VAC to 12VAC power transformer should be connected to a branch circuit's standard wall outlet. A 6' power
cord with a standard 15A 3-prong plug is attached to the transformer input and 8’ of low voltage wires are attached
to the transformer's 12V output. The low voltage wires are to be connected to the to the LEDs with one lead routed
through a relay contact through the steamer's options terminal block.
Determine how the lights will be used:
• The lights turn on automatically when the steam bath is on.
Connect the wires to the LIGHT connection on the options
terminal block in the steamer. The lights will stay lit for 10
minutes after the bath turns off . The lights may be turned
on or off manually at any time using the A3 or A6 control.
• The lights turn on only when the user turns them on.
Connect the wires to one pair of the AUX connections on
the options terminal block in the steamer. On the A6 control,
set the chosen AUX option to on/off and choose a name,
such as Chroma Lights. To turn the lights on, go to the temp-
erature menu (select ± on the tool bar at the bottom of the
screen). The lights will stay lit until turned off again or until
the end of the next bath period.
To Options Terminal Block
in AX Steamer
OPTIONS
TERMINAL BLOCK
TYPICAL
CONNECTIONS
DIP SWITCH
ON
NTC
1
ON
1
23
4
5
6
AUX1
AUX0
AUX2
LIGHT
FAN
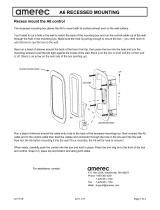
DIAGRAM 2

4211-1901 07/13/18
page 2
AX Chromatherapy-White Light Kit
Installation and Operating Instructions
DIP SWITCH
ON
NTC
1
ON
1
23
4
5
6
AUX1
WATER
DRAIN
AUX0
AUX2
LIGHT
FAN
AUX1
AUX0
AUX2
LIGHT
FAN
Install the Power Transformer
The transformer should be connected to a wall outlet in a conveniently accessible location, generally near the steamer.
• A 6 foot power cord with an attached NEMA-15 plug is supplied as part of the transformer.
• The transformer may be attached to the wall using its integral mounting tabs.
• Connect the black 12V output wire from the transformer to the steamer options terminal block at the Light location's
black wire. The wire may be lengthened by adding a 60°C 18 AWG copper wire. A diff erent option location may be
used if that option has been set up on the A6 control.
• Connect the white 12V output wire from the transformer
to the white wires from the LED cables. The wire may
be lengthened by adding a 60°C 18 AWG copper wire.
Install the Light Assembly (Diagrams 3 & 4)
• Determine placement of each light.
• Drill a 2-5/8" hole for each lens assembly.
• Remove the lens from the lens housing and set it aside.
The supplied lens wrench fi ts into holes in the lens to
turn it and the spanner holds the housing while installing
or removing the lens. See Diagram 3.
• Insert the lens housing through the hole with the silicone
gasket on the room side of the ceiling and hand tighten
nut against other side. (Approximately 13-15 ft-lbs). If the
ceiling is too thick to use the nut, silicone the light
assembly into place using 100% silicone sealant. See
Diagram 3.
• Screw the refl ector onto the lens housing then connect
the light socket to the refl ector.
• Insert the LED into the light socket through the lens
opening then install the lens (see lens removal section
above).
• Make sure the white wire from the transformer is
connected to the LED (s).
• Connect the black wire from the LED(s) to the steamer
in the terminal next to the black wire from the transformer
. (See Diagram 4.) Note: Each option connects to two
terminals, each terminal is connected o a black and a
red wire to relay contacts on the circuit board. The relay
acts as a switch to control the option.
• Secure the wires to the wall as needed to prevent stress
or other risks of damage.
DIAGRAM 3
DIAGRAM 4
Refl ector
LED
Nut
Ceiling
Gasket
Housing
Lens
Lens Wrench
Spanner
OPTIONS
TERMINAL BLOCK
TYPICAL
CONNECTIONS
BLACK
WHITE

4211-1901 07/13/18
page 3
AX Chromatherapy-White Light Kit
Installation and Operating Instructions
Additional Light Assemblies
For your convenience, two LEDs connection are included in the Chroma kit. Up to 5 LED light assemblies may be added
by splicing their harness wires in parallel with the fi rst two LEDs (for a maximum 7 LEDs). For additional LED lights, order
the Single Lamp Kit, Amerec's part number 9223-112
Operation
The lights are low power LED assemblies with built in intelligence providing an array of pre-programmed light displays
and easy synchronization of multiple lights. The last display selected will be active the next time the lights are turned
on.
• To synchronize lights, such as after adding or replacing a light, turn the lights on then turn them off again for 6 to 8
seconds, then turn them on again. When the lights turn on again, they will blink a few times then all the lights will be
reset to the initial display.
• To change light displays, turn the lights off for 1 to 3 seconds then turn them on again. Repeat until your preferred
display is lit.
Description of displays (in order):
• Bright White
• Aqua Blue - a light blue/green mix.
• Soothing Violet - a light blue/red.
• Ocean Blue - pure blue.
• Majestic Gold - a red/green mix.
• Shamrock Green - pure green.
• Fiery Red - pure red.
• Chameleon Mode - a slow fade through all the colors in a repeating sequence.
• Party Mode - fast, random changes through all the colors.
1
2
3
4
Provided
1
1
2
2
Part #
3164-51
5268-12
3160-77
3160-54
Description
Transformer, 120VAC-12VAC
(with wire harness with light socket)
Wire Harness with Light Socket, 8 ft
Light, 12 LED, Chroma and White
Lens Assembly
Item
Contact Technical Support for additional/replacement parts.
3
2
1
4
P.O Box 2258 Woodinville, WA 98072
Phone: 425-951-1120
800-363-0251
Fax: 425-951-1130
email address: [email protected]
9223-216 KIT,CHROMATHERAPY-WHITE,AX
/