Page is loading ...

Technical Support
If you need any assistance to get your unit functioning properly, please have your
product information ready and contact Addonics Technical Support at:
Hours: 8:30 am - 6:00 pm PST
Phone: 408-453-6212
Email: http://www.addonics.com/support/query/
T E C H N O L O G I E S
www.addonics.com
User Guide
Multi-Media Tower Pro
(MMTPRO)

www.addonics.com Technical Support (M-F 8:30am - 6:00pm PST) Phone: 408-453-6212 Email: www.addonics.com/support/query/
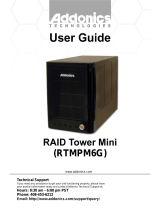
Unpacking and Overview
Bay 1
Bay 2
Bay 3
Bay 4
1. Power Button
3. Bay 1 HDD
4. Bay 2 HDD
5. Bay 3 flash media LED
6. Bay 4 HDD drive
2. Power LED
eSATA connector
AC Input
Power Switch
Power Supply
Voltage Switch
100 cm eSATA Cable Power cord (US version shown)
1
2
3
4
5
6

www.addonics.com Technical Support (M-F 8:30am - 6:00pm PST) Phone: 408-453-6212 Email: www.addonics.com/support/query/
Connecting the Multi-Media Tower Pro
WARNING: Please remember to set the power supply to your local outlet
voltage prior to plugging in the power cord. Failure to do so may
damage the power supply.
1. Set the power supply voltage switch to the correct main input voltage, then
connect the power cord to an AC outlet.
2. Turn on the power switch on the back of the unit.
3. Connect the eSATA cable from the eSATA port on the back of the unit to an
eSATA host adapter.
4. Turn on the unit using the power button on the front.
The Multi-Media Tower Pro includes an internal 5x1 Port Multiplier. The unit
must be directly connected to an eSATA host adapter that supports port
multipliers. If the host adapter does not support port multipliers, only the first
device found in the cabinet will be seen by the controller. The unit cannot be
connected to another port multiplier.
The Multi-Media Tower Pro also supports hot swapping for all media types.
This feature must also be supported by the eSATA host adapter. If a drive or
media is inserted or removed when the unit is connected to a host adapter
that does not support hot swapping, the operating system may not reflect the
change at all or it may crash.
Identify your eSATA controller adapter and check with its hardware manufac-
turer if you are unsure if these features are supported. Addonics offers
several port multiplier compatible adapters that also support hot swapping.
Drive Installation: Bay 1 (Snap-In Mobile Rack)
1. Use the key to set the lock to the unlocked position if necessary, then
gently pull the lever.
2. Insert a 3.5” SATA drive or device installed in a Snap-In 25 adapter (not
included), SATA connector first with contacts down. The drive should give
little resistance, DO NOT FORCE IT.
3. Gently close the door over the drive until the drive is completely inserted,
then press firmly until the door snaps closed.
4. Turn the lock to the locked position. The drive will not power up until the
door is locked.
Drive Installation: Bay 2 (Internal Micro SATA UDD)
Gently insert a Micro SATA hard disk or media adapter into the bay, Micro
SATA connector with contacts first, facing down until it resists further travel.
Then press firmly to seat the Micro SATA connector. The drive will be protrud-
ing from the bay.

www.addonics.com
Phone: 408-573-8580
Fax: 408-573-8588
Email: http://www.addonics.com/sales/query/
CONTACT US
Media Installation: Bay 3 (Internal SATA/USB DigiDrive)
The SATA Digi Drive will recognize only one media device at a time. If more
than one media device is inserted, the device found earlier on this list of slots
will be used: CompactFlash, SmartMedia/xD, SD/MMC/miniSD, MS/MS Duo.
The CompactFlash slot accepts CompactFlash media including CF Micro-
drives. Insert media connector first with label side up.
The SmartMedia/xD slot accepts SmartMedia (SmartCard) or xD Picture Card
devices. Insert SmartMedia contacts down with the “cut” corner toward the slot
on the left side. Insert xD Picture card media contacts first, facing down.
The SD/MMC/MiniSD slot will accept SD, SDHC and SdxC devices or a
miniSD installed in an adapter as well as Multi Media Card (Smart MMC)
devices. Insert media contacts first, facing down.
The MS/MS Duo slot accepts Memory Stick or Memory Stick Pro Duo devices,
insert media contacts first, facing down.
Drive Installation: Bay 4 (Multimedia Bay Hard drive)
1. Gently pull the lever until the door swings open.
2. Gently insert a SATA 3.5” hard drive or device installed in a Snap-In 25
adapter (not included), SATA connectors first, facing down. The drive should
give little resistance, DO NOT FORCE IT.
3. Gently close the door over the drive until it closes, then press firmly until it
snaps in place. The drive will power up immediately.
/