Page is loading ...

Quick Start Guide
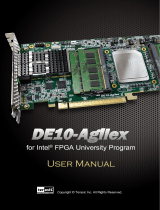
What’s in the Box?
1
DE10-Nano
DE10-Nano Board
DE10-Nano Quick Start Guide
Type A to Mini-B USB Cable x1
Type A to Micro-B USB Cable x1
Power DC Adapter (5V)
microSD Card (installed)
Four Silicon Footstands
8
GB
11 1
1
2
2
3
3
4
4
5
5
6
6
7
7
2
2
6
6
7
7
3
3 44 55
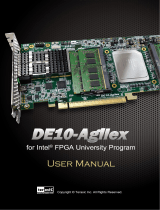
FPGA
HPS
System
Cyclone V
SoC FPGA
5CSEBA6U23I7
DDR32x20 GPIO (FPGA)
2x20 GPIO (FPGA)
5V DC
Power Jack
Clock Generator
2x5 ADC Header
Ethernet RJ45
G-Sensor
USB OTG
(USB Micro-AB)
USB Blaster II
(USB Mini-B)
UART to USB
(USB Mini-B)
WARM_RST
HPS_RST
User Button
User LED
FPGA
Configuration
Mode Switch
Slide Switch x4
Button x2
LTC 2x7 Header
LED x8
Arduino Header
HDMI-TX
EPCS 128
MicroSD Card
Socket
Analog-to-digital
converter

Connect the USB port on your PC to the board USB port by using the Type A to Micro-B
USB cable
Look for the DE10-Nano to appear as a USB mass storage device on your PC
Locate and open the START.HTML file stored on the DE10-Nano
Follow the instructions in the START.HTML file
1
2
3
4
ooting the board
B
2
nteracting with the board
I
3
MicroSD
Socket
5V Power
Adapter
FPGA Configuration
Mode Switch
1 2 3 4 5
MSEL
01234
6
N
O
4
Y
SW10
“0”
“1”
8
GB
User LED
To boot the board, follow these steps:
USB cable
PC
Micro-B USB Type A USB
Verify the FPGA Configuration Mode Switches are set to 01010, as shown above, to boot the
DE10-Nano board from the microSD Card
Make sure the microSD Card, included in the kit, is properly inserted
Connect the power adapter to the power jack on the DE10-Nano
After about 10 seconds, the user LED will begin to pulse like a heartbeat indicating that the
Linux OS has booted
2
3
4
1
/