Extron VLC 302 User manual

Category
Musical Equipment
Type
User manual
1
IMPORTANT:
Go to www.extron.com for the complete
user guide, installation instructions, and
specifications before connecting the
product to the power source.
VoiceLift Pro Microphone Kits • Setup Guide
This guide provides instructions for an experienced installer to set up the Extron VLP 302 VoiceLift Compact Pendant
Microphone, the VLH 302 VoiceLift Handheld Microphone, the VLC 302 Charging Station, and the VLR 302 Receiver in a system
with a PVS 407D PoleVault Digital Switcher.
Installing the VLR 302 Receiver
The VLR 302 Receiver outputs audio signals from the microphones as one balanced mono line level signal to the PVS switcher.
Connect the VLR 302 to the PVS 407D PoleVault switcher as shown below. For mounting instructions, see the
VoiceLift Pro User Guide.
A
Connect the PVS 407D to the VLR 302 output port using a shielded RJ-45 cable as shown
below.
NOTE: The receiver is powered by the PVS switcher.
3A MAX
POWER
12V
1/2
SIGLINKSIG LINK
3/4
INPUTS
PVT IN
PVT IN
13
PVS 407D
4
VOICELIFT
Tx Rx G
OVER PVT
IR
SG
AUDIO OUT
PAGING
SENSOR
L
R
INPUT 5
L
OUTPUT
LR
DO NOT
GROUND
OR SHORT
SPEAKER
OUTPUTS
AMPLIFIED AUDIO OUT
CLASS 2 WIRING
2
5
6
1
3
A
UDI
O
O
U
T
P
A
G
IN
G
S
EN
SO
R
L
R
L
DO
N
OT
G
R
OU
N
D
O
R SHOR
T
S
PEAKE
R
O
UTPUT
S
A
MPLIFIED AUDI
O
O
U
T
C
LA
SS
2 WIRIN
G
4
Tx
R
x
G
O
VER PV
T
I
R
S
G
INPUT
5
L
2
P
V
S
407
D
3A
MAX
P
OWE
R
12V
1
/
2
SIG
LINK
S
I
G
LINK
3/4
I
NPUT
S
P
VT I
N
P
VT IN
O
UTPUT
5
6
3
VLR 302 Receiver
Out
PVS 407D PoleVault Switcher
B
These relays can be integrated with various life alert systems, or connected to a digital input
on an Extron MediaLink MLC or a control processor (see the VoiceLift Pro User Guide for
details). Wire this 4-pole captive screw Relay connector for relays 1 and 2, if necessary.
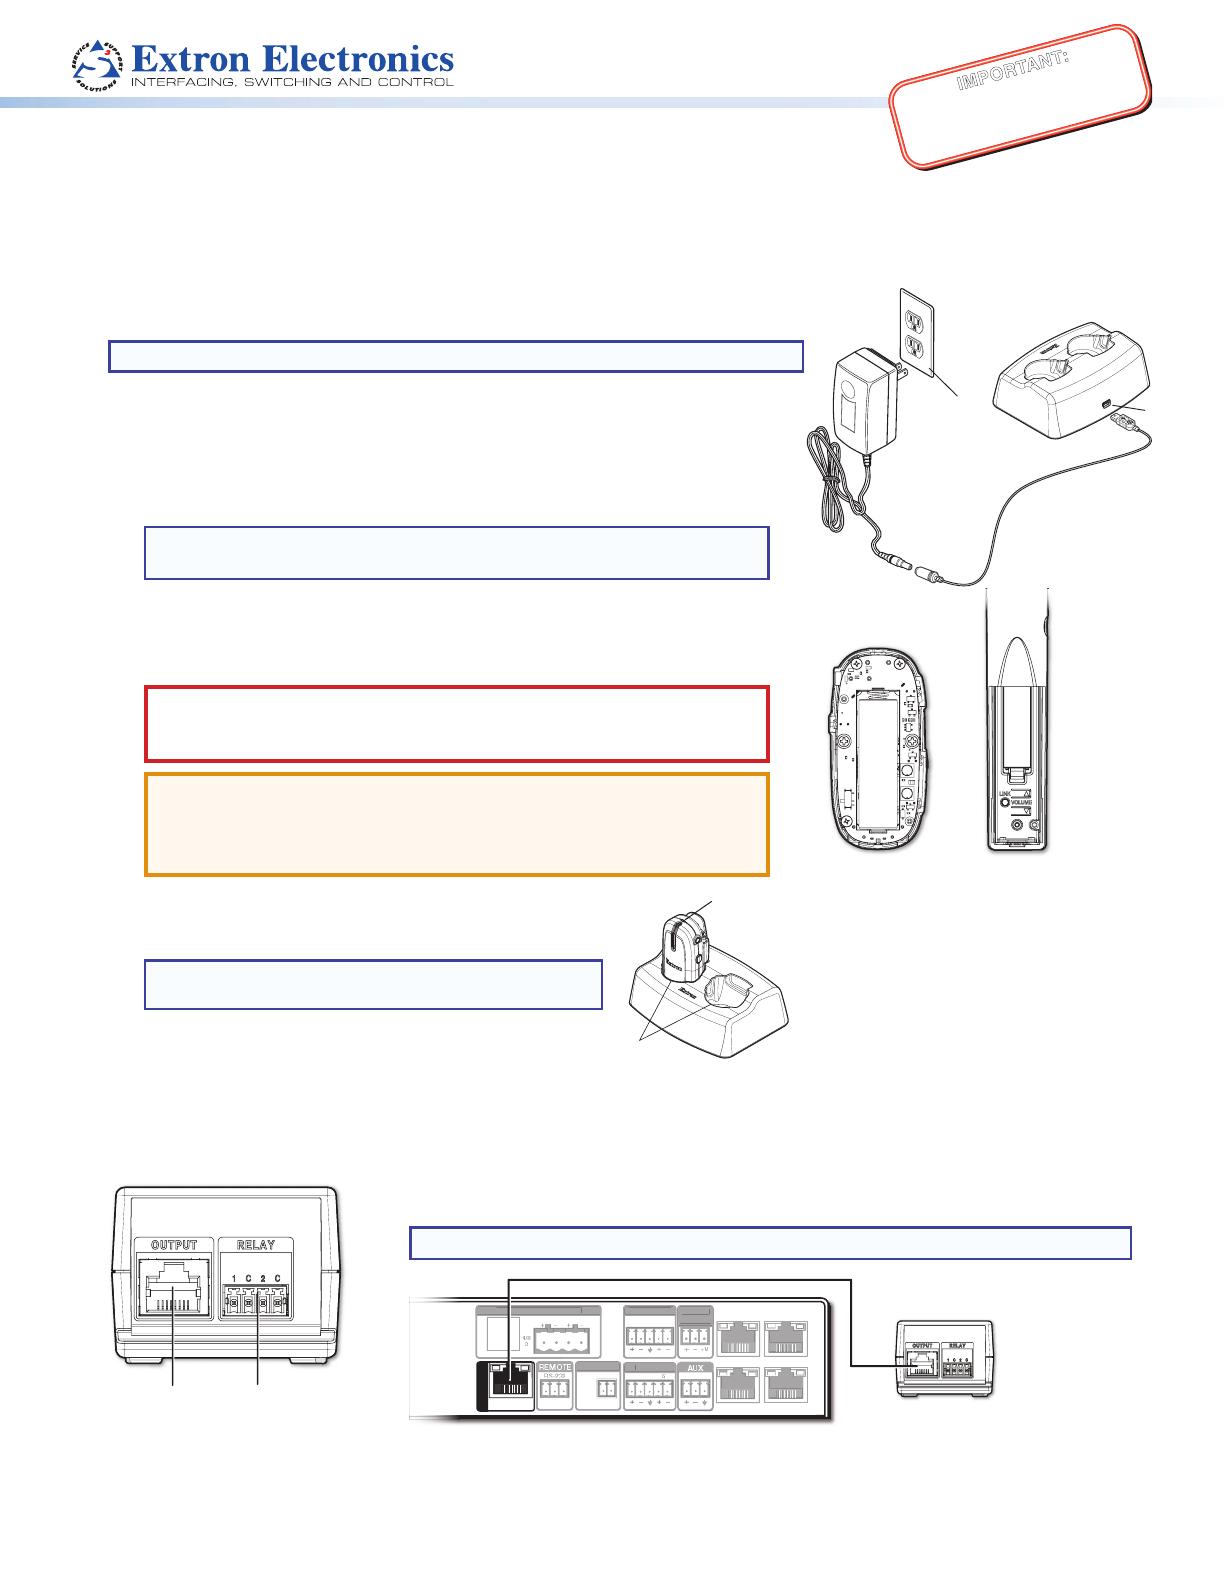
Connecting the VLC 302 Charger and
Charging the Microphones
NOTE: The charging station is to be used with NiMH rechargeable batteries only.
To connect the charger and charge the microphone(s):
1. Connect the 5 VDC, 2.6 A wall charger (with USB Mini-B adapter) to a
110-130 VAC (US) or a 100-240 VAC (international), 50-60 Hz power source.
2. Connect the USB mini plug end of the adapter to the USB mini jack located
on the back of the VLC 302.
NOTE: The charger can also be powered by a USB source using a mini
USB cable.
3. If required, unscrew and remove the microphone battery cover to install the
battery. Insert the battery, aligning the + and – poles as indicated inside the
compartment.
CAUTION: Do not replace the batteries with an incorrect type. Use
only rechargeable batteries specified or provided by Extron, or alkaline
batteries.
ATTENTION:
Do not attempt to charge alkaline batteries.
Be sure to replace the battery with the correct type and to dispose
of used batteries appropriately.
4. Insert the microphone into one of the charger slots.
The microphone LED turns red to indicate charging, and
green when the microphone is fully charged.
NOTE: Microphones can be left to charge for
extended periods.
VLP 302
(Cover Removed)
VLH 302
(Cover Removed)
+
+
_
AB
11
22
LED
44
11
22
LED
44
2
Setting up the Microphones
VLP 302 Pendant Microphone
1. Verify that the battery is installed and fully charged.
2. Set the microphone(s) for either Teacher or Student mode using the
DIP switch, accessible from beneath the battery cover (see
2
at
right):
In Teacher mode (default), all microphone features are fully
functional. Set the dip switch to the OFF (down) position to
enable “teacher” mode.
In Student mode, all buttons are disabled except for power. Set
the dip switch to the ON (up) position to enable “student” mode.
3. Apply the appropriate label (provided) to identify the microphone
(see
3
at right).
4. To wear as a pendant microphone:
a. Push the lanyard into the guides on the lanyard lock.
b. Open the microphone clip.
c. Slide up the lanyard lock under the clip, then release the clip.
d. Place the lanyard
around your neck
and adjust the
microphone’s position
by sliding it up so it
rests approximately
6 inches (15.2 cm)
below your chin.
~ 6 inches (15.2 cm)
Extron
PW
R
OFF/M
UTE
O
N
VLH 302 Handheld Microphone
1. Verify that the battery is installed and fully charged.
2. Turn the microphone on by sliding up the power switch.
NOTE: Each VoiceLift kit includes VLP 302/VLH 302
microphones and VLR 302 receivers that have already
been paired. Follow the steps on the next page to pair the
microphone if necessary.
3. Speak in a normal tone of voice, adjusting the volume level as
necessary (the volume buttons are located under the microphone
cover as show at right).
4. When nished, return the microphone to the charging station.
5. Turn the microphone(s) on by holding the power button for 3 seconds. One
of the LINK LEDs on the VLR 302 receiver will illuminate to indicate that
connection has been established.
NOTE: Each VoiceLift kit includes VLP 302/VLH 302 microphones
and VLR 302 receivers that have already been paired. Follow the
steps on the next page to pair the microphone if necessary.
6. Speak in a normal tone of voice, adjusting the volume level as necessary.
7. When nished, return the microphone to the charging station.
2
3
c
b
Press to
open clip
Lanyard
Lock
a
Status
LED
5
6
Status
LED
Power
Switch
VLH 302
(Cover Removed)
+
V
olume
Buttons
3
Pairing with the VLR 302 Receiver
Each VoiceLift kit includes VLP 302/VLH 302 microphones and VLR 302 receivers that have already been paired. If needed, follow
the steps below to pair microphones with a receiver.
Verify which Microphones are Paired
1. Ensure that the microphones are fully charged. Power each microphone on, one at a
time, to determine if the microphones are paired to the VLR 302 receiver.
NOTES:
As each microphone is powered on, one of the VLR link slot LEDs (see
A
at right) will illuminate if the microphone is paired.
Only one microphone can be paired to each LINK slot on the VLR
receiver.
2. Once you have determined which microphones are paired, turn them off.
Pair New Microphones
Follow these steps to pair microphones to the VLR 302 receiver.
NOTE: All paired microphones must be turned off before pairing new microphones.
1. Press and hold the LINK button on the VLR 302 receiver (see
B
in the image above) for 4 seconds to start pairing mode.
If LINK slots are available, one of the LINK LEDs blinks to indicate that pairing mode has started.
NOTES:
Once initiated, pairing mode is enabled for 30 seconds. Users must repeat the process if they have exceeded the 30
second pairing window or if pairing was not successful.
Receiver Pairing/Discovery mode can also be enabled remotely via SIS comands. Commands can be sent to the
receiver through direct USB connection or through PVS switcher connection.
2. Follow the steps below for your microphone model:
For the VLP 302:
Ensure that the microphone is powered off.
NOTE: The VLP microphone must be in “TEACHER”
(off) mode in order to pair.
Then, press and hold the POWER and FUNCTION buttons
(see
A
and
B
at right) simultaneously for 4 seconds until
the status LED blinks red and green, indicating pairing mode
has started.
For the VLH 302:
Ensure that the microphone is powered on.
NOTE: The VLH microphone must be in “STUDENT”
(on) mode in order to pair.
Then, press and hold the LINK button, located beneath the battery cover (see
C
at right), for
4 seconds.
The microphone status LED changes from solid amber to alternating red and green, indicating that pairing mode has
started.
NOTE: The receiver assigns the microphone to the rst available LINK slot. If the microphone is paired successfully,
one of the LINK LEDs on the VLR receiver lights solid green.
3. After pairing the microphones, verify that they have been set up properly as shown in the previous section, Setting up the
Microphones, on the previous page.
A B
B
A
C
4
Extron Headquarters
+800.633.9876 Inside USA/Canada Only
Extron USA - West Extron USA - East
+1.714.491.1500 +1.919.850.1000
+1.714.491.1517 FAX +1.919.850.1001 FAX
Extron Europe
+800.3987.6673
Inside Europe Only
+31.33.453.4040
+31.33.453.4050 FAX
Extron Asia
+65.6383.4400
+65.6383.4664 FAX
Extron Japan
+81.3.3511.7655
+81.3.3511.7656 FAX
Extron China
+86.21.3760.1568
+86.21.3760.1566 FAX
Extron Middle East
+971.4.299.1800
+971.4.299.1880 FAX
Extron Australia
+61.8.8113.6800
+61.8.8351.2511 FAX
Extron India
1800.3070.3777
(Inside India Only)
+91.80.3055.3777
+91.80.3055.3737 FAX
© 2017 Extron Electronics All rights reserved. All trademarks mentioned are the property of their respective owners. www.extron.com
68-2957-50
Rev. A
07 17
  • Page 1 1
  • Page 2 2
  • Page 3 3
  • Page 4 4

Extron VLC 302 User manual

Category
Musical Equipment
Type
User manual

Ask a question and I''ll find the answer in the document

Finding information in a document is now easier with AI