Page is loading ...


Important User Information
Because of the variety of uses for the products described in this
publication, those responsible for the application and use of these
products must satisfy themselves that all necessary steps have been
taken to assure that each application and use meets all performance
and safety requirements, including any applicable laws, regulations,
codes and standards. In no event will Rockwell Automation be
responsible or liable for indirect or consequential damage resulting
from the use or application of these products.
Any illustrations, charts, sample programs, and layout examples
shown in this publication are intended solely for purposes of
example. Since there are many variables and requirements associated
with any particular installation, Rockwell Automation does not
assume responsibility or liability (to include intellectual property
liability) for actual use based upon the examples shown in this
publication.
Allen-Bradley publication SGI-1.1, Safety Guidelines for the
Application, Installation and Maintenance of Solid-State Control
(available from your local Allen-Bradley office), describes some
important differences between solid-state equipment and
electromechanical devices that should be taken into consideration
when applying products such as those described in this publication.
Reproduction of the contents of this copyrighted publication, in
whole or part, without written permission of Rockwell Automation, is
prohibited.
Throughout this publication, notes may be used to make you aware
of safety considerations. The following annotations and their
accompanying statements help you to identify a potential hazard,
avoid a potential hazard, and recognize the consequences of a
potential hazard:
WARNING
!
Identifies information about practices or
circumstances that can cause an explosion in a
hazardous environment, which may lead to personal
injury or death, property damage, or economic loss.
ATTENTION
!
Identifies information about practices or
circumstances that can lead to personal injury or
death, property damage, or economic loss.
IMPORTANT
Identifies information that is critical for successful
application and understanding of the product.
AB Drives

Rockwell Automation
Support
Before you contact Rockwell Automation for technical assistance, we
suggest you please review the troubleshooting information contained
in this publication first.
If the problem persists, call your local Rockwell Automation
representative or contact Rockwell Automation in one of the following
ways:
If you need to contact Rockwell Automation for assistance, please
have the following information available when you call:
• a clear statement of the problem, including a description of what
the system is actually doing. Note the LED state; also note input
and output image words for the module.
• a list of remedies you have already tried
• processor type and firmware number (See the label on the
processor)
• hardware types in the system, including all I/O modules
• fault code if the processor is faulted
Your Questions or Comments on this Manual
If you find a problem with this manual, please notify us of it on the
enclosed How Are We Doing form.
Phone United
States/Canada
1.440.646.5800
Outside United
States/Canada
You can access the phone number for your
country via the Internet:
1. Go to http://www.ab.com
2. Click on Product Support
(http://support.automation.rockwell.com)
3. Under Support Centers, click on Contact
Information
Internet
⇒
1. Go to http://www.ab.com
2. Click on Product Support
(http://support.automation.rockwell.com)

v Publication 1790-UM003A-EN-P - May 2002
Table of Contents
Important User Information . . . . . . . . . . . . . . . . . . . . . . . . . iii
Rockwell Automation Support . . . . . . . . . . . . . . . . . . . . . . . iv
Your Questions or Comments on this Manual . . . . . . . . . iv
Chapter 1
Overview
General Description . . . . . . . . . . . . . . . . . . . . . . . . . . . . . 1-1
Thermocouple/mV Inputs and Ranges . . . . . . . . . . . . . 1-2
Hardware Features . . . . . . . . . . . . . . . . . . . . . . . . . . . . . . 1-3
General Diagnostic Features . . . . . . . . . . . . . . . . . . . . . 1-4
System Overview . . . . . . . . . . . . . . . . . . . . . . . . . . . . . . . 1-4
System Operation . . . . . . . . . . . . . . . . . . . . . . . . . . . . 1-4
Module Operation - DeviceNet Example . . . . . . . . . . . . 1-5
Chapter Summary . . . . . . . . . . . . . . . . . . . . . . . . . . . . . . . 1-6
Chapter 2
Installation and Wiring
Before You Begin . . . . . . . . . . . . . . . . . . . . . . . . . . . . . . . 2-1
Power Requirements . . . . . . . . . . . . . . . . . . . . . . . . . . . . . 2-1
1790D-4T0/T4T0 . . . . . . . . . . . . . . . . . . . . . . . . . . . . . 2-1
1790P-T4T0 . . . . . . . . . . . . . . . . . . . . . . . . . . . . . . . . . 2-1
General Considerations . . . . . . . . . . . . . . . . . . . . . . . . . . . 2-2
Hazardous Location Considerations . . . . . . . . . . . . . . . 2-2
Selecting a Location . . . . . . . . . . . . . . . . . . . . . . . . . . . 2-5
Protecting the Circuit Board from Contamination. . . . . . 2-6
Installing CompactBlock LDX I/O. . . . . . . . . . . . . . . . . 2-6
Set the Node Address on the DeviceNet 1790D-4T0/T4T0
Base Block . . . . . . . . . . . . . . . . . . . . . . . . . . . . . . . . . 2-6
Set the Station Address on the 1790P-T4T0 PROFIBUS DP
Base Block . . . . . . . . . . . . . . . . . . . . . . . . . . . . . . . . . 2-7
Mounting . . . . . . . . . . . . . . . . . . . . . . . . . . . . . . . . . . . . . 2-7
Mount the Base Block . . . . . . . . . . . . . . . . . . . . . . . . . 2-7
Panel Mounting . . . . . . . . . . . . . . . . . . . . . . . . . . . . . . 2-7
DIN Rail Mounting. . . . . . . . . . . . . . . . . . . . . . . . . . . . 2-8
Connect the DeviceNet Cable to the 1790D-4T0/T4T0 Base
Block . . . . . . . . . . . . . . . . . . . . . . . . . . . . . . . . . . . . . 2-9
Connect the PROFIBUS DP Terminal Connector to the
1790P-T4T0 Base Block . . . . . . . . . . . . . . . . . . . . . . . . 2-10
Connect Power to the 1790P-T4T0 Block . . . . . . . . . . . 2-11
Field Wiring Connections . . . . . . . . . . . . . . . . . . . . . . . . . 2-12
System Wiring Guidelines. . . . . . . . . . . . . . . . . . . . . . . 2-12
Wiring the Module. . . . . . . . . . . . . . . . . . . . . . . . . . . . 2-14
Wiring the Terminal Blocks . . . . . . . . . . . . . . . . . . . . . 2-15
Cold Junction Compensation . . . . . . . . . . . . . . . . . . . . . . . 2-16
Chapter Summary . . . . . . . . . . . . . . . . . . . . . . . . . . . . . . . 2-16
AB Drives

Publication 1790-UM003A-EN-P - May 2002
vi
Chapter 3
Module Data, Status, and Channel
Configuration for DeviceNet
Module Memory Map . . . . . . . . . . . . . . . . . . . . . . . . . . . . 3-1
Input Image. . . . . . . . . . . . . . . . . . . . . . . . . . . . . . . . . 3-1
Accessing Input Image File Data . . . . . . . . . . . . . . . . . . . . 3-1
Input Data File . . . . . . . . . . . . . . . . . . . . . . . . . . . . . . . . . 3-2
Input Data Values . . . . . . . . . . . . . . . . . . . . . . . . . . . . 3-2
Under-Range Flag Bits (S0 to S3) . . . . . . . . . . . . . . . . . 3-2
Over-Range Flag Bits (S8 to S11) . . . . . . . . . . . . . . . . . 3-3
Data Format . . . . . . . . . . . . . . . . . . . . . . . . . . . . . . . . . . . 3-3
Filter Frequency . . . . . . . . . . . . . . . . . . . . . . . . . . . . . . . . 3-4
Channel Step Response . . . . . . . . . . . . . . . . . . . . . . . . . . . 3-5
Channel Cutoff Frequency . . . . . . . . . . . . . . . . . . . . . . . . . 3-5
Effective Resolution. . . . . . . . . . . . . . . . . . . . . . . . . . . . . . 3-7
Cold Junction Compensation . . . . . . . . . . . . . . . . . . . . . . . 3-11
Determining Module Update Time. . . . . . . . . . . . . . . . . . . 3-12
Calculating Accuracy . . . . . . . . . . . . . . . . . . . . . . . . . . . . . 3-12
Configuring DeviceNet Thermocouple/mV Module
(1790D-4T0/T4T0). . . . . . . . . . . . . . . . . . . . . . . . . . . . . . . 3-14
Configure DeviceNet Thermocouple/mV Modules Using
RSNetWorx . . . . . . . . . . . . . . . . . . . . . . . . . . . . . . . . . . . . 3-15
Chapter Summary . . . . . . . . . . . . . . . . . . . . . . . . . . . . . . . 3-19
Chapter 4
Diagnostics and Troubleshooting
Safety Considerations . . . . . . . . . . . . . . . . . . . . . . . . . . . . 4-1
Indicator Lights . . . . . . . . . . . . . . . . . . . . . . . . . . . . . . 4-1
Activating Devices When Troubleshooting . . . . . . . . . . 4-1
Stand Clear of the Equipment. . . . . . . . . . . . . . . . . . . . 4-2
Program Alteration. . . . . . . . . . . . . . . . . . . . . . . . . . . . 4-2
Safety Circuits . . . . . . . . . . . . . . . . . . . . . . . . . . . . . . . 4-2
Module Operation vs. Channel Operation . . . . . . . . . . . . . 4-2
Power-up Diagnostics . . . . . . . . . . . . . . . . . . . . . . . . . . . . 4-3
Module Status . . . . . . . . . . . . . . . . . . . . . . . . . . . . . . . 4-3
Network Status . . . . . . . . . . . . . . . . . . . . . . . . . . . . . . 4-3
Channel Diagnostics . . . . . . . . . . . . . . . . . . . . . . . . . . . . . 4-4
Over- or Under-Range Detection . . . . . . . . . . . . . . . . . 4-4
Open-Circuit Detection . . . . . . . . . . . . . . . . . . . . . . . . 4-4
Module Error Definition Table . . . . . . . . . . . . . . . . . . . 4-5
Channel LED Indicator Operation . . . . . . . . . . . . . . . . . . . 4-5
Appendix A
Specifications
Environmental Specifications . . . . . . . . . . . . . . . . . . . . . . . A-1
DeviceNet Specifications . . . . . . . . . . . . . . . . . . . . . . . . . . A-2
PROFIBUS DP Specifications . . . . . . . . . . . . . . . . . . . . . . . A-2
General Specifications . . . . . . . . . . . . . . . . . . . . . . . . . . . . A-3
Thermocouple/mV Specifications. . . . . . . . . . . . . . . . . . . . A-4

Publication 1790-UM003A-EN-P - May 2002
vii
Appendix B
Two’s Complement Binary
Numbers
Positive Decimal Values . . . . . . . . . . . . . . . . . . . . . . . . . . B-1
Negative Decimal Values. . . . . . . . . . . . . . . . . . . . . . . . . . B-2
Appendix C
Thermocouple Descriptions
International Temperature Scale of 1990. . . . . . . . . . . . . . . C-1
Type B Thermocouples . . . . . . . . . . . . . . . . . . . . . . . . . . . C-1
Type E Thermocouples . . . . . . . . . . . . . . . . . . . . . . . . . . . C-3
Type J Thermocouples . . . . . . . . . . . . . . . . . . . . . . . . . . . C-5
Type K Thermocouples . . . . . . . . . . . . . . . . . . . . . . . . . . . C-7
Type N Thermocouples. . . . . . . . . . . . . . . . . . . . . . . . . . . C-9
Type R Thermocouples . . . . . . . . . . . . . . . . . . . . . . . . . . C-11
Type S Thermocouples . . . . . . . . . . . . . . . . . . . . . . . . . . C-12
Type T Thermocouples . . . . . . . . . . . . . . . . . . . . . . . . . . C-14
References . . . . . . . . . . . . . . . . . . . . . . . . . . . . . . . . . . . C-17
Appendix D
Using Thermocouple Junctions
Using a Grounded Junction Thermocouple . . . . . . . . . . . . D-1
Using an Ungrounded (Isolated) Junction Thermocouple . . D-2
Using an Exposed Junction Thermocouple. . . . . . . . . . . . . D-3
Appendix E
Module Configuration for
PROFIBUS
Configure PROFIBUS Thermocouple/mV Modules (1790P-T4R0)
E-1
Configure Thermocouple/mV Modules Using the SST PROFIBUS
Configuration Tool . . . . . . . . . . . . . . . . . . . . . . . . . . . . . . E-1
Save the Configuration . . . . . . . . . . . . . . . . . . . . . . . . . . . E-7
Download the Configuration . . . . . . . . . . . . . . . . . . . . . . . E-7
Summary . . . . . . . . . . . . . . . . . . . . . . . . . . . . . . . . . . . . E-10
Glossary
. . . . . . . . . . . . . . . . . . . . . . . . . . . . . . . . . . . . . . . . . . . . G-1
Index
. . . . . . . . . . . . . . . . . . . . . . . . . . . . . . . . . . . . . . . . . . . . . I-1
AB Drives

Publication 1790-UM003A-EN-P - May 2002
viii

1 Publication 1790-UM003A-EN-P
Chapter
1
Overview
This chapter describes the 1790D-4TO/T4TO (1790P-T4TO)
Thermocouple/mV Input module and explains how the module reads
thermocouple or millivolt analog input data. Included is:
• the module’s hardware and diagnostic features
• an overview of system and module operation
• compatibility
General Description
The thermocouple/mV input module supports thermocouple and millivolt
signal measurement applications that require up to four channels. It
digitally converts and stores thermocouple and/or millivolt analog data
from any combination of up to four thermocouple or millivolt analog
sensors. Each input channel is individually configurable via software for a
specific input device, and filter frequency, and provides open-circuit,
over-range and under-range detection and indication. When configured
for thermocouple inputs, the module can convert the thermocouple
readings into digital temperature readings in °C or °F. When configured
for mV inputs, the module assumes that the direct mV input signal is
linear prior to input to the module.
The data can be configured on board each module as:
engineering units x 1
The module uses a digital filter that provides high frequency noise
rejection for the input signals. The filter is programmable, allowing you
to select from seven different filter frequencies for each channel:
The module uses five input words for data and status bits. Module
configuration is stored in the module memory. The 1790D modules’
configuration is done via RSNetWorx for DeviceNet™ programming
software. See Chapter 3, Module Data, Status, and Channel Configuration
for DeviceNet , for details on module configuration. The 1790P module
configuration is explained in Appendix E.
• 10 Hz
• 25 Hz
• 50 Hz
• 60 Hz
• 100 Hz
• 250 Hz
• 500 Hz
AB Drives

Publication 1790-UM003A-EN-P
1-2 Overview
Thermocouple/mV Inputs and Ranges
The table below defines thermocouple types and their associated
full-scale temperature ranges. The second table lists the millivolt analog
input signal ranges that each channel will support.
Table 1.1 Thermocouple Analog Input Signal Types
Thermocouple
Type
Temperature
Range
Scaling (Counts)
Resolution
*
* Filter set for 10 Hz
Accuracy
**
(0 to 55°C)
** Module only
B +300 to +1800°C +3000 to +18000 0.1°C ±4.2°C
E -270 to +1000°C -2700 to +10000 0.1°C ±2.5°C
J -210 to +1200°C -2100 to +12000 0.1°C ±2.8°C
K -270 to +1370°C -2700 to +13700 0.1°C ±3.3°C
R -50 to +1768°C -500 to +17680 0.1°C ±3.6°C
S -50 to +1768°C -500 to +17680 0.1°C ±3.6°C
T -270 to 400°C -2700 to 4000 0.1 °C ±1.3°C
N -270 to 1300°C -2700 to 13000 0.1°C ±3.1°C
Table 1.2 mV Analog Input Signal Types
Millivolt Input Range Scaling
(Counts)
Resolution
*
* Filter set for 10 Hz
Accuracy
**
(0 to 55°C)
** Module only
10µV
-76.5 to +76.5 mV -7650 to +7650
10µV 306µV

Publication 1790-UM003A-EN-P
Overview 1-3
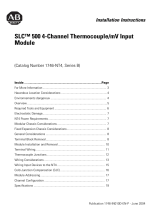
Hardware Features
The thermocouple/mV module contains either a fixed terminal block or a
removable D-sub connector, which provides connections for four inputs
for any combination of thermocouple and mV input devices. Channels are
wired as differential inputs. The illustration below shows the hardware
features of the module.
Figure 1.1 1790D-4T0/T4T0 DeviceNet Module
Figure 1.2 1790P-T4T0 PROFIBUS DP Module
Node Address
Switches
Module and Network
Status Indicators
43223
Thermoucouple/mV
Channel Indicators
Thermocouple/mV Connections
(D-sub Connector shown)
Compact
Block LDX
17
90
D
-8
B
V
8
V
8
IN
P
U
T
S
/8O
U
T
P
U
T
S
-D
C
P
O
W
E
R
0
7
0
7
DeviceNet Network
Connection
DIN Rail Slot
Panel Mount
Hole
Node Address
Switches
Module and Network
Status Indicators
Panel Mount
Hole
Thermocouple/mV
Channel Indicators
Thermocouple/mV
Connections (Terminal block)
PROFIBUS Network
Connector
DIN Rail Slot
Module Power Connector
(underneath module)
PROFIBUS
Connector
31341-M
AB Drives

Publication 1790-UM003A-EN-P
1-4 Overview
Internal to the module, Cold Junction Compensation (CJC) sensors are
attached to the terminal block to enable accurate readings from each
channel. These sensors compensate for offset voltages introduced into
the input signal as a result of the cold-junction where the thermocouple
wires are connected to the module.
General Diagnostic Features
Module, network, and channel LEDs help you identify the source of
problems that may occur during power-up or during normal channel
operation. The LEDs indicate both status and power. See Chapter 4,
Diagnostics and Troubleshooting , for details on power-up and channel
diagnostics.
System Overview
The modules communicate to the controller or network scanner via the
DeviceNet™ or PROFIBUS network. The 1790D modules also receive 24V
dc power through DeviceNet. An external 24V dc auxiliary source is
required to power the 1790P module and all thermocouple/mV channels.
System Operation
At power-up, the module performs a check of its internal circuits,
memory, and basic functions. If no faults are found during power-up
diagnostics, the module status LED is turned on (green).
Once a channel is properly configured and enabled, the module
continuously converts the thermocouple or mV input to a value within the
range selected for that channel.
Each time the module reads an input channel, it tests the data for a fault
(over- or under-range or open-circuit condition). If it detects a fault, the
module sets a unique bit in the channel status word. See Input Data File
on page 3-2. The module sends two’s compliment binary converted
thermocouple/mV data out over the network. See Appendix B for a
description of two’s compliment binary numbers.

Publication 1790-UM003A-EN-P
Overview 1-5
Module Operation - DeviceNet Example
When the module recieves a differential input from an analog device, the
module’s circuitry multiplexes the input into an A/D converter. The
converter reads the signal and converts it as required for the type of input.
The module also continuously samples the CJC sensors and compensates
for temperature changes at the terminal block cold junction, between the
thermocouple wire and the input channel. See the block diagram below.
Figure 1.3 Block Diagram
Each channel can receive input signals from a thermocouple or millivolt
analog input device, depending upon how you configured the channel.
When configured for thermocouple input types, the module converts the
analog input voltages into cold-junction compensated and linearized
digital temperature readings. The module uses the National Institute of
Standards and Technology (NIST) ITS-90 standard for linearization for all
thermocouple types (J, K, T, E, R, S, B, N).
When configured for millivolt inputs, the module converts the analog
values directly into digital counts.
Input
CH0
Multiplexer
VA2
A/D
VREFVref
Channel Select
Channels 1 through 3 same as
channel 0 above.
43309
A
B
VA1
Vcc
Optical
Isolation
AIN-
AIN+1
VA3
A-GND
Micro-
Controller
Transmit
Receive
GND
Network
Power
Supply
Analog
Power
Supply
DeviceNet
24Vdc
Power
Vcc
GND
VA1
VA2
VA3
A-GND
VDC
GND
1
2
3
Auxiliary
24Vdc
Power
Transceiver
+
_
AB Drives

Publication 1790-UM003A-EN-P
1-6 Overview
From the readings taken by the converter, the module sends
thermocouple or mV data through the microcontroller to the DeviceNet
network.
The PROFIBUS block diagram is similar.
Chapter Summary
In this chapter, you learned about the 1790D-4T0/T4T0 (1790P-T4T0)
thermocouple/mV module. See Chapter 2 to learn how to install and wire
the module.

1 Publication 1790-UM003A-EN-P - May 2002
Chapter
2
Installation and Wiring
Before You Begin
This chapter tells you how to:
• determine the power requirements for the modules
• avoid electrostatic damage
• install the module
• wire the module’s terminal block
Power Requirements
1790D-4T0/T4T0
The module receives system power from the DeviceNet network. An
auxiliary field supply provides power for the thermocouple/mV
channels.
1790P-T4T0
The module requires external supplies for both system power and for
the thermocouple/mV channels.
Table 2.1 1790D-4T0/T4T0 Power Specifications
Power Specification
DeviceNet Supply voltage - 24V dc nominal
Voltage range - 11-28.8V dc
Power dissipation - 1.2W maximum @ 28.8V dc
Field Supply voltage - 24V dc nominal
Voltage range - 21.6-26.4V dc (+
10%)
Power dissipation - 1.5W maximum @ 26.4V dc
Table 2.2 1790P-T4T0 Power Specifications
Power Specification
PROFIBUS Supply voltage - 24V dc nominal
Voltage range - 19.2-28.8V dc
Power dissipation - 2W maximum @ 28.8V dc
Field Supply voltage - 24V dc nominal
Voltage range - 21.6-26.4V dc (+
10%)
Power dissipation - 1.5W maximum @ 26.4V dc
AB Drives

Publication 1790-UM003A-EN-P - May 2002
2-2 Installation and Wiring
General Considerations
The modules are suitable for use in a commercial or light industrial
environment when installed in accordance with these instructions.
Specifically, this equipment is intended for use in clean, dry
environments (Pollution degree 2
(1)
) and to circuits not exceeding
Over Voltage Category II
(2)
(IEC 60664-1)
(3)
.
Hazardous Location Considerations
This equipment is suitable for use in Class I, Division 2, Groups A, B,
C, D or non-hazardous locations only. The following WARNING
statement applies to use in hazardous locations.
(1)
Pollution Degree 2 is an environment where, normally, only non-conductive pollution occurs except that
occasionally a temporary conductivity caused by condensation shall be expected.
(2)
Over Voltage Category II is the load level section of the electrical distribution system. At this level transient
voltages are controlled and do not exceed the impulse voltage capability of the product’s insulation.
(3)
Pollution Degree 2 and Over Voltage Category II are International Electrotechnical Commission (IEC)
designations.
WARNING
!
EXPLOSION HAZARD
• Substitution of components may impair suitability
for Class I, Division 2.
• Do not replace components or disconnect
equipment unless power has been switched off or
the area is known to be non-hazardous.
• Do not connect or disconnect components unless
power has been switched off or the area is known
to be non-hazardous.
• This product must be installed in an enclosure.
• All wiring must comply with N.E.C. article 501-4(b).

Publication 1790-UM003A-EN-P - May 2002
Installation and Wiring 2-3
The following information applies when operating this
equipment in hazardous locations:
Informations sur l’utilisation de cet équipement en
environnements dangereux :
Products marked “CL I, DIV 2, GP A, B, C, D” are suitable for use in
Class I Division 2 Groups A, B, C, D, Hazardous Locations and
nonhazardous locations only. Each product is supplied with
markings on the rating nameplate indicating the hazardous
location temperature code. When combining products within a
system, the most adverse temperature code (lowest “T” number)
may be used to help determine the overall temperature code of
the system. Combinations of equipment in your system are
subject to investigation by the local Authority Having Jurisdiction
at the time of installation.
Les produits marqués "CL I, DIV 2, GP A, B, C, D" ne conviennent qu’à
une utilisation en environnements de Classe I Division 2 Groupes A,
B, C, D dangereux et non dangereux. Chaque produit est livré avec
des marquages sur sa plaque d’identification qui indiquent le code
de température pour les environnements dangereux. Lorsque
plusieurs produits sont combinés dans un système, le code de
température le plus défavorable (code de température le plus faible)
peut être utilisé pour déterminer le code de température global du
système. Les combinaisons d’équipements dans le système sont
sujettes à inspection par les autorités locales qualifiées au moment
de l’installation.
WARNING
!
EXPLOSION HAZARD
• Do not disconnect equipment unless
power has been removed or the area
is known to be nonhazardous.
• Do not disconnect connections to this
equipment unless power has been
removed or the area is known to be
nonhazardous. Secure any external
connections that mate to this
equipment by using screws, sliding
latches, threaded connectors, or other
means provided with this product.
• Substitution of components may
impair suitability for Class I,
Division 2.
• If this product contains batteries, they
must only be changed in an area
known to be nonhazardous.
AVERTISSEMENT
!
RISQUE D’EXPLOSION
• Couper le courant ou s’assurer que
l’environnement est classé non
dangereux avant de débrancher
l'équipement.
• Couper le courant ou s'assurer que
l’environnement est classé non
dangereux avant de débrancher les
connecteurs. Fixer tous les
connecteurs externes reliés à cet
équipement à l'aide de vis, loquets
coulissants, connecteurs filetés ou
autres moyens fournis avec ce
produit.
• La substitution de composants peut
rendre cet équipement inadapté à une
utilisation en environnement de
Classe I, Division 2.
• S’assurer que l’environnement est
classé non dangereux avant de
changer les piles.
AB Drives

Publication 1790-UM003A-EN-P - May 2002
2-4 Installation and Wiring
ATTENTION
!
Environment and Enclosure
This equipment is intended for use in a Pollution
Degree 2 industrial environment, in overvoltage
Category II applications (as defined in IEC
publication 60664-1), at altitudes up to 2000 meters
without derating.
This equipment is considered Group 1, Class A
industrial equipment according to IEC/CISPR
Publication 11. Without appropriate precautions,
there may be potential difficulties ensuring
electromagnetic compatibility in other environments
due to conducted as well as radiated disturbance.
This equipment is supplied as "open type"
equipment. It must be mounted within an enclosure
that is suitably designed for those specific
environmental conditions that will be present and
appropriately designed to prevent personal injury
resulting from accessibility to live parts. The interior
of the enclosure must be accessible only by the use
of a tool. Subsequent sections of this publication may
contain additional information regarding specific
enclosure type ratings that are required to comply
with certain product safety certifications.
See NEMA Standards publication 250 and IEC
publication 60529, as applicable, for explanations of
the degrees of protection provided by different types
of enclosure. Also, see the appropriate sections in
this publication, as well as the Allen-Bradley
publication 1770-4.1 ("Industrial Automation Wiring
and Grounding Guidelines"), for additional
installation requirements pertaining to this
equipment.

Publication 1790-UM003A-EN-P - May 2002
Installation and Wiring 2-5
Selecting a Location
Reducing Noise
Most applications require installation in an industrial enclosure to
reduce the effects of electrical interference. Thermocouple inputs are
highly susceptible to electrical noise. Electrical noise coupled to the
thermocouple inputs will reduce the performance (accuracy) of the
module.
Group your modules in the enclosure to minimize adverse effects
from radiated electrical noise and heat. Consider the following
conditions when selecting a location for the module. Position the
module:
• away from sources of electrical noise such as hard-contact
switches, relays, and AC motor drives
• away from modules which generate significant radiated heat.
In addition, route shielded, twisted-pair wiring away from any high
voltage I/O wiring.
ATTENTION
!
Preventing Electrostatic Discharge
This equipment is sensitive to electrostatic discharge,
which can cause internal damage and affect normal
operation. Follow these guidelines when you handle
this equipment:
• Touch a grounded object to discharge potential
static.
• Wear an approved grounding wriststrap.
• Do not touch connectors or pins on component
boards.
• Do not touch circuit components inside the
equipment.
• If available, use a static-safe workstation.
• When not in use, store the equipment in
appropriate static-safe packaging.
WARNING
!
If you insert or remove the module while power is
on, an electrical arc can occur. This could cause an
explosion in hazardous location installations.
Be sure that power is removed or the area is
nonhazardous before proceeding.
AB Drives

Publication 1790-UM003A-EN-P - May 2002
2-6 Installation and Wiring
Protecting the Circuit Board from Contamination
The printed circuit boards of analog modules must be protected from
dirt, oil, moisture, and other airborne contaminants. To protect these
boards, the system must be installed in an enclosure suitable for the
environment. The interior of the enclosure should be kept clean and
the enclosure door should be kept closed whenever possible.
Installing CompactBlock LDX I/O
Follow these steps to install the block:
1. Set the node address on the base block.
2. Mount the base block.
3. Wire the terminal blocks.
4. Connect the network cable.
These steps are explained in detail in the following procedures for
both the 1790D-4T0/T4T0 DeviceNet and 1790P-T4T0 PROFIBUS DP
modules.
Set the Node Address on the DeviceNet 1790D-4T0/T4T0 Base
Block
Each base block comes with its internal program set for node address
63. To reset the node address, adjust the switches on the front of the
block. The two switches are most significant digit (MSD) and least
significant digit (LSD). The switches can be set between 00 and 63.
The rotary switches are read at block power up only. Switch settings
between 64 and 99 cause the block to use the last valid node address
stored internally.
The node address may also be set through RSNetWorx for DeviceNet
or a similar configuration tool. When software configuration is used
for the node address, the switches must be set between 64 and 99.
Example: Node
Address is set at 26
43230
/