Page is loading ...


Solid state equipment has operational characteristics differing from those
of electromechanical equipment. “Safety Guidelines for the Application,
Installation and Maintenance of Solid State Controls” (Publication
SGI-1.1) describes some important differences between solid state
equipment and hard–wired electromechanical devices. Because of this
difference, and also because of the wide variety of uses for solid state
equipment, all persons responsible for applying this equipment must
satisfy themselves that each intended application of this equipment is
acceptable.
In no event will the Allen-Bradley Company be responsible or liable for
indirect or consequential damages resulting from the use or application
of this equipment.
The examples and diagrams in this manual are included solely for
illustrative purposes. Because of the many variables and requirements
associated with any particular installation, the Allen-Bradley Company
cannot assume responsibility or liability for actual use based on the
examples and diagrams.
No patent liability is assumed by Allen-Bradley Company with respect to
use of information, circuits, equipment, or software described in this
manual.
Reproduction of the contents of this manual, in whole or in part, without
written permission of the Allen-Bradley Company is prohibited.
Throughout this manual we use notes to make you aware of safety
considerations.
!
ATTENTION: Identifies information about practices or
circumstances that can lead to personal injury or death, property
damage, or economic loss.
Attentions help you:
• identify a hazard
• avoid the hazard
• recognize the consequences
Important: Identifies information that is especially important for
successful application and understanding of the product.
SLC, SLC 500, and SLC 5/02 are trademarks of Allen-Bradley Company, Inc.
Important User Information

Summary of Changes
SOC–1
Publication 1746-6.16 – January 1999
Summary of Changes
This publication contains new and revised information not included in the
previous version.
New Information
The Thermocouple/mV Isolated Input module, cat. no. 1746-INT4 is now a
series B module. The series B module is identical to the series A module
with the exception that the series B module is CE certified and has CSA
hazardous location approval (refer to Appendix A for complete ratings).
Compliance with European Union Directives
This series B module complies with the directives outlined in Chapter 1 of
this document.
CSA Hazardous Location Approval
This series B module complies with CSA classifications as outlined under
Specifications in Appendix A.
Revised Information
This publication also contains information formally included in a document
update, publication 1746-6.16–DU1.
Change Bars
The areas in this manual which are different from previous editions are
marked with change bars (as shown to the right of this paragraph) to indicate
the addition of new or revised information.
Allen-Bradley

Summary of Changes
SOC–2
Publication 1746-6.16 – January 1999

Preface
P–1
Publication 1746-6.16 – January 1999
Preface
Read this preface to familiarize yourself with the manual.
This preface covers the following topics:
• who should use this manual
• purpose and contents of this manual
• format conventions used in this manual
• terms and abbreviations
• Allen-Bradley support
Use this manual if you are responsible for the design, installation,
programming, or maintenance of an automation control system that uses
Allen-Bradley small logic controllers.
You should have a basic understanding of SLC 500 products. You should
understand electronic process control and be able to interpret the ladder logic
instructions required to control your application. If you do not, contact your
local Allen-Bradley representative for training before using this product.
This manual is a learning and reference guide for the 1746-INT4
Thermocouple/mV Isolated Input Module. It contains the information you
need to program, install, wire, and troubleshoot the module.
Who Should Use this Manual
Purpose and Contents
of this Manual
Allen-Bradley

Preface
P–2
Publication 1746-6.16 – January 1999
Contents of this Manual
Chapter Title Content
1 Overview
Describes module hardware features, and
operation.
2 Quick Start Serves as a Quick Start Guide for this module.
3 Installation and Wiring
Provides installation information and wiring
guidelines.
4
Preliminary Operating
Considerations
Describes the module ID code, I/O image words
used by the module, input channel characteristics,
and response to slot disabling.
5
Accessing Files
to Configure I/O
Describes how to use the software to create a new
file and configure I/O for system hardware.
6
Channel Configuration,
Data, and Status
Describes configuration and status words used by
the module. Explains how the module uses
configuration data and generates status during
operation.
7
Ladder Programming
Examples
Gives ladder logic examples for configuring and
operating the module that include verifying changes
in configuration, using the PID instruction,
monitoring status bits, and enabling autocalibration.
8
Module Diagnostics and
Troubleshooting
Explains how to interpret LEDs and correct
problems that may occur while using the module.
9
Application Programming
Examples
Describes how to write ladder logic to achieve
desired results for two example applications.
Appendices Title Content
A Module Specifications
Provides physical, electrical, environmental, and
functional specifications for the module.
B
Channel Configuration
Worksheets
Provides a worksheet to help you configure each
channel for operation.
C Thermocouple Descriptions
Gives you information about thermocouples and
the environments in which they perform best.
D Channel Calibration
Gives you the procedure to calibrate input
channels.
E
List of Terms and
Abbreviations
Gives you the terms and abbreviations used in this
manual.
F CSA Hazardous Information
Gives you the definition of the CSA hazardous
classification.
The following conventions are used throughout this manual:
• Bulleted lists such as this one provide information, not procedural steps.
• Numbered lists provide sequential steps or hierarchical information.
• Text in this
font
indicates words or phrases you should type.
• Key names appear in bold, capital letters within brackets (for example,
[ENTER]).
Format Conventions
Used in this Manual

Preface
P–3
Publication 1746-6.16 – January 1999
Related Documentation
The following documents contain information that may be helpful to you as
you use Allen-Bradley SLC products. To obtain a copy of any of those
listed, contact your local Allen-Bradley office or distributor.
For Read this Document
Document
Number
An overview of the SLC 500 family of products SLC 500 System Overview 1747-2.30
A description on how to install and use your Modular SLC 500
programmable controller
Installation & Operation Manual for Modular
Hardware Style Programmable Controllers
1747-6.2
A description on how to install and use your Fixed SLC 500
programmable controller
Installation & Operation Manual for Fixed Hardware
Style Programmable Controllers
1747-NI001
A procedural manual for technical personnel who use APS to
develop control applications
Allen-Bradley Advanced Programming Software
(APS) User Manual
9399-APSUM
A reference manual that contains status file data, instruction
set, and troubleshooting information about APS
Allen-Bradley Advanced Programming Software
(APS) Reference Manual
1747-6.15
An introduction to APS for first–time users, containing basic
concepts but focusing on simple tasks and exercises, and
allowing the reader to begin programming in the shortest time
possible
Getting Started Guide for APS 9399-APSQS
A training and quick reference guide to APS
SLC 500 Software Programmer’s Quick Reference
Guideavailable on PASSPORT at a list price of
$50.00
ABT-1747–TSG001
A procedural and reference manual for technical personnel
who use an HHT to develop control applications
Allen-Bradley Hand–Held Terminal User Manual 1747-NP002
An introduction to HHT for first–time users, containing basic
concepts but focusing on simple tasks and exercises, and
allowing the reader to begin programming in the shortest time
possible
Getting Started Guide for HHT 1747-NM009
A resource manual and user’s guide containing information
about the analog modules used in your SLC 500 system.
SLC 500 Analog I/O Modules User Manual 1746-NM003
An article on wire sizes and types for grounding electrical
equipment
National Electrical Code
Published by the
National Fire
Protection
Association of
Boston, MA.
A complete listing of current Allen–Bradley documentation,
including ordering instructions. Also indicates whether the
documents are available on CD-ROM or in multi–languages.
Allen-Bradley Publication Index SD499
A glossary of industrial automation terms and abbreviations Allen-Bradley Industrial Automation Glossary AG-7.1
Allen-Bradley

Preface
P–4
Publication 1746-6.16 – January 1999
Allen-Bradley offers support services worldwide, with over 75 Sales/Support
offices, 512 authorized Distributors and 260 authorized Systems Integrators
located throughout the United States alone, plus Allen-Bradley
representatives in every major country in the world.
Local Product Support
Contact your local Allen-Bradley representative for:
• sales and order support
• product technical training
• warranty support
• support service agreements
Technical Product Assistance
If you need to contact Allen-Bradley for technical assistance, please review
the information in the Module Diagnostics and Troubleshooting chapter first.
Then call your local Allen-Bradley representative.
Allen-Bradley
Support Services

Publication 1746-6.16 – January 1999
Chapter 1
General Description 1–2. . . . . . . . . . . . . . . . . . . . . . . . . . . . . . . . . .
Input
Ranges
1–2. . . . . . . . . . . . . . . . . . . . . . . . . . . . . . . . . . . . . . .
Hardware
Features
1–3. . . . . . . . . . . . . . . . . . . . . . . . . . . . . . . . . .
Diagnostic LEDs 1–4. . . . . . . . . . . . . . . . . . . . . . . . . . . . . . . . . . . .
System Overview 1–4. . . . . . . . . . . . . . . . . . . . . . . . . . . . . . . . . . .
System
Operation
1–4. . . . . . . . . . . . . . . . . . . . . . . . . . . . . . . . . . .
Module
Operation
1–5. . . . . . . . . . . . . . . . . . . . . . . . . . . . . . . . . . .
Module
Addressing
1–5. . . . . . . . . . . . . . . . . . . . . . . . . . . . . . . . . .
Compatibility
with Thermocouple and Millivolt Devices and Cables
1–5.
Block
Diagram of Isolated Channel Input Circuits
1–6. . . . . . . . . . . . .
Chapter 2
Required
T
ools and Equipment
2–1. . . . . . . . . . . . . . . . . . . . . . . . . .
Procedures 2–2. . . . . . . . . . . . . . . . . . . . . . . . . . . . . . . . . . . . . . . .
Chapter 3
Electrostatic Damage 3–1. . . . . . . . . . . . . . . . . . . . . . . . . . . . . . . . .
Power Requirements 3–1. . . . . . . . . . . . . . . . . . . . . . . . . . . . . . . . .
Considerations
for a Fixed Controller
3–2. . . . . . . . . . . . . . . . . . . . . .
Module
Installation and Removal
3–3. . . . . . . . . . . . . . . . . . . . . . . . .
Terminal Block Removal 3–3. . . . . . . . . . . . . . . . . . . . . . . . . . . . . . .
Module
Installation Procedure
3–3. . . . . . . . . . . . . . . . . . . . . . . . . . .
Wiring
the Module
3–4. . . . . . . . . . . . . . . . . . . . . . . . . . . . . . . . . . .
Cold Junction Compensation (CJC) 3–5. . . . . . . . . . . . . . . . . . . . . . .
Wiring
Considerations
3–5. . . . . . . . . . . . . . . . . . . . . . . . . . . . . . . .
Preparing
and Wiring the Cables
3–6. . . . . . . . . . . . . . . . . . . . . . . . .
Installing
the Ferrite Collar
3–8. . . . . . . . . . . . . . . . . . . . . . . . . . . . .
Chapter 4
Module
ID Code
4–1. . . . . . . . . . . . . . . . . . . . . . . . . . . . . . . . . . . .
Module
Addressing
4–2. . . . . . . . . . . . . . . . . . . . . . . . . . . . . . . . . .
Output
Image – Configuration W
ords 4–2. . . . . . . . . . . . . . . . . . . . . .
Input
Image – Data W
ords and Status W
ords 4–3. . . . . . . . . . . . . . . .
Input Channel Characteristics 4–3. . . . . . . . . . . . . . . . . . . . . . . . . . .
Channel
Cut-of
f Frequency
, Update T
ime, and Step Response
4–3. . .
Effective
Resolution of a Channel and Input Device
4–4. . . . . . . . . . .
Response
to Slot Disabling
4–5. . . . . . . . . . . . . . . . . . . . . . . . . . . . .
Input Response 4–5. . . . . . . . . . . . . . . . . . . . . . . . . . . . . . . . . . . . .
Output Response 4–5. . . . . . . . . . . . . . . . . . . . . . . . . . . . . . . . . . . .
Notes: 4–6. . . . . . . . . . . . . . . . . . . . . . . . . . . . . . . . . . . . . . . . . . . .
Table of Contents
Module Overview
Quick Start
Installation and Wiring
Preliminary Operating
Considerations
Allen-Bradley

Table of Contentsii
Publication 1746-6.16 – January 1999
Chapter 5
Create
a New File
5-1. . . . . . . . . . . . . . . . . . . . . . . . . . . . . . . . . . .
Configure I/O 5-3. . . . . . . . . . . . . . . . . . . . . . . . . . . . . . . . . . . . . . .
Return
to an Existing File
5-5. . . . . . . . . . . . . . . . . . . . . . . . . . . . . .
Notes: 5-6. . . . . . . . . . . . . . . . . . . . . . . . . . . . . . . . . . . . . . . . . . . .
Chapter 6
Channel
Configuration
6–1. . . . . . . . . . . . . . . . . . . . . . . . . . . . . . . .
Selecting
the Correct Data Format
6–3. . . . . . . . . . . . . . . . . . . . . . .
Channel
Configuration Procedure
6–4. . . . . . . . . . . . . . . . . . . . . . . .
Using
Channel Data W
ords 6–4. . . . . . . . . . . . . . . . . . . . . . . . . . . .
Using
Channel Status W
ords 6–6. . . . . . . . . . . . . . . . . . . . . . . . . . .
Detected
Faults Indicated by Bits 12-15
6–8. . . . . . . . . . . . . . . . . . . .
Chapter 7
Processor Basics 7–1. . . . . . . . . . . . . . . . . . . . . . . . . . . . . . . . . . . .
Load
Channel Configurations for T
ransfer to the Module
7–2. . . . . . . .
Procedure 7–2. . . . . . . . . . . . . . . . . . . . . . . . . . . . . . . . . . . . . . . . .
Change
a Channel Configuration
7–3. . . . . . . . . . . . . . . . . . . . . . . .
Verify
Changes to a Channel Configuration
7–4. . . . . . . . . . . . . . . . .
Process
a Channel Input with the PID Instruction
7–5. . . . . . . . . . . . .
Monitor
Channel Status Bits
7–6. . . . . . . . . . . . . . . . . . . . . . . . . . . .
Chapter 8
Module
and Channel Diagnostics
8–1. . . . . . . . . . . . . . . . . . . . . . . .
Module
Diagnostics at Power-up
8–1. . . . . . . . . . . . . . . . . . . . . . . . .
Channel Diagnostics 8–1. . . . . . . . . . . . . . . . . . . . . . . . . . . . . . . . .
LED
Indicators
8–2. . . . . . . . . . . . . . . . . . . . . . . . . . . . . . . . . . . . . .
Channel-status LEDs (Green) 8–3. . . . . . . . . . . . . . . . . . . . . . . . . . .
Open-circuit
Detection (Bit 12)
8–3. . . . . . . . . . . . . . . . . . . . . . . . . .
Out-Of-Range
Detection (Bit 13 for under range,
bit 14 for over range)
8–3. . . . . . . . . . . . . . . . . . . . . . . . . . . . . .
Invalid
Channel Configuration (Bit 15)
8–3. . . . . . . . . . . . . . . . . . . . .
Module Status LED (Green) 8–3. . . . . . . . . . . . . . . . . . . . . . . . . . . .
Troubleshooting Flowchart 8–4. . . . . . . . . . . . . . . . . . . . . . . . . . . . .
Replacement Parts 8–5. . . . . . . . . . . . . . . . . . . . . . . . . . . . . . . . . .
Contacting
Allen-Bradley
8–5. . . . . . . . . . . . . . . . . . . . . . . . . . . . . .
Notes: 8–6. . . . . . . . . . . . . . . . . . . . . . . . . . . . . . . . . . . . . . . . . . . .
Accessing Files to Configure
I/O
Channel Configuration, Data,
and Status
Ladder Programming
Examples
Module Diagnostics and
Troubleshooting

Table of Contents iii
Publication 1746-6.16 – January 1999
Chapter 9
Basic
Example (to display a temperature)
9–1. . . . . . . . . . . . . . . . . .
Channel
Configuration
9–1. . . . . . . . . . . . . . . . . . . . . . . . . . . . . . . .
Supplementary Example (select display in
o
C or
o
F) 9–3. . . . . . . . . . .
Channel
Configuration
9–4. . . . . . . . . . . . . . . . . . . . . . . . . . . . . . . .
Program
Setup
9–5. . . . . . . . . . . . . . . . . . . . . . . . . . . . . . . . . . . . .
Program
9–6. . . . . . . . . . . . . . . . . . . . . . . . . . . . . . . . . . . . . . . . . .
Appendix A
Electrical
Specifications
A–1. . . . . . . . . . . . . . . . . . . . . . . . . . . . . . .
Physical
Specifications
A–1. . . . . . . . . . . . . . . . . . . . . . . . . . . . . . . .
Environmental
Specifications
A–2. . . . . . . . . . . . . . . . . . . . . . . . . . .
Input
Specifications
A–2. . . . . . . . . . . . . . . . . . . . . . . . . . . . . . . . . .
Overall Accuracy A–3. . . . . . . . . . . . . . . . . . . . . . . . . . . . . . . . . . . .
Thermocouple
Resolution
A–4. . . . . . . . . . . . . . . . . . . . . . . . . . . . . .
Type J Thermocouple A–5. . . . . . . . . . . . . . . . . . . . . . . . . . . . . . . . .
Type
K Thermocouple
A–5. . . . . . . . . . . . . . . . . . . . . . . . . . . . . . . .
Type
E Thermocouple
A–6. . . . . . . . . . . . . . . . . . . . . . . . . . . . . . . .
Appendix B
Channel
Configuration W
orksheets B–1. . . . . . . . . . . . . . . . . . . . . . .
Appendix C
Thermocouple Descriptions C–1. . . . . . . . . . . . . . . . . . . . . . . . . . . .
J
T
ype Thermocouple
C–1. . . . . . . . . . . . . . . . . . . . . . . . . . . . . . . . .
K
T
ype Thermocouple
C–2. . . . . . . . . . . . . . . . . . . . . . . . . . . . . . . .
T
T
ype Thermocouple
C–3. . . . . . . . . . . . . . . . . . . . . . . . . . . . . . . .
E
T
ype Thermocouple
C–4. . . . . . . . . . . . . . . . . . . . . . . . . . . . . . . .
S
and R T
ype Thermocouples C–5. . . . . . . . . . . . . . . . . . . . . . . . . . .
C
and D T
ype Thermocouples C–6. . . . . . . . . . . . . . . . . . . . . . . . . . .
Appendix D
About
the Procedure
D–1. . . . . . . . . . . . . . . . . . . . . . . . . . . . . . . . .
Calibration
Logic
D–1. . . . . . . . . . . . . . . . . . . . . . . . . . . . . . . . . . . .
Calibration
Codes and Status
D–2. . . . . . . . . . . . . . . . . . . . . . . . . . .
Calibration
Procedure
D–3. . . . . . . . . . . . . . . . . . . . . . . . . . . . . . . .
Notes: D–4. . . . . . . . . . . . . . . . . . . . . . . . . . . . . . . . . . . . . . . . . . . .
Appendix E
Terms
and Abbreviations
E–1. . . . . . . . . . . . . . . . . . . . . . . . . . . . . .
Appendix F
CSA
Hazardous Location Approval
F–1. . . . . . . . . . . . . . . . . . . . . . .
Module Specifications
Channel Configuration
Worksheets
Thermocouple
Descriptions
Channel Calibration
Terms and Abbreviations
CSA Hazardous Location
Approval
Application Programming
Examples
Allen-Bradley

Table of Contentsiv
Publication 1746-6.16 – January 1999

1
Chapter
1–1Publication 1746-6.16 – January 1999
Module Overview
This chapter describes the thermocouple/millivolt isolated input module and
explains how the SLC controller reads thermocouple or millivolt analog
input data from the module. Included is information about:
• compliance with European Union Directives
• general description and hardware features
• an overview of system and module operation
• block diagram of channel input circuits
If this product has the CE mark, it is approved for installation within
the European Union and EEA regions. It has been designed and tested to meet
the following directives.
EMC Directive
This product is tested to meet Council Directive 89/336/EEC Electromagnetic
Compatibility (EMC) and the following standards,
in whole or in part, documented in a technical construction file:
EN 50081-2EMC – Generic Emission Standard, Part 2 – Industrial
Environment
EN 50082-2EMC – Generic Immunity Standard, Part 2 – Industrial
Environment
This product is intended for use in an industrial environment.
Low Voltage Directive
This product is tested to meet Council Directive 73/23/EEC Low Voltage, by
applying the safety requirements of EN 61131–2 Programmable Controllers,
Part 2 – Equipment Requirements and Tests.
For specific information required by EN 61131-2, see the appropriate sections
in this publication, as well as the following Allen-Bradley publications:
Industrial Automation Wiring and Grounding Guidelines
(for noise immunity), publication 1770-4.1
Automation Systems Catalog, publication B111
This equipment is classified as open equipment and must be mounted in an
enclosure during operation to provide safety protection.
Compliance with
European Union Directives
Allen-Bradley

Chapter 1
Module Overview
1–2
Publication 1746-6.16 – January 1999
The module stores digitally converted thermocouple and/or millivolt (mV)
analog data in its image table for retrieval by all fixed and modular SLC 500
processors. The module supports connections from any combination of up to
four thermocouple and/or mV analog sensors.
Input Ranges
The following tables define thermocouple types and associated temperature
ranges and the millivolt analog input signal ranges that each of the module’s
input channel will support. To determine the practical temperature range of
your thermocouple, refer to the specifications in appendix A.
Thermocouple Temperature Ranges
Type
°C Temperature Range °F Temperature Range
C 0
o
C to 2317
o
C 32
o
F to 4201
o
F
D 0
o
C to 2317
o
C 32
o
F to 4201
o
F
J –210°C to 760°C –346°F to 1400°F
K –270°C to 1370°C –454°F to 2498°F
T –270°C to 400°C –454°F to 752°F
B 300°C to 1820°C 572°F to 3308°F
E –270°C to 1000°C –454°F to 1832°F
R 0°C to 1768°C 32°F to 3214°F
S 0°C to 1768°C 32°F to 3214°F
N 0°C to 1300°C 32°F to 2372°F
CJC Sensor 0°Cto 85°C 32°F to 185°F
Millivolt Input Ranges
–50 to +50 mV
–100 to +100 mV
Each input channel is individually configurable for a specific input device, and
provides open-circuit, over-range, and under-range detection and indication.
General Description

Chapter 1
Module Overview
1–3Publication 1746-6.16 – January 1999
Hardware Features
The module fits into any single slot for I/O modules in either an SLC 500
modular system or an SLC 500 fixed system expansion chassis (1746-A2). It
is a Class 1
➀
module (uses 8 input words and 8 output words).
➀ Requires use of Block T
ransfer in a remote configuration.
The module contains a removable terminal block providing connections for
four thermocouple and/or analog input devices. There are two cold-junction
compensation (CJC) sensors that compensate for the cold-junction at ambient
temperature rather than at freezing (0
o
C). There are no output channels on
the module. You configure the module with software rather than with
jumpers or switches.
Cable Tie Slots
INPUT
Self-Locking Tabs
Side Label
Removable
Terminal Block
CJC A+
CHL3–
CHL3+
CHL2–
CHL2+
CHL1–
CHL1+
CHL0–
CHL0+
Door Label
CJC Sensors
Do Not
Remove
CJC A–
Do Not
Remove
CJC B–
Do Not
Remove
CJC B+
Do Not
Remove
MODULE STATUS
0
1
2
3
CHANNEL
STATUS
THERMOCOUPLE/mV
Channel Status
LEDs (Green)
Module Status
LED (Green)
ISOLATED
ISOLATED THERMOCOUPLE / mV INPUT MODULE
Do Not
Connect
Do Not
Connect
Do Not
Connect
Do Not
Connect
Do Not
Connect
Do not connect
to this terminal
Do Not
Connect
Hardware Features
Hardware
Function
Channel Status LED Indicators Display operating and fault status of channels 0, 1, 2, and 3
Module Status LED Displays operating and fault status of the module
Side Label (Nameplate) Provides module information
Removable Terminal Block Provides electrical connection to input devices.
Door Label Permits easy terminal identification
Cable Tie Slots Secure input wiring at the module
Self-Locking Tabs Secure module in chassis slot
Allen-Bradley

Chapter 1
Module Overview
1–4
Publication 1746-6.16 – January 1999
Diagnostic LEDs
The module contains diagnostic LEDs that help you identify the source of
problems that may occur during power-up or during normal operation.
Power-up and channel diagnostics are explained in chapter 8, Module
Diagnostics and Troubleshooting.
The module communicates with the SLC 500 processor and receives +5Vdc
and +24Vdc power from the system power supply through the parallel back-
plane interface. No external power supply is required. You may install as
many thermocouple modules in the system as the power supply can support.
Thermocouple Modules
SLC Processor
Each module channel can receive input signals from a thermocouple or a mV
analog input device. You configure each channel to accept either one. When
configured for thermocouple input types, the module converts analog input
voltages into cold-junction compensated and linearized, digital temperature
readings. The module uses the National Bureau of Standards (NBS)
Monograph 125 and 161 based on IPTS-68 for thermocouple linearization.
When configured for millivolt analog inputs, the module converts analog
values directly into digital counts. The module assumes that the mV input
signal is linear.
System Operation
At power-up, the module checks its internal circuits, memory, and basic
functions. During this time the module status LED remains off. If the
module finds no faults, it turns on its module status LED.
Thermocouple
Input
Module
SLC 500
Processor
Channel Configuration W
ord
Channel Data W
ord
Thermocouple or mV
Analog Signals
Channel Status W
ord
System Overview

Chapter 1
Module Overview
1–5Publication 1746-6.16 – January 1999
After completing power-up checks, the module waits for valid channel
configuration data from your SLC ladder logic program (channel status
LEDs are off). After channel configuration data is transferred and channel
enable bits are set for one or more channels, the module turns on its channel
status LEDs. Then it continuously converts the thermocouple or millivolt
input to a value within the range you selected for the channel.
Each time the module reads an input channel, the module tests that data for a
fault, i.e. open-circuit, over-range, or under-range condition. If it detects
such a condition, the module sets a unique bit in the channel status word and
causes the channel status LED to blink.
The SLC processor reads the converted thermocouple or millivolt data from
the module at the end of the program scan, or when commanded by the
ladder program. After the processor and module determine that the data
transfer was made without error, the data can be used in your ladder program.
Module Operation
The module’s input circuitry consists of four differential analog inputs, each
with its own analog-to-digital (A/D) convertor. The A/D convertors read the
analog input signals and convert them to digital counts. The input circuitry
also continuously samples the CJC sensors and compensates for temperature
changes at the cold junction (terminal block). The figure on the following
page shows a block diagram for the analog input circuitry.
Module Addressing
The module requires eight words each in the SLC processor’s input and
output image tables. Addresses for the module in slot e are as follows:
I:e.0-3 thermocouple/mV data for channels 0-3, respectively
I:e.4-7 status data for channels 0-3, respectively
O:e.0-3 configuration data for channels 0-3, respectively
O:e.4-7 reserved for future use. Do not use.
Compatibility with Thermocouple and Millivolt Devices and Cables
The module is compatible with the following NBS MN-125 and -161 standard
types of thermocouples: B, C, D, E, J, K, N, R, S, and T and extension wire.
Refer to appendices A and C for details. The module is also compatible with a
variety of mV devices with an output of "50 or "100 mV.
Allen-Bradley

Chapter 1
Module Overview
1–6
Publication 1746-6.16 – January 1999
To minimize interference from radiated electrical noise, we recommend
twisted-pair and highly shielded cables such as the following:
For This Type of Device We Recommend This Cable (or equivalent)
Thermocouple Type J EIL Corp. J20-5-502
Thermocouple Type K EIL Corp. K20-5-510
Thermocouple Type T EIL Corp. T20-5-502
other Thermocouple types consult with EIL Corp or other manufacturers
mV devices
Alpha Suprashield XTRA-GUARD 1
5121 (1pr), 5122 (2pr), 5131 (3pr), 5141 (4pr)
Digital
V
alue
Channel 1
8 Hz
Digital
Filter
Analog to
Digital
Convertor
Open Circuit
Detection
Channel 0
+
–
+
–
+
–
+
–
+
–
+
–
CJCA Sensor
CJCB Sensor
Terminal Block Module Circuitry
I/O Chassis
Ground
Digital Value
Channel 0 &
CJC Sensor
Signal
8 Hz
Digital
Filter
Analog to
Digital
Convertor
Digital Value
Channel 2
8 Hz
Digital
Filter
Analog to
Digital
Convertor
8 Hz
Digital
Filter
Analog to
Digital
Convertor
Multiplexer
Digital Value
Channel 3 &
CJC Sensor
Signal
Multiplexer
I/O Chassis
Ground
wire braid
2
4
6
8
10
12
14
16
18
Block Diagram
of Isolated
Channel Input Circuits

2
Chapter
2–1
Publication 1746-6.16 – January 1999
Quick Start
Use this chapter as an abbreviated procedure for getting the module into
operation or as an overview if you need the additional steps described in
subsequent chapters. This chapter assumes that you understand:
• SLC 500 products
• electronic process control
• ladder logic instructions
Because this chapter is a start-up guide, it does not contain detailed
explanations. It does, however, refer to other chapters or to other SLC
publications for more information.
If you are unsure of terms used or concepts presented in this chapter, always
read the referenced chapters before trying to apply the information.
This chapter will:
• tell you what equipment you need
• explain how to install and wire the module
• show you how to set up one channel for thermocouple input
• examine the state of the LEDs at normal startup
• examine the channel status word
Have the following tools and equipment ready:
• medium blade screwdriver
• medium cross-head screwdriver
• thermocouple or millivolt sensor
• thermocouple extension wire (if needed)
• the module
• I/O chassis
• SLC processor and power supply
• programming equipment
(Programming examples in this manual demonstrate the use of
Allen-Bradley’s Advanced Programming Software for personal
computers.)
Required Tools and
Equipment
Allen-Bradley

Chapter 2
Quick Start
2–2
Publication 1746-6.16 – January 1999
1.
Unpack the Module Reference
Important:: Follow these precautions to prevent damaging the module from electrostatic discharge:
• Before handling the module, rid yourself of electric charge by touching a grounded object
• Avoid touching connector terminations and circuit components.
• When not in use, keep the module in its electrostatic shielded bag.
Unpack the module making sure that the contents include:
• module (Catalog Number 1746-INT4)
• removable terminal block (factory–installed on module) with CJC sensors attached
• this user manual (publication number 1746-6.16)
–
If the contents are incomplete, call your local Allen-Bradley representative for assistance.
2.
Review Power Requirements Reference
Review the power requirements of the modules drawing power from the chassis power supply.
• The fixed, 2-slot chassis supports 2 1746-INT4 modules. If combining an INT4 module with
a different type of module, refer to Considerations for a Fixed Controller in chapter 3.
• For a modular system, compute the total load on the system power supply using the
procedure described in the SLC Installation & Operation Manual for Modular Controllers
(publication 1747-6.2) or the SLC 500 Family System Overview (publication 1747-2.30).
Chapter 3
(Installation and
Wiring)
Appendix A
(Specifications)
3.
Install the Module Reference
ATTENTION: Never install, remove, or wire
modules with power applied to the chassis or
devices wired to the module.
!
Chapter 3
(Installation and
Wiring)
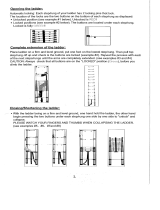
Make sure system power is off; then insert the the module into the I/O chassis.
In this example procedure, the module is inserted into slot 1.
Card
Guide
Top and Bottom
Module Release(s)
Procedures
/