Page is loading ...

CDN366 DeviceNet Gateway
Application Notes

2
Table of Contents
Revision...........................................................................................................................3
Purpose:...........................................................................................................................4
Hardware and Software Requirements:...........................................................................4
Schematic Diagrams:.......................................................................................................5
CDN366 Setup & Configurations:..................................................................................7
Register Electronic Data Sheet (EDS) File:....................................................................8
CDN366 Parameter Configuration:...............................................................................13
Change Parameter Setting Using RSNetWorx:.............................................................16
Serial Stream Object Parameters (Class Code 64):.......................................................17
Serial Receive Object Parameters (Class Code 65): .....................................................20
Serial Transmit Object Parameters (Class Code 66):....................................................22
Serial Receive/Transmit & I/O Mapping:.....................................................................25
Receive Handshaking & I/O Mapping:.........................................................................25
Transmit Handshaking & I/O Mapping: .......................................................................27
Mapping the Poll I/O Connection to AB-1747-SDN:...................................................30
Basic Troubleshooting...................................................................................................35
ASCII Table ..................................................................................................................36
CDN366 Enclosure Dimensions ...................................................................................38
CDN366 Template ........................................................................................................39

3
Revision
Initial Release ……………………………………………………………..……. 6/12/01

4
Purpose:
This application note is intended to assist users to setup and configure the
CDN366 DeviceNet ASCII gateway converter module with an Allen Bradley (AB)1747-
SDN DeviceNet master scanner for the SLC500 programmable logic controller (PLC)
series.
The users must have some basic knowledge of hardware and software.
Hardware: CDN366, AB PLC, AB 1747-SDN modules.
Software: RSLinx, RSNetworx, RSLogix500, and Microsoft Windows.
The user must have a basic knowledge of DeviceNet specifications and principles.
Hardware and Software Requirements:
The hardware and software requirement is based upon the application. For this
particular application note, the hardware and software are set up based on the listing
below. Note, the configuration below is meant to demonstrate the CDN366 DeviceNet
module integrated with an AB SLC502 PLC and not intended to ask users to use the same
configuration. Based on application requirements, the CDN366 can integrate with many
brands of PLC (AB, Omron, etc.) or PC based platforms (Synergetic, etc.). As long as a
DeviceNet network is available for a particular application, the CDN366 should be able
to integrate in the network.
Hardware:
1) AB SLC500 4 slot rack, cat. #1747-A4, series B
2) AB SLC500 power supply, cat #1747-P1, series A
3) AB SLC502 CPU, cat.#1747-L524, series C
4) AB SLC500 scanner module, cat.#1747-SDN, series A
5) AB SLC500 8 input module, cat. #1747-IV8, series A (optional)
6) AB SLC500 8 output module, cat. #1747-OB8, series A (optional)
7) AB SLC500 personal computer interface module, cat. #1747-PIC, series A
8) AB SLC500 converter RS232 to DeviceNet, cat.#1770-KFD, series A
9) MKS DIP CDN366 DeviceNet gateway module
10) MKS DIP DIP790 DeviceNet distribution board
11) Connector and cable
Software:
1) AB SLC500 RSLinx & RSNetWorx for DeviceNet, Rev. 2.01.03-ENE
2) AB SLC500 RSLogix 500 programming, Rev. 4.00.00-ENE
For more information on the above products, please visit the web sites at …

5
1) CDN366 support documents … specs. manual, EDS files, examples
www.mksinst.com/cgi-bin/product.exe?pid=cdn366
2) 1747-SDN DeviceNet Scanner Module: Installation Manual
www.ab.com/manuals/io/1747/174758.pdf
3) Setup RSLinx, RSNetworx with 1747-SDN DeviceNet Scanner Module
www.ab.com/manuals/cn/1747-um652b-en-p.pdf
4) SLC500 Instructions & Set Manual
www.ab.com/manuals/cp/1747615.pdf
5) DeviceNet to RS232 Interface Converter Installation Instructions
www.ab.com/manuals/cn/177056.pdf
6) DeviceNet to RS232 Interface Module Communication Protocol Ref. Manual
www.ab.com/manuals/cn/17706522.pdf
7) SLC500 chassis, power supply, digital/analog/adapter modules
www.ab.com/manuals/io/1746/index.html#1746adapter
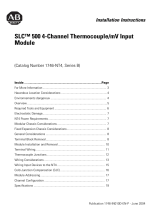
Schematic Diagrams:
The electrical schematic diagram figure 1 shown on page 3, CDN366 is integrated
with an Allen Bradley (AB) SLC502. The AB SLC500 four-slot rack system contains a
rack power supply (1747-P1), a PLC processor on slot 0 (1747-L524), and a DeviceNet
scanner module on slot 1 (1747-SDN), an 8 points input module on slot 2 (1746-IV8),
and an 8 points output module on slot 3 (1747-OB8). (For further hardware and software
configurations, please visit Allen Bradley website at http://www.ab.com/ )
The 24vdc regulated power supply is powered the network BUS-(0vdc) and
BUS+(24vdc) on DIP790 board. DIP790 is a DeviceNet distribution board with 1-inline
& 6-outline connections. The DIP790 is connected to an AB 1747 DeviceNet scanner
module, which is tapped into the DeviceNet network. Based upon Open DeviceNet
Vendor Association, Inc. (ODVA) specification, the operational voltage ranges from
11~25 vdc. The nominal voltage is 24 vdc. (For more information on specifications, visit
ODVA home page at www.odva.org.)
The AB 1747-PIC is a communication interface module, which uses RSLogic500
software to interface with a PC. RSLogic500 is a window based ladder logic software
program. RSLogic500 enables the user to upload/download and monitor PLC data.
The AB 1770-KFD is a communication interface module, which enables the user
to communicate between serial RS232 to DeviceNet network. The communication
enables the user to setup, configure and access DeviceNet network information using
RSLinx and RSNetWorx software.

6
Comm. Comm.
GND
DeviceNet network
24VDC Power Supply
+
120VAC 24VDC
--
GND
Pin
1
RS232 serial
3
communication
5
Pin
1
2
3
4
5
Pin Pin Pin
27
43
1
38
5
2
53
12
4
5
Figure 1. CDN366 Integrate with Allen Bradley SLC500
PS to DeviceNet Dist.
Color Description
red BUS+ (24vdc)
Func. Func.
9 pin DIN RS232 Serial
Interface to Barcode
Reader, Scanner
Weigh Scale or etc.
To PC RS232 9 pin
Serial Interface For
Used with RSLinx,
& RSNetWorx Prog.
V- (BUS-)
data high (CAN H)
Male Connector
DeviceNet
Color Description
clear
red
shield (Drain)
V+ (BUS+)
blue data low (CAN L)
Fuse 1A Fuse 6A
RXD
TXD
GND
RTS
CTS
DeviceNet Connector
black
white
to pin 1 DeviceNet connector
black
clear
data high (CAN H)
V+ (BUS+)
Terminal Connector
BUS- (0vdc)
Shield (Drain)
white
Description
red
V- (BUS-)
data low (CAN L)
shield (Drain)
black
blue
clear
CDN366
RS232-DeviceNet
DeviceNet
Gateway Module
PC Interface
Color
to pin 5 DeviceNet connector
1770-KFD
RS232-DeviceNet
PC Interface Mod.
DIP790 Device
Net Dist. Board
Slot 3Power Sup. Slot 2
8 pt. Input
Slot 0
120/240VAC
Slot 1
1747-L524
DeviceNet
Scanner
1747-SDN
Input
SLC502
PLC CPUFuse 3A
24vdc output
1747-P1
Allen Bradley SLC500 4 Slot Rack, 1746-A4
NL
Neutral
module
1746-IV8
8 pt.Output
module
1746-OB8
120VAC
Pin 1,4,6,9 are unused
1747-PIC
RS232-PLC
Module
RS232 Pin Layout
To PC RS232 25
Pin Serial Interface
For Used with
RSLogic Prog.

7
CDN366 Setup & Configurations:
Prior to the setup and configuration of the CDN366 device, the PLC hardware
(power supply, CPU, DeviceNet scanner, I/O modules), software (RSLinx, RSNetWorx
& RSLogic500) and interface modules must be setup and configured first. (For further
information on setup and configuration of the Allen Bradley PLC controller, please visit
www.ab.com)
In this particular example, the hardware and software were setup and configured
based upon page 1 listing. The figures below demonstrate that the RSNLinx and
RSNetWorx are running. The DeviceNet scanner module scanned the network and found
node 00 (master DeviceNet scanner) and node 03 (slave interface module). It is
recommended to setup the DeviceNet master scanner module to MAC-ID 00. The
maximum number of nodes on the DeviceNet network is 64, with a MAC-ID ranges of
00~63.

8
Register Electronic Data Sheet (EDS) File:
In order to integrate the CDN366 to DeviceNet network, the CDN366 must be set
up and configured first. CDN366 must be disconnected from the DeviceNet network
before configuring the node address and baud rate. Set the DeviceNet baud rate to match
with the network baud rate. Set the Mac ID to an unused node address. The example
below shows that the CDN366 was set at Mac ID 01 (MSD=0, LSD=1), and DeviceNet
network baud rate is at 125Kb.
RS-232 9 pin DIN male connector
Connect to serial perhiphial
Micro-style male connector
5 pin to DeviceNet network
Connect the CDN366 to the DeviceNet network and click on the “network scan” (Online
icon). The DeviceNet master will scan the network. The CDN366 is not registered.
Therefore, RSLinx and RSNetworx do not recognize the device.
Online

9
In order to register the CDN366 on RSNetWorx, click on “Tools” and select “EDS
Wizard”. Click on “Next>” and the “Options” menu is prompted.
Select “Register an EDS file(s)” and click on “Next>”

10
Select “Register a single file” and enter the EDS file name on the white box. Click on
“Next>”

11
The “EDS File Installation Test Results” menu is prompted, click on “Next>”. The
“Change Graphic Image” menu is prompted. Select CDN366 and click on “Change
icon”.
Select another icon to replace current CDN366 icon. Click “OK” to exit “Change Icon”
menu. After it is changed to a new icon, click on “Next>”.

12
The “Final Task Summary” menu is prompted, click on “Next>”
The “Completing the EDS Wizard” menu is prompted. Click on “Finish” to complete
the EDS Wizard. On RSLinx and RSNetWorx, click on the “Online” icon to re-scan or
browse the network. The CDN366 should be identified on the RSLinx and RSNetWorx
network. If after registering the EDS file, the CDN366 is unrecognized on the DeviceNet
network (see the Troubleshooting Guide on page 35).

13
CDN366 Parameter Configuration:
Now, the CDN366 is on the DeviceNet network. To change the CDN366 parameters,
ensure that the CDN366 device is not on the DeviceNet master scanlist. To edit the
parameters on CDN366, point the mouse to CDN366 icon and right click.

14
When the sub-menu is prompted, click on “Properties” and the “CDN366” menu
appears. Select “Parameters”, and the “EDS Editor” sub-menu is prompted. Click on
“Upload”, and the default parameters will upload from CDN366 device.

15
Download parameters to device Help for the selected parameter
Upload parameters from device Restore default parameters
Monitor Parameters
The CDN366 has eight (8) Rx/Tx instances. The total number of parameters are 155. On
the “Groups” selection, click on the “down arrow key” and then select “Serial Stream
Object”, “Rx Inst 1” or “Tx Inst 1”.

16
Change Parameter Setting Using RSNetWorx:
The CDN366 must be offline (not on Scanlist) to change any parameters. Some of
the parameters cannot be change, but can be read (see CDN366 DeviceNet Specifications
for details). Before making the parameter change, always upload the current parameters
from the CDN366 device.
1) In the “Parameters” menu, double click on the parameter, and enter the new
value. Then press “Enter” to accept the new value.
2) Click on “Apply” and click on “Yes” to download new changes to CDN366.
Another method for changing the parameters on CDN366 is using RSNetWorx.
1) Point mouse to CDN366 icon and right click. The sub menu is prompted.
2) Click on “Class Instance Editor”, and the “WARNING!” alert menu is
prompted.
3) Click on “Yes” to access the class instance editor menu.
Service Code:
Used to verify or
set new/current parameters for a
single or a group of attributes.
Object Address:
Enters a
particular class, instance and
attribute to verify or change
parameter setting.
Set data in decimal or
hexadecimal value.

17
Serial Stream Object Parameters (Class Code 64):
1) Baud Rate: The serial channel RS232 baud rate ranges from 300 ~ 57600 bits/sec.
The acceptable baud rate are 300, 1200, 2400, 4800, 9600, 19200, 38400, and
57600. The baud rate should be set to match the serial connection.
2) Data Bits: The number of data bits can be selected at 7 or 8 bits. The data bits
should be set to match the serial connection.
3) Parity: The parity bit can be selected at None, Odd, Even, Mark or Space. The
parity bit should be set to match the serial connection.
None = no parity
Odd = parity bit =1, if there are odd number of one in data size
Even = parity bit =1, if there are even number of ones data size.
Mark = parity bit is 1 always
Space = parity bit is 0 always
In most applications, parity bit is set at None (no parity).
4) Stop Bits: The stop bits can be selected at 1 or 2. Each data byte (character)
transmitted in a sequence is followed by 1 or 2 extra zero bits. The extra “0” is
marked at the end of a character transmission. In most applications, the stop bit is
set at 1. The stop bits should be set to match the serial connection.
1 = Each data byte (character) transmit is followed by one zero (0).
2 = Each data byte (character) transmit is followed by two zeros (0).
5) Flow Control: The flow control can be set at 0, 1, or 2. When flow control is set
to 1, the X-Off (CTRL S) will force the CDN366’s transmit function to block.
The transmitted characters are stored in the FIFO buffer until transmission is re-
enable by sending the X-On (CTRL Q) character to the CDN366. When the
receive FIFO buffer is full, the X-Off character is transmitted to the RS232
interface. The X-On/ X-Off flow control characters are extracted from the data
stream. Therefore, this setting is unsuitable for making binary data transmissions.
When flow control is set to 2, the RTS (pin 7) and CTS (pin 8) control signals are
enabled. The data is transmitted only when the CTS signal asserts a high/low
voltage. When the receive FIFO buffer is not full, the RTS signal is asserted to
allow data reception.
0 = No flow control
1 = X-On/X-Off flow control (software flow control)
2 = CTS / RTS flow control (hardware flow control)
In most applications, the flow control is set to 0 (no flow control).

18
List – select “List” when using the injunction with Pre and Post Short String data
type format. The Pre/Post delimiters can be set in ASCII characters. Pre-delimiter
is a character or list of characters (short string data type range 1~256 bytes) that
trigger CDN366 to read the beginning of a data packet. Post-delimiter is a
character or list of characters (short string data type range 1~256 bytes) that
trigger CDN366 to read the end of a data packet.
Example: The data packet looks like this => [STX][Barcode data][ETX][CR]
STX (start of text) =ASCII 0x02, ETX (end of text) = ASCII 0x03,
CR (carriage return) = ASCII 0x13
STX= Pre-delimiter (Class=64, Instance=1, Attribute=11)
ETX + CR = Post-delimiter (Class=64, Instance=1, Attribute=12)
Setting Pre/Post delimiters: All values are in ASCII unit.
Pre-delimiter (Class=64, Instance=1, Attribute=11) = 01 02
Pos-delimiter (Class=64, Instance=1, Attribute=12) = 02 03 13
First byte is defined as bytes length in ASCII characters. The 01 is equivalent to 1
byte length, which is in Pre-Delimiter. The 02 is equivalent to 2 bytes length
which is that set in Post-Delimiter.
Timeout – When Timeout Delimiter is enabled, the value is set at Packet Timeout
(Class=64, Instance=1, Attribute=13), which will delay the time to determine
when a package is completed. The Packet Timeout value ranges from 1~255msec.
A poll response message is sent, if either the Packet Length or Post Delimiter is
not received within the time specified in the Packet Timeout.
Packet Timeout – Specifies the amount of time in milliseconds (1~255msec)
between bytes that CDN366 uses to determine when the data packet is complete.
6) Delimiter Mode: The delimiter is used to
determine when the a complete packet is
received from the RS232 side (see
DeviceNet for further info.). There are three
functions in delimiter mode: List, Timeout
and Length.

19
Length – When a value (byte range from 1~255) is set in the Packet Length,
(Class=64, Instance=1, Attribute=14) the data packet is fixed based upon the
Packet Length. As the data packet receives from a poll response, the data packet is
complete as number of bytes sent is equal to the byte value set in Packet Length.
Packet Length – Specifies the number of bytes (1~255 bytes) to wait for before
determining the data packet is complete.
8) Poll Produce Size: This attribute can be accessed as read only. The produce size
is defined as the number of Rx data bytes plus two handshaking bytes. One
handshaking byte is for Transmit Acknowledge, which confirms the data
transmitted in instances 1 to 8. Bit 0 is set for transmit acknowledge in Instance 1.
Bit 1 is set for transmit acknowledge in Instance 2 and etc. The other handshaking
byte is for the Receive Toggle, which toggle instances 1 to 8. Bit 0 is set for
receive toggling in Instance 1. Bit 1 is set for receive toggling in Instance 2 and so
on (see Serial Receive/Transmit & I/O Mapping section). When Poll I/O
Connection is established with Allen Bradley 1747-SDN DeviceNet master
scanner, the produce size number of bytes will map into discrete Input data
memory or M file table.
9) Poll Consume Size: This attribute can be accessed as read only. When
establishing a short string data type I/O connection, the produce size is defined as
the number of Tx data bytes plus two handshaking bytes. One handshaking byte is
for Transmit Toggle for instances 1~8. The other one handshaking byte is for
Receive Acknowledge for instances 1~8, (see Serial Receive/Transmit & I/O
Mapping section). When Poll I/O Connection is established with Allen Bradley
1747-SDN DeviceNet master scanner, the consume size bytes will map into
discrete Output data memory or M file table.
7) Serial Status: The serial status indicates
whether the serial Receive/Transfer on RS232
has errors. When an error has occurred
in the serial status, a bit is set for the error.
Set any of these bits to zero, and it will clear
the particular error.

20
Serial Receive Object Parameters (Class Code 65):
There are eight identical receive (Rx) instance parameters which can be set in CDN366.
This section will review one of the eight receive instance parameters. These parameters
can easily be changed using RSNetWorx. When using RSNetWorx to upload the
parameters, first go to “Groups” and select “Rx Inst 1”.
Use Data (bit 0): Normally, this parameter bit is set to 1. When it is enabled, the
packet data is extracted to transmit to DeviceNet.
Use Pre-String (bit 1): When this parameter bit is set to 1, the pre-string ASCII
characters (bytes) will be removed before the PLC receives data from DeviceNet.
Pre-string characters are the ASCII characters found before the serial data.
Use Post-String (bit 2): When this parameter bit is set to 1, the post-string ASCII
characters (bytes) will be removed before the PLC receives data from DeviceNet.
Post-string characters are the serial ASCII characters found after the data.
10) Receive Toggle: This parameter is
read only. When new data has been
received, bit 0 is toggle (see Receive
Handshaking & I/O Mapping).
11) Receive Acknowledge: The value
in this parameter ranges from 0~1 bit.
In the poll response, this value must
match with the Receive Toggle bit to
receive new serial data on the
DeviceNet. The Sync Enabled attribute
must be enable when using this
attribute (see Receive Handshaking&
I/O Mapping).
12) Receive Mode: Bits 3~7 are
unused (label Xs). When a bits 0~2 are
set to 1, their function is enabled.
bit 7 bit 6 bit 5 bit 4 bit 3 bit 2 bit 1 bit 0
unused unused unused unused unused Use Post Use Pre Use Data
Receive Mode (class=65, instance=1, attribute=6)
/