Page is loading ...

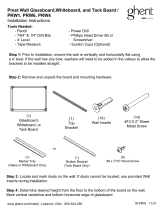
Coda Flush Mount Glassboard / CDA
Installation Instructions
www.ghent.com/install - Lebanon, Ohio 800-543-055
IS-CODA 09/21
Step 2:
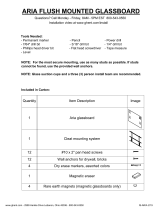
Remove and unpack Glassboard and mounting hardware.
Step 1:
Prior to installation, ensure the wall is vertically and horizontally flat using
a 4' level. If the wall has any bow to it washers will need to be added in the valleys to allow
the cleat to install flat.
(1)
Glassboard
(2)
Wall
Cleats
(8)
#10 X 2" Sheet
Metal Screw
(8)
Wall Inserts
Step 3:
Locate and mark studs on the wall. If studs cannot be located, use provided Wall
Inserts during installation.
Tools Needed:
- Pencil - Power Drill
- 7/64" & 1/4" Drill Bits - Phillips Head Driver Bit or
- 4' Level Screwdriver
- Tape Measure - Suction Cups (Optional)
Step 4:
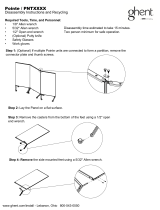
Determine desired height from the floor to the bottom of the glassboard on the wall.
Mark vertical centerline and bottom horizontal edge of glassboard.

B
A
C
D
Scribed bottom of board
Drill
Scribed vertical center line
www.ghent.com/install - Lebanon, Ohio 800-543-0550
IS-CODA 09/21
Step 7:
Using the #10 x 2" sheet metal screws, affix the lower small Wall Cleat to the
wall.
Step 5:
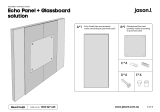
Determine and measure position of small Wall Cleat using the horizontal scribed
line (position A and B on the below diagram).
Step 6:
Locate the holes for the cleats by drilling pilot holes in the wall with a 7/64" drill
bit, use the cleat holes as a guide. If you do not hit studs, remove the cleat to install
the provided wall anchors. Wall anchors require a 1/4" pilot hole for proper installation.
Step 8:
Measure position of large Wall Cleat using horizontal scribed line. Center the
cleat with center scribed line and lower small Wall Cleat (position C and D on the below
diagram). Repeat Steps 6 and 7.
Step 9:
Lift the glassboard to the wall above cleats and slowly lower onto the cleats.
Use suction cups, if available to handle the glassboard.
Step 10:
Recycle all packaging in accordance with local regulations.
Glass
Diameter
A
B
C
D
24"
3-3/4"
7"
15-3/4"
10"
36"
8-1/4"
11"
26-1/4"
11"
48"
10-1/4"
16"
36-1/4"
16"
/