Page is loading ...

Any problems or questions call Regency Ofce Furniture at 1-866-816-9822
IMPORTANT NOTICE:
● Place all wooden parts on a clean and smooth surface such as a rug or carpet to avoid the parts from being scratched.
● Check to be sure that you have all parts and hardware.
● Remove all wrapping materials, including staples & packing straps before you start to assemble.
● Do not tighten all screws/bolts until completely assembled.
● Keep all hardware parts out of reach of children.
LHD71 (L71HCBDR), LHD66 (L66HCBDR) - INSTRUCTIONS
VHD71 (V71HCBDR), VHD66 (V66HCBDR)
D
E
Organize your parts and hardware. Hardware Components should include: A) 17 Cam Locks B) 17 Klix Cams (may already
be located in wooden parts) C) 17 Housing Caps D) 4 Outer Door Hinges E) 4 Inner Door Hinges F) 32 Screws
G) 1 Grommet H) Roll of Double-Sided Foam Tape I) 4 Door Stoppers
Wooden parts include: J) 1 Hutch Back K) 2 Hutch Sides L) 1 Hutch Shelf M) 1 Hutch Shelf Divider N) 1 Hutch Top
O) 4 Hutch Cabinet Doors
Other materials needed: Phillips-head screwdriver
O
M
K
LN
J
K
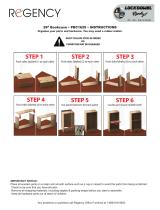
Step 1: Insert all Cam Locks into wooden parts J, K,
L, and N--Look for 2 holes, side by side, and insert into
smaller hole with screwdriver.
Important Note on Klix Cam
Operation: Make sure the arrow
is pointing upward toward the hole
before inserting Cam Locks (A) into
the panel’s hole.
Turn Klix Cam 1/4 turn to the right
to lock in place.

Any problems or questions call Regency Ofce Furniture at 1-866-816-9822
Step 2: Attach Left Hutch Side (K) to Hutch Back (J). SEE IMPORTANT NOTE ON
KLIX CAM OPERATION. Line up Cam Locks (A) on Hutch Side with Klix Cams (B) on
Hutch Back. Turn Klix Cams 1/4 turn to the right to lock in place.
K
K
K
J
J
J
Step 3: Attach Hutch Shelf
(L) to Hutch Back (J) and Left
Hutch Side (K).
K
J
L
L
M
Step 4: Attach Hutch Shelf Divider
(M) to Hutch Shelf (L). Holes for
screws should be at front of hutch.
Step 5: Attach Right Hutch Side (K) to
Hutch Back (J) and Hutch Shelf (L).
L
J
K
L
K
J
Step 6: Attach Hutch Top (N)
to both Hutch Sides (K) and
Hutch Shelf Divider (M).
M
K
N
Step 7: Attach Inner Cabinet Doors--Attach Inner Door Hinges (E) to both Hutch Shelf Divider (M)
and Cabinet Doors (O) separately, with screws. Check to make sure that hinge parts line up on both
the door and the divider. Repeat for Outer Door Hinges (D).
M
M
O
O
M
Step 8: Place all Housing Caps (C) over all
Klix Cams (B). Insert Grommet (G) into Hutch
Back (J). Attach Door Stoppers (I) to Hutch
Shelf (L) beneath corners of Hutch Cabinet
Doors (O). Apply Double-sided Tape (H) to
secure bottom of Hutch to top of desk. Adjust
Cabinet Doors as needed.
O
L
C
G
I
/