Hutch Systems Hutch Mercury ELD User manual

Type
User manual

Hutch Systems Hutch Mercury ELD provides you with a user-friendly interface and a wide range of features to help you stay compliant with HOS regulations and manage your fleet efficiently. With its intuitive design, you can easily log your duty status, track your hours of service, and view your HOS history. The ELD also allows you to send and receive messages, navigate to your destinations, and perform DVIR inspections. Additionally, you can monitor vehicle and driver performance, receive real-time alerts, and access various reports for in-depth analysis.

Hutch Systems Hutch Mercury ELD provides you with a user-friendly interface and a wide range of features to help you stay compliant with HOS regulations and manage your fleet efficiently. With its intuitive design, you can easily log your duty status, track your hours of service, and view your HOS history. The ELD also allows you to send and receive messages, navigate to your destinations, and perform DVIR inspections. Additionally, you can monitor vehicle and driver performance, receive real-time alerts, and access various reports for in-depth analysis.

HUTCH
ELD
MANUAL
INDEX
1. INTRODUCTION
2. HUTCH SYSTEMS
3. SETUP PROCEDURE
a. Logging To The System
b. Unidentified Data Events
c. How To Assume Unidentified Data
4. MAIN SCREEN FOR THE CURRENT USER
a. Main Screen Description
5. HOW TO CHANGE DUTY STATUS
6. SHIPPING & TRAILER INFORMATION
a. How To Enter/Change Shipping & Commodity And Trailer Info
7. HOW TO EDIT THE DUTY STATUS CHANGE
8. DESCRIBE THE HOURS AVAILABLE ON THE HOME SCREEN
9. VARIOUS ELD/AOBRD/AOBRD FUNCTIONS AVAILABLE IN COMMON TASK MENU
10. HOW TO ACCESS ADVANCE HUTCH ELD/AOBRD FUNCTIONALITY
11. HOW TO CERTIFY THE DAILY LOG
12. HOW TO CHANGE HOS RULE BETWEEN CANADA/USA
13. HOW TO LOGIN A CO-DRIVER
14. HOW TO CHECK DRIVER PROFILE?
15. HOW TO INSPECT PREVIOUS DAILY LOGS
16. EDIT REQUEST
a. How To Accept/Reject Edit Request?
17. VEHICLE IN MOTION
a. What Happens When Vehicle Is In Motion?
b. Gauge Cluster
18. TEAM OPERATION
a. How To Login Team Drivers?
b. How To Switch Back To First Driver?
c. How To Set Active Driver?
d. How To Assume Team Driving Time?
19. SYSTEM STATUS ICON
a. System Status Icon Explanation
20. ELD/AOBRD MALFUNCTIONS / DIAGNOSTIC INDICATORS
a. How To Determine Hutch ELD/AOBRD Malfunction(s) And/Or Diagnostic?
b. Diagnostics
c. Malfunctions
21. DVIR (DAILY VEHICLE INSPECTION REPORT)
a. How To Complete A DVIR?
22. ADD DEFECT
a. How To Add Defects?
23. ADD IMAGE
a. How To Add Image?
24. VIEW COMPLETED DVIR
a. How To View Previously Completed DVIR?
b. How To Delete Previously Done DVIR?
25. NAVIGATION
a. How To Use The Navigation?
26. MESSAGE
a. How To Send/Check Messages?
27. SETTINGS
28. MORE
29. TRAILER MANAGEMENT
a. How To Hook & Unhook Trailers?
b. How To Hook A Trailer?
c. How To Unhook A trailer?
30. DRIVER SCORECARD
a. How To Check Driver Scorecard?
31. VEHICLE INFO
a. How To Check Real-time Vehicle Information?
32. FUEL DETAIL
a. How To Enter Fuel Detail?
33. ROADSIDE INSPECTION
a. How To Complete Roadside Inspection Report?
34. MAINTENANCE
a. How To View And Complete Vehicle Maintenance?
b. How To Add Ad hoc Maintenance?
35. SCANNING
a. How To Scan And Send Bill Of Ladings?
36. EXPLAIN DIAGNOSTIC AND MALFUNCTION EVENTS AND HOW
TO CLEAR THEM
37. EDITS REQUESTED BY SUPPORT PERSONNEL
a. How To Accept Or Reject Edit Requests Requested By Support Personnel
38. VIOLATION HISTORY
a. How To Check Hos Violations?
b. How To Get Description Of Hours Of Service Violations
39. SUBMIT RECORD TO SAFETY PERSONNEL
a. How To Submit Daily Log Records To Safety Official Over The Web Services Or
Transfer File To Usb Drive?
40. SETTING ELD/AOBRD PREFERENCES
a. Plan for ELD/AOBRD preference setup.
41. LOGOUT/EXIT
a. How to logout from the system?
42. HELP
INTRODUCTION
Comprehensive “Smart Fleet” to alleviate your concern to sustain HOS compliance Optimize everyday fleet
activities and performance by engaging our federally compliant software named as “Hutch ELD” for driver log
automation.
This product is offered to enable businesses to function under recent FMCSA statute. The fleet manager can get
real-time insight into moving assets through detailed window providing exhaustive information for each vehicle.
This made to order system gives facilitation to trucking companies, carriers and commercial drivers to proactively
control any kind of violation prior they get caught in the inspection.
HUTCH SYSTEMS
Industry leading software to stay competitive and productive in market
We believe that everyone engaged in the fleet operations must remain connected without any hassle.
Our intuitive “Hutch ELD” is programmed to meet operational needs to run a safer fleet and decrease the expense incurred due to
manual paperwork.
The common fleet challenges resolved by our software are:
Decrease errors and violations: Our digitized concept highlights all exceptions and violations in order to keep accurate HOS
records.
Fast retrieval of data: HOS data can be quickly retrieved through the web App in just a few seconds and can be sent to the
drivers when they got stuck without any latency.
Saves time: Maintaining, e-log book needs significant time interval specifically when an audit occurs. This
e-logs concept will eradicate the need for manual record keeping. Moreover, we have automated most of the time-intensive
activities that are required to be performed by a driver to stay compliant.
User-friendly: Our “ELD” solution helps drivers to record hours of service automatically through a simple touch screen interface.
SETUP PROCEDURE
Logging To The System
The steps for logging into the system are as follows:
1. Turn off your Vehicle. Launch the application.
2. Use the Unique Login ID and Password provided by the Company Admin or the safety manager to sign in.
3. Enter the Username in the respective field.
4. Enter the password in the Password field.
5. Tap Sign In.
6. Once the system logs in the user, enter the details in the system.
7. If you are logging in and launching the application for the first time, then enter Shipping Number/Commodity and
Trailer Number details.
(Note: The information is strictly for your facilitation and is not mandatory to fill and can be skipped).
8. Select Save to save the data and view the Daily Log screen.
Unidentified Data Events
If Hutch ELD/AOBRD has any Unidentified Data Events, you will be prompted during login to view.
Unidentified events are the events where the driver has not logged into the system and still driving the vehicle . The system records the events
but does not know the identity of the user.
Each time someone logs in, the ELD/AOBRD will prompt that there are unidentified events and ask whether the user would like to
assume those events.
The dispatcher/safety Manager can also alert the driver about certain unidentified events.
How To Assume Unidentified Data
1. Tap “Yes” to view the data.
2. Select the event you wish to assume by “Tapping” on the
number (Note: You can select multiple options).
3. Tap the “Accept” button.
4. Enter the “Shipping & Trailer”
info that was utilized at the time.
5. Tap the “Save” button.
NOTE: ELD/AOBRD will prompt the driver to stop
driving if he drives without logging in to the system. it will
also notify the same to safety manager/dispatcher.
MAIN SCREEN FOR THE CURRENT USER
Main Screen Description
System Menu Various Hutch System applications can be accessed here which includes ELD/AOBRD, DVIR,
Navigation, Message, TPMS, Settings, and Logout.
System Status Hutch ELD/AOBRD monitors various health checks. All
icons must be green to function properly, but occasionally some icons may turn red.
Duty Status Change All Duty Status changes can be made by Tapping on this menu which includes: OFF
(off-duty), SB (sleeper berth), D (driving), ON (on-duty), PC (personal use / personal conveyance), and YM (yard move).
Rule Change
By Tapping this icon, you can switch among the available rules enabled by your company
administrator which may include 70hrs/7days (Cycle 1), 120hrs/14 days(Cycle 2), or 70hrs/ 8days (USA).
Common Task
Various ELD/AOBRD related functions can be accessed by Tapping on this menu which
includes: Post Data, Set Active, Certify Log, Sync, Change Rule, Switch User, and Undocking.
– This is a shortcut to access Main Screen from any menu.
During DOT Roadside Inspection, ELD/AOBRD data can be shared with officer by
– This is the back button of the tablet. Click on this icon to hide the keyboard.
– This is the home button of the tablet.
Daily Log
ELD/AOBRD Data Share
Tapping on this menu.
Back Button on tablet
Home Button on tablet
Shipment Details
By Tapping this, you can enter shipping & commodity and trailer information.
Additional information shown on Main Screen:
1. Current Daily Log Date
2. Current logged in driver name
3. Vehicle & Driver Info
Time Zone – Hutch ELD/AOBRD displays the home terminal time zone for the logged in driver.
Co-Driver – Hutch ELD/AOBRD displays the name of the co-driver if present.
Veh. Mi/Hrs – Hutch ELD/AOBRD displays the total vehicle mileage and total engine hours as read from the
vehicle ECM.
Note: If the dashboard odometer display does not match the odometer value returned by the ECM, the ECM
odometer value must be identified as the valid value.
Current Trip – Hutch ELD/AOBRD displays the miles driven and hours elapsed since last engine power up.
4. Driver HOS (Hour Of Service) Info
Driving Hours - Hutch ELD/AOBRD displays the driving hours available up to the next potential HOS
violation based on the current HOS rule selected.
Work Shift Hours – Hutch ELD/AOBRD displays the work shift hours remaining based on the current HOS
rule selected.
Canada 70hrs/7days – Hutch ELD/AOBRD displays the current hours remaining as per Cycle selected by
the driver
US 70hrs/7days – Hutch ELD/AOBRD displays the current hours remaining as per rule selected by the
driver (in this example its 70hrs/8days).
5. Duty Status Grid displays duty status changes for the current 24 hours.
6. Total Hours spent in each Duty Status.
Note: If you want to display the Grid Line to current time, you can set it in the Settings menu.
HOW TO CHANGE DUTY STATUS
2. To change a Duty Status, select the Status Change button as shown above.
3. Select the suitable Duty Status from the Select Duty Status menu that pops up as shown below.
1. Daily Log screen shows all six types of Duty Status:
Off Duty: Driver not driving the vehicle and is not on Duty.
Sleeper: Driver is physically present in sleeper berth.
Driving: Driver is driving the vehicle.
On Duty: Driver is on duty working for the employer but not driving the vehicle.
Personal Use: Driver is off duty and vehicle is being used as personal conveyance.
Yard Move: Driver is on duty working for the employer in the yard.
Note: PU and YM statuses are configurable.
Note: If YM or PC is selected, add a minimum of four characters in the Annotation column including spaces.
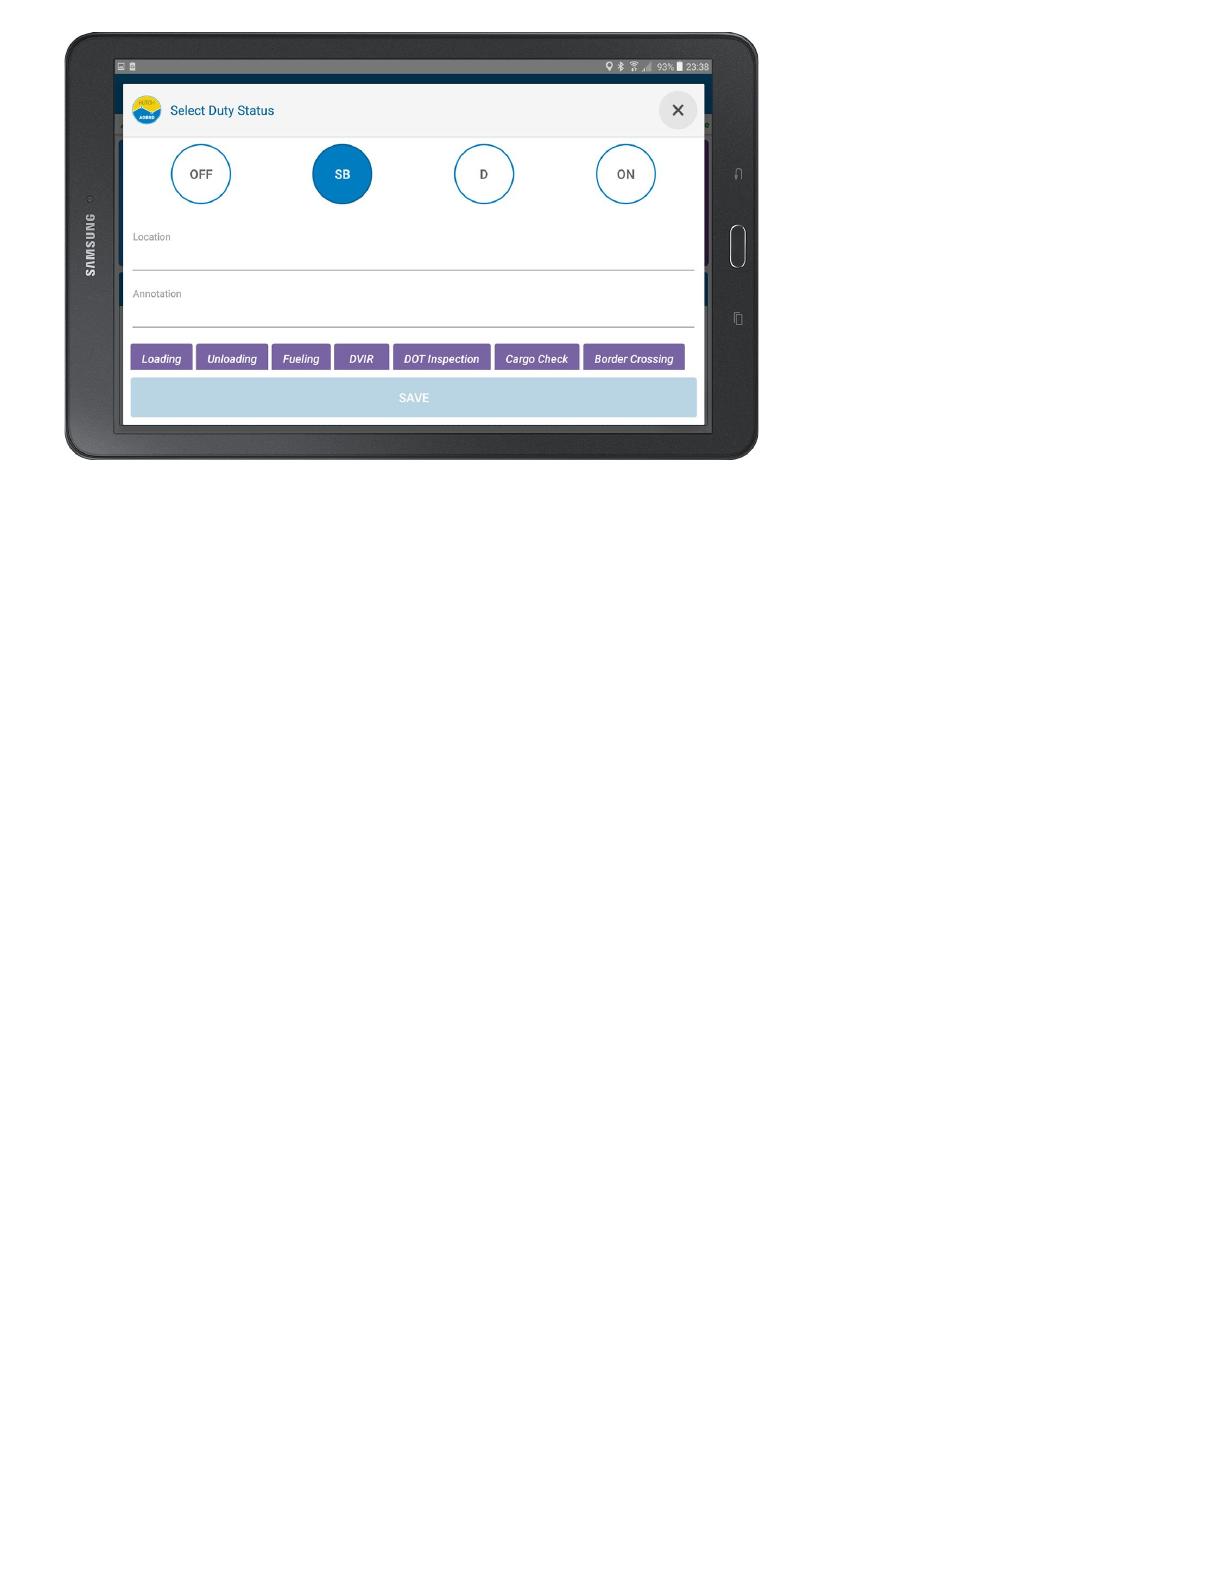
Annotation is optional, if you want to enter
some other input apart from the options presented, Tap the
annotation field and type. When On-Duty and annotation is select, the system will guide you to complete the
necessary forms.
5. Tap the Save button to save the change of duty status.
6. The Daily Log screen appears, which shows the status change.
7. Duty Status grid shows a timeline of 24 hours with a line indicating the changes in duty status and hours
spent in each duty status. The graph line turns
red in US and blue in Canada region in the duty status grid
by default (The color of the graph line can be Configured in the Display Settings of ELD/AOBRD/AOBRD
APP).
Note: As an additional option the user can select the duration of the graph line additionally entering the
preferences.
8. Each Duty Status is indicated on the left side of the screen. These include: Off Duty, Sleeper, Driving and
On Duty.
9. The Total hours in each duty status are shown on the right side of the screen.
10. Scroll down to view each change in the duty Status, it will be listed below. The most recent change will be
at the top.
Note:
Yard Move (YM): When you select Yard Move, system will place you on-duty and when the vehicle
goes through power cycle (Engine OFF and then ON), you must select Yard Move again, otherwise, the
system will transfer your status to driving status when vehicle reaches 5 MPH.
Personal Use (PC): When you select Personal Use, system would place you in the off-duty mode and
when the vehicle goes through power cycle (Engine OFF and then ON), ELD/AOBRD will display a
dialog box for you to confirm whether you wish to continue Personal Use. If you do not confirm, and
vehicle reaches 5 MPH, the ELD/AOBRD will place you in driving status.
Minimum 4 character long annotation is required for YM & PC
Note: PC and YM are configurable and if you do not see these, please consult your Safety Manager. The
Safety Manager or Authorized Personnel can provide the Access for the same.
4. Select from the following duty statuses:
OFF: Off Duty
SB: Sleeper Berth
On: On Duty
D: Driving Mode
PC: Personal Use of CMV
YM: Yard Move
Shipment Details
How To Enter/Change Shipping & Commodity And Trailer Information
According to USA HOS regulations, the driver must enter Shipper Name or BOL and Commodity information. The
driver must also provide trailer information.
1. Tap Truck icon present in the top right
2. Enter Shipping & Commodity and Trailer information
3. Tap Save
Note:
If you wish to pick more than 1 shipment or trailer, please append by using Comma.
If truck icon has red X, then you have not entered Shipping and Trailer information for the day.
If you have enabled Copy Trailer in Settings menu, then Hutch ELD/AOBRD will continue to copy the Shipping &
Trailer information for you (Trailer in DVIR is copied from here as well).
HOW TO EDIT THE DUTY STATUS
1. Scroll down to the duty status log.
2. Select the Duty Status record you want to change
3. When a Duty Status record is selected, an Edit
(Pencil Icon ) option appears on the left side. Tap on
the Edit button to edit the record.
4. To edit the Event Type, Tap the event type button.
5. Select new Duty Status and fill in the required
Annotation. Select the Save button to save the data.
6. Tap Time to change the time of the duty status.
7. Select the correct time from the pop up time clock
that appears on screen.
8. Tap on the OK and then Tap Save to save data
9. Enter the reason for the Duty Status change in the
Comments field. Select Save to save the data.
10. The changed Duty Status along with the edit and
comments are shown below on the Daily Log screen.
DESCRIBE THE HOURS AVAILABLE ON THE HOME SCREEN
1. As soon as the user logs into the driving status, the status button starts calculating the number of hours left in his driving.
2. The hours shown, are the hours left as per the rule (USA/Canada in accordance to Motor Vehicle Act) selected by the user.
3. The screen also shows the Time Zone in which the user is driving. These can be: Eastern Standard Time, Mountain Standard
Time, Central Standard Time, Pacific Standard Time and Atlantic Standard Time.
4. For a stationary vehicle, an alert will appear asking the Driver to change the status if the current duty status is driving.
If user does not respond within the stipulated time the status will automatically change to On Duty.
5. However, in case of a vehicle being stationary for more than 3 seconds then again moving at a speed more than 5 miles an
hour, the system will automatically change the status to Driving.
6. The Canadian work shift is made of 16 hours and American work shift is 14 hours, which is an accumulation of On Duty, Off
Duty, Sleeper Berth and Driving. The Off Duty shall be more than 8 or 10 consecutive hours for the system to reset the
daily driving and work shift to reset based upon current hours of service rule selected by the driver.
7. The total weekly hours will be rescheduled once the user takes a minimum of 34 or 36 consecutive hours of Off Duty.
VARIOUS ELD/AOBRD FUNCTIONS AVAILABLE IN COMMON
TASK MENU
You can access the common task menu function by Tapping on the Common Task menu
located on the main screen.
Post You can send the ELD/AOBRD data to Hutch Server by Tapping on this menu (Note: Hutch ELD/AOBRD automatically
sends data to Hutch Servers periodically depending on the data type).
Set Active – Set active is only required when operating ELD/AOBRD in a team environment. When the first driver logs in, the
system automatically sets the first driver as active and all automatic duty status changes are logged for the active driver. When the
co-driver starts to operate the vehicle, he/she must set himself/herself as the active driver (Note: To set yourself in the active status,
the other driver must not be in the driving status. When co-driver logs out, Hutch ELD/AOBRD will make the logged in driver as active, if
he/she was not already active).
Certify Log – You must certify log after Midnight.
Sync You can download new configuration from Hutch Servers by Tapping on this (Note: If your password has been changed
or your profile is modified, you must Tap here to download the latest information).
Change Rule – You can change your HOS rule by clicking on this menu and select appropriate rule.
Switch User – Switch User is used to login co-driver or to view the other driver’s daily log information.
Undocking – If you wish to take the tablet out of the vehicle, you can undock it by clicking this (Note: If you take the tablet out and do
not undock it, then the tablet loses connection with Hutch CONNECT, it will log Engine Synchronization error and you will not be able
to use the tablet unless you connect it with the ECM).
Note:
When Undocked, you must dock it to access ELD/AOBRD functionality.
When clicked on switch user, Hutch ELD/AOBRD will display the login screen. If you are already logged in,
entry of username is not required.
Set Deffered is available for drivers driving in Canada.
HOW TO MANUALLY POST AND SYNC DATA WITH SERVERS
Once the device boots up, the device downloads and syncs all the information from the server to the device.
In case of a new driver, who has never logged into the system, the user can manually sync the data with the server
by using the following steps:
1. Select the Context Menu button to show the menu.
2. Select Sync from the menu to sync the data.
3. A confirmation screen pops up once the data is synced.
The device will automatically post the data to the servers. To manually post the
data to the server:
1. Select Post from the Context Menu.
2. A confirmation screen pops up once the data is posted.Every five minutes, the
device synchronizes the data with the server.
HOW TO ACCESS ADVANCE HUTCH ELD/AOBRD FUNCTIONALITY
Hutch ELD/AOBRD is in compliance with FMCSA ELD/AOBRD Mandate and features for Driver Daily Log are
available under the ELD/AOBRD menu which can be accessed via System Menu.
1. Tap System Menu
2. Tap ELD/AOBRD (Scroll if necessary)
Description Of ELD/AOBRD Menu:
Daily Log – This menu will open the ELD/AOBRD Main Screen and to learn more, check the Main Screen
part of this manual.
Create Event – Create event is used to log Duty Status Change event happened in the same 24 hour period
(For instance, if you forgot to change to Sleeper-berth and would like to log it).
Violation History – Hutch ELD/AOBRD computes every HOS rule and displays any HOS Violation occurred
with a description.
Driver Profile – Driver profile shows information related to logged in driver.
Inspect Daily Log – Driver can inspect his/her previous Driver Daily Logs for maximum of 15 days.
Edit Request – All edit requests suggested by your safety manager can be confirmed or rejected.
Unidentified Data – Any time someone operates the vehicle, Hutch ELD/AOBRD logs those events under
the Unidentified Driver account and can be viewed and/or assumed. To learn more, check the Login part
of this manual.
Certify – All un-certified driver daily logs are displayed. All driver daily logs must be certified. To know more,
check the Un-Certified Log part of this manual.
Inspector Mode – During the Roadside inspection, driver can enable this feature, before giving the tablet to
the officer.
HOW TO CERTIFY THE DAILY LOG
1. The objective of certification of the daily log is to make the driver take the ownership of each 24-hour log.
2. In the event of any changes/edits to the log, the driver has to re-certify the log.
3. Tap on Common Task Menu
On home screen
4. To certify a log, select the Certify Log button.
5. Tap Certify.
VIOLATION HISTORY
How To Check HOS Violations?
Hutch ELD/AOBRD computes HOS Violation in real-time based on the rule elected by the driver. Prior to violation
system displays remaining driving time visually and audibly when 1 hr is remaining. In an event, the driver keeps on
driving and violation occurs, it will be logged and notification will be sent to safety manager.
1. Tap System Menu
2. Tap ELD/AOBRD
3. Tap Violation History
4. All the violation history details will be shown on the
Violation History screen.
5. When the user selects a particular violation, he will
be given a description about the type of violation.
Note: System will display most recent violations first. These violations are not visible in Inspector Mode.
Note:
Driver will be notified about the violations every time he logs into the system.
While driving, the driver is notified by the ELD/AOBRD one hour prior to the
violation limit. Thereafter, he is notified periodically at intervals of 30 minutes, 15 minutes and 5 minutes
respectively.
How to get description of hours of service violations
To view the hours of violations:
1. Select Violation History from the slide in menu to view all the violations done in the past.
2. All the violation history details will be shown on the Violation History Screen.
3. When the user selects a particular violation log, he gets a description of the hours and the reason of violation.
HOW TO CHANGE HOS RULE BETWEEN CANADA/ USA
The system will change the driver rules automatically whenever the driver crosses the borders between the USA and Canada.
The system will prompt the driver for a rule change whenever the vehicle crosses international borders if the settings are enabled from
setting menu
on the bottom right hand side corner of the device.
To change the rule, select the Common Task menu
Select Change Rule.
Select the suitable rule from the rules available.
Hutch ELD/AOBRD supports multiple rules, consult
with your Safety Manager to enable options, such
as, Cycle 2, Oil field exemptions.
The Daily Log screen will also show the number of
hours one was operating in the US rule and Canada
rule.
Note:
If you have enabled Automatic Rule Change
in the Settings menu, Hutch ELD/AOBRD will
automatically change rule to the previously
selected rule when a vehicle crosses the
country boundary.
You can select the Grid Line color for USA
and Canada in the Settings me
  • Page 1 1
  • Page 2 2
  • Page 3 3
  • Page 4 4
  • Page 5 5
  • Page 6 6
  • Page 7 7
  • Page 8 8
  • Page 9 9
  • Page 10 10
  • Page 11 11
  • Page 12 12
  • Page 13 13
  • Page 14 14
  • Page 15 15
  • Page 16 16
  • Page 17 17
  • Page 18 18
  • Page 19 19
  • Page 20 20
  • Page 21 21
  • Page 22 22
  • Page 23 23
  • Page 24 24
  • Page 25 25
  • Page 26 26
  • Page 27 27
  • Page 28 28
  • Page 29 29
  • Page 30 30
  • Page 31 31
  • Page 32 32
  • Page 33 33
  • Page 34 34
  • Page 35 35
  • Page 36 36
  • Page 37 37
  • Page 38 38
  • Page 39 39
  • Page 40 40
  • Page 41 41
  • Page 42 42
  • Page 43 43
  • Page 44 44
  • Page 45 45
  • Page 46 46
  • Page 47 47
  • Page 48 48
  • Page 49 49
  • Page 50 50
  • Page 51 51
  • Page 52 52
  • Page 53 53
  • Page 54 54
  • Page 55 55

Hutch Systems Hutch Mercury ELD User manual

Type
User manual

Hutch Systems Hutch Mercury ELD provides you with a user-friendly interface and a wide range of features to help you stay compliant with HOS regulations and manage your fleet efficiently. With its intuitive design, you can easily log your duty status, track your hours of service, and view your HOS history. The ELD also allows you to send and receive messages, navigate to your destinations, and perform DVIR inspections. Additionally, you can monitor vehicle and driver performance, receive real-time alerts, and access various reports for in-depth analysis.

Ask a question and I''ll find the answer in the document

Finding information in a document is now easier with AI