Page is loading ...

Style #:
Lot:
Date:
___________
___________
___________
July,10 2014, 25136-79700-R0 ©2014 DELTA ENTERPRISE CORP.
A
Consumer Care:
www.DeltaChildren.com
Delta Children’s Products
114 West 26th Street
New York, NY 10001
Tele.212-645-9033
79700
REV
THIS PRODUCT IS NOT INTENDED FOR
INSTITUTIONAL OR COMMERCIAL USE.
Read all instructions before assembly and use.
KEEP INSTRUCTIONS FOR FUTURE USE.
ADULT ASSEMBLY REQUIRED
Due to the presence of small parts during assembly, keep out of
reach of children until assembly is complete.
When contacting Delta Consumer Care please reference the above information. Before contacting Delta
Consumer Care please ensure that the information above matches the information found on the label on
the Back Panel, please reference the information found on the product when contacting Delta Consumer
Care.
To register your product for important safety alerts and updates to your product please visit
www.DeltaChildren.com and click on Product Registration.
Convertible Bookcase

NOTES ON ASSEMBLY:
-During the assembly process whenever using screws or bolts, check each by placing the screw/bolt
on the diagram of the item which is drawn actual size and design. Be sure to use the proper size and
shape specified in the instructions.
-To assemble this unit you may be required to place the unit on it’s side and face. It is strongly
recommended that assembly is done on a soft, non-abrasive surface (such as the foam packing wrap)
to avoid damaging the finish.
NOTES ON CARE AND MAINTENANCE:
- Do not scratch or chip the finish.
- Inspect the product periodically, contact Delta Children's Products for replacement parts or questions.
- Do not store the product or any parts in extreme temperatures and conditions such as a hot attic or a
damp, cold basement. These extremes can cause a loss of structural integrity.
-To preserve the luster of the high quality finish on your product, it is recommended to place a doily or
felt pad under any items you place on the finish.
-Clean with a damp cloth, then a dry cloth to preserve the original luster and beauty of this fine finish.
-Do not use abrasive chemicals.
-Do not spray cleaners directly onto furniture.
-Lift slightly when moving on carpeting to prevent leg breakage.
-Use of a vaporizer near furniture will cause wood to swell and finish to peel.
NOTES ON USE:
Keep children and others safe by following these simple rules:
- Do not allow any child to play on furniture
- Do not allow climbing on any piece of furniture.
- Do not allow hanging from any piece of furniture.
- Always monitor your child’s activity when in the nursery.
2

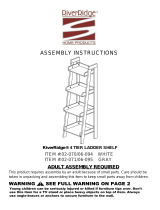
PARTS:
Hardware kits part# 25135 For colors 988 and 986
F. Top x1
Part# 25128
A. Left Side x1
Part# 25121
B. Right Side x1
Part# 25122
C. Front Rail x1
Part# 25123
D.Top Back Rail x1
Part# 25124
L. Fixed Shelf x1
Part# 25126
K. Removable Shelf x1
Part# 25127
E. Bottom Back Rail x1
Part# 25125
J.
Base Front Rail x1
Part# 25134
N. Base Top x1
Part# 25133
V. Base Corner Brace x2
Part#24322
R. Base Left Side x1
-Part# 25117
S. Base Right Side x1
Part# 25118
U. Joint Cover x1
Part# 25132
G. Back Panel-Upper x1
Part# 25129
H. Back Panel-Middle x1
Part# 25130
T. Back Panel-Lower x1
Part# 25131
3

4
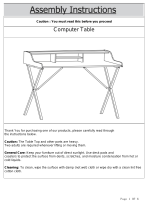
PARTS:
FF. WOOD DOWEL 30mm x28
KK. Metal Plate x2
M4 Allen Wrench x1
AA. 80mm Bolt x4
GG. 30mm Bolt x20
CC.50mm Bolt x4
HH. shelf Support x4
EE. Washer Head Screw 15mm x51
BB. Plastic Crescent
Washer x8
DD. 70mm Bolt x8
Hardware kits part# 24153
Phillips Screwdriver
(not supplied)
M4 Ballend Screw Driver Hex Wrench

2. Align the bolt with the hole in the end of the rail, align the
dowels in the end of the rail with the with the holes in the
post. Slide together until tight.
3. Slide the Plastic Crescent Washer over the exposed bolt,
behind the head of the bolt. Tighten the bolt with the Allen
Wrench provided.
Use the Hex WrenchEnsure all bolts are tightened.
Install (1) bolt and (1) crescent washer at a time.
Using the Hex Head Screwdriver,
Tighten until it looks like the picture.
1. Insert the Dowels in the Rail into the holes in the Post.
HARDWARE SYSTEM - REVIEW BEFORE ASSEMBLY
Plastic Crescent Washer
70mm Bolt
5

STEP #1
6
FF. WOOD DOWEL
30mm x6
DD.70mm Bolt x3
BB. Crescent
Washer x3
Attach the Bottom Back Rail (Part E), Front Rail (Part C) and
Top Back Rail (Part D) to the Left Side (Part A). Install (6) Dowels (Part FF) as shown. Attach the
rails to the Left Side using (3) 70mm Bolts (Part DD) and (3) Crescent Washers (Part BB).
Install and tighten the Bolts following the directions on page 5.
DD
BB
FF
FF
DD
BB
BB
DD
FF
FF
E
C
D

Attach the Fixed Shelf (Part L), to the Left Side using(2) Wood Dowels (Part FF) and (2)
30mm Bolts (Part GG) through the Fixed Shelf .
Install and tighten the Bolts following the directions on page 5.
Then install (8) Wood Dowels (Part FF) in ends of the rails and Shelf as shown.
FF. WOOD DOWEL
30mm x10
GG. 30mm Bolt x2
FF
FF
FF
FF
FF
L
FF
FF
GG
GG
7
STEP #2

Carefully align all of the Dowels with the holes in the Right Side (Part B). Attach the Right Side
using (3) 70mm Bolts (Part DD) and (3) Crescent Washers (Part BB).
Install and tighten the Bolts following the directions on page 5.
Then install (2) 30 Bolts (Part GG) through the Fixed Shelf. Tighten all bolts with Allen Wrench.
DD.70mm Bolt x3
BB. Crescent
Washer x3
GG. 30mm Bolt x2
GG
BB
BB
DD
DD
BB
DD
8
STEP #3

CC.50mm Bolt x4
STEP #4
GG. 30mm Bolt x8
FF. WOOD
DOWEL 30mm x4
GG
CC
9
Attached the Top Panel (Part F) to the base of the case. Ensure (4) Dowels (Part FF) from the Side
are aligned properly before installing any bolt. Install (4) 50mm Bolts (Part CC) through the Back
Rails, and (4) 30mm Bolts (Part GG) through the Top Front Rail, then install (4) 30mm Bolts (Part
GG) through the Sides. Tighten all bolts with the Allen Wrench.
GG
GG
CC GG
CC GG
CC
GG
GG
FF
F
FF
FF
FF

STEP #5
EE. Washer Head Screw x30
G
T
Attach Back Panel - Upper (Part G) and Back Panel - Lower (Part T) using (30) Washer Head
Screws (Part EE). Tighten with a Phillips Screwdriver.
10

STEP #6
EE. Washer Head Screw x13
H
11
Insert The Joint Cover Rail (Part U)
on the Back Panel - Lower, then
insert the back Panel - Middle
(Part H) into the slot of Joint Cover
Using (13) Washer Head Screws
(Part EE). Tighten with a Phillips
Screwdriver.
To use as a Hutch go to Step 12.
To use as a Book Case go to
Step 7.
U

STEP #7
FF. WOOD
DOWEL 30mm x6
BB. Crescent
Washer x2
GG. 30mm Bolt x2
DD
BB
FF
12
DO NOT complete this step if using
as a Hutch. This step is for Bookcase
ONLY
Attach the Front Rail (Part J) to the Book Shelf Left Side and Book Shelf Right Side (Parts R and S)
using (4) Dowels (Part FF), (2) 70mm Bolts (Part DD) and (2) Crescent Washers (Part BB). Install
and tighten the Bolts following the directions on page 5. Attach (2) Corner Braces (Part V) using (2)
Dowels (Part FF) and (2) 30mm Bolts (Part GG), Tighten all bolts with Allen Wrench.
DD. 70mm Bolt x2
GG
FF
FF
R
S
J

STEP #8
GG. 30mm Bolt x6
GG
FF. WOOD
DOWEL 30mm x2
Attach the Book Shelf Bottom (Part N) to the base of the bookcase using (6) 30mm Bolts (Part GG)
and (2) Dowels (Part FF). Tighten with the Allen Wrench.
GG
GG
GG
GG
N
FF
GG
FF
13

AA
14
DO NOT complete this step if using as a Hutch.
This step is for Bookcase ONLY.
Install (4) 80mm Bolts (Part AA) through the Book Shelf Sides.
Tighten all bolts with the Allen Wrench.
AA. 80mm Bolt x4
STEP #9

HH
15
STEP #10
HH. Shelf Support x4
Insert (4) Shelf Supports (Part HH) in to the predrilled holes in the side.
HH
HH
HH

16
STEP #11
Insert the Removable Shelf (Part K) in the Hutch and place shelf on the supports.

17
BOOKCASE ASSEMBLY

18
KK
EE
DO NOT complete this step if assembled as a Bookcase.
This step is for Hutch ONLY.
KK. Metal Plate x2
STEP #12
EE. Washer Head Screw x8
Place the Hutch onto the Dresser Base Unit NOT Included - See Retail Store or Contact Delta
Children's Products. Install (2) Metal Plates (Part KK) to back of the Hutch, using (4) Screws (Part
EE) into the pre-drilled holes. Install (4) Screws (Part EE) into the back of Double Dresser into the
pre-drilled holes. Tighten with a Phillips Screwdriver.

19
STEP #13
HH. Shelf Support x4
Insert (4) Shelf Supports (Part HH) in to the predrilled holes in the side.
HH
HH
HH
HH

20
STEP #14
Insert the Removable Shelf (Part K) in the Hutch and place shelf on the supports.
DO NOT use the Removable Shelf when using base unit as a changing surface.
1/22