Page is loading ...


Navigil S1 user guide 1.06 Page 2 of 28
© 2016 Navigil Ltd - www.navigil.com
GENERAL NOTE
THIS DOCUMENT CONTAINS INFORMATION ON NAVIGIL PRODUCTS. THE SPECIFICATIONS IN THIS
DOCUMENT ARE SUBJECT TO CHANGE WITHOUT PRIOR NOTICE. THE RECIPIENT SHALL NOT TRANSFER,
COPY, MODIFY, TRANSLATE, REVERSE ENGINEER, CREATE DERIVATIVE WORKS; DISASSEMBLE OR
DECOMPILE THE PRODUCT OR OTHERWISE USE THE PRODUCT EXCEPT AS SPECIFICALLY AUTHORIZED. THE
PRODUCT AND THIS DOCUMENT ARE PROVIDED ON AN "AS IS" BASIS ONLY AND MAY CONTAIN
DEFICIENCIES OR INADEQUACIES. TO THE MAXIMUM EXTENT PERMITTED BY APPLICABLE LAW, NAVIGIL
LTD DISCLAIMS ALL WARRANTIES AND LIABILITIES. THE RECIPIENT UNDERTAKES FOR AN UNLIMITED
PERIOD OF TIME TO OBSERVE NON-DISCLOSURE REQUIREMENTS REGARDING ANY INFORMATION AND
DATA PROVIDED TO HIM IN THE CONTEXT OF THE DELIVERY OF THE PRODUCT. THIS GENERAL NOTE SHALL
BE GOVERNED AND CONSTRUED ACCORDING TO FINNISH LAW.
Copyright
Transmittal, reproduction, dissemination and/or editing of this document as well as utilization of its
contents and communication thereof to others without express authorization are prohibited. Offenders
will be held liable for payment of damages. All rights created by patent grant or registration of a utility
model or design patent are reserved.
Copyright © 2016, Navigil Ltd
Trademark Notice
Navigil is a registered trademark of Navigil Ltd. All registered trademarks or trademarks mentioned in this
document are property of their respective owners.

Navigil S1 user guide 1.06 Page 3 of 28
© 2016 Navigil Ltd - www.navigil.com
Contents
1 S1 at a glance .............................................................................................................. 6
1.1 S1 overview ...................................................................................................................................... 6
1.2 Accessories ....................................................................................................................................... 7
1.3 Buttons ............................................................................................................................................. 7
1.3.1 Help request call .................................................................................................................. 7
1.3.2 Menu button ........................................................................................................................ 8
1.3.3 Function buttons in the watch bezel .................................................................................... 8
1.4 LEDs .................................................................................................................................................. 9
1.5 Speaker and microphone ................................................................................................................. 9
1.6 Analog watch ................................................................................................................................... 9
1.7 Wearing the S1 ................................................................................................................................. 9
1.8 S1 display status icons ..................................................................................................................... 9
2 Getting Started ......................................................................................................... 11
2.1 Charging ......................................................................................................................................... 11
2.2 Setting up ....................................................................................................................................... 12
2.2.1 S1 ready for setup .............................................................................................................. 12
2.2.2 Setting up Rafael service.................................................................................................... 12
2.3 Using the Rafael service ................................................................................................................. 15
3 Using S1.................................................................................................................... 16
3.1 S1 profiles....................................................................................................................................... 16
3.1.1 Track profile ....................................................................................................................... 16
3.1.2 Auto profile ........................................................................................................................ 16
3.1.3 Easy profile ........................................................................................................................ 17
3.1.4 Full profile .......................................................................................................................... 17
3.1.5 Profile default values ......................................................................................................... 17
3.2 Making Help Request calls ............................................................................................................. 18
3.2.1 Help requests call in normal mobile network conditions ................................................... 18
3.2.2 Help requests call when S1 is not connected to a mobile network .................................... 19
3.3 Making a speed dial call ................................................................................................................. 19
3.4 Answering a call ............................................................................................................................. 21
3.5 Changing the S1 mode ................................................................................................................... 21
3.6 The S1 location reporting ............................................................................................................... 22
3.6.1 Report emergency location ................................................................................................ 22
3.6.2 Report location always ...................................................................................................... 23
3.6.3 Tracking outside of home beacon range ........................................................................... 23
3.6.4 Emergency tracking ........................................................................................................... 24
4 Safety, Handling and Support .................................................................................... 25
4.1 Guidelines for Safe Use .................................................................................................................. 25
4.1.1 Recommendations for safe use of the S1 .......................................................................... 25
4.1.2 Home beacon power supply .............................................................................................. 25
4.1.3 S1 Battery .......................................................................................................................... 25
4.1.4 Disposal of an used S1 and battery ................................................................................... 26
4.2 Charging of the S1 .......................................................................................................................... 26
4.3 Repair ............................................................................................................................................. 26
4.4 Strap replacement ......................................................................................................................... 26
4.5 Export regulations .......................................................................................................................... 26
4.6 End user license agreement ........................................................................................................... 27
4.7 GPS/GLONASS, home beacon and mobile network location ......................................................... 27
4.8 Help request calls ........................................................................................................................... 27

Navigil S1 user guide 1.06 Page 4 of 28
© 2016 Navigil Ltd - www.navigil.com
4.9 Medical devices .............................................................................................................................. 28
4.10 Specific Absorption Rate (SAR) and Radio Frequency (RF) exposure ............................................ 28
4.11 S1 support information .................................................................................................................. 28
4.12 Battery replacement ...................................................................................................................... 28

Navigil S1 user guide 1.06 Page 5 of 28
© 2016 Navigil Ltd - www.navigil.com
DOCUMENT HISTORY
Rev. #
Notes
Date
1.00
Initial release
10.9.2014
1.01
Firmware 1.4.8 updates
03.11.2014
1.02
Profile and Geofence update
18.12.2014
1.03
Firmware 1.4.15 updates
12.02.2015
1.04
Firmware 1.5.X updates
04.08.2015
1.05
Firmware 1.5.9 updates
23.08.2015
1.06
Rafael service updates
10.02.2016
Complementary reading
The following Navigil reference documents are complementary reading for this document. All operating
and firmware related documentation is also available at navigil.com/support
Ref. #
Document Name
1
Rafael service user guide
S1 device HW and SW requirements
This document describes features of the following S1 device HW and SW version.
HW version
SW version
S1 HW revision D or later
S1 SW version 1.5.15 or later
Instructional icons
Warning: situations that could cause injury to yourself, others or may damage a
device
Note: notes, usage tips, or additional information

Navigil S1 user guide 1.06 Page 6 of 28
© 2016 Navigil Ltd - www.navigil.com
1 S1 at a glance
1.1 S1 overview
This user guide describes the use of the Navigil S1 wearable personal safety wristwatch. Please refer to the
Rafael service user guide [Ref #1] for instructions on how to configure and manage the S1 wristwatch. The
S1 wristwatch is primarily designed for assisting persons who may require help in order to manage their
day to day life. It is also well suited for lone workers. There are four profiles which are each designed for a
specific assistee groups:
Track profile for persons with dementia or Alzheimer’s disease
Auto profile for persons with poor dexterity
Easy profile for persons with fair dexterity
Full profile for persons with good dexterity including lone workers
The most commonly function of the S1 wristwatch is to show the time. The safety requirements are
catered for by mobile phone capabilities for making help request calls, normal calls and receiving calls as
well as the mobile data communications with the Rafael service. S1 wristwatch has an inbuilt
GPS/GLONASS receiver enabling accurate location information of the S1 wearer to be sent to the Rafael
service when the wearer is outdoors. In the event that GPS/GLONASS location cannot be acquired mobile
network cell location or home beacon location can be reported to the Rafael service.
The S1 wristwatch features such as color, type of strap and language may vary depending on the model
and software version of the S1 wristwatch. Some of the features available depend on your location and
mobile network carrier. Key features of the S1 wristwatch are:
The S1 also has a Bluetooth Low Energy link that can be used to detect the proximity of a home beacon
and more importantly the loss of contact with the home beacon.
S1 also has a vibrator to assist persons with hard of hearing or poor eye sight with the use of the S1. The
S1 speaker is also used as part of the user interface.
Analog watch
GREEN LED
Help request call crown
Help request call button
Speaker
YELLOW LED
RED LED
Display
Charging contacts
Microphone

Navigil S1 user guide 1.06 Page 7 of 28
© 2016 Navigil Ltd - www.navigil.com
1.2 Accessories
The following accessories are provided with S1 (these may vary depending on model and region).
Home beacon
USB cable
Charger
1.3 Buttons
The S1 wristwatch has four buttons and a crown. The four buttons on the watch bezel are hidden inside
the watch mechanics and there are no mechanical buttons visible. Press firmly the watch bezel at 3, 6, 9 or
12 o’clock and when the button is activated the watch gives a haptic feedback and the selected action is
activated. The crown button is the only visible mechanical button.
The help request button is located at 6 o’clock in the wristwatch bezel and/or in the crown button. In
some versions it is marked with a red or green area. The UP button is located at 12 o’clock in the bezel.
The CALL / YES button is located at 3 o’clock in the bezel. The CANCEL / NO button is located at 9 o’clock in
the bezel. The buttons and crown are enabled or disabled depending on the profile selected.
1.3.1 Help request call
User can make a help request call by pressing the bezel at 6 o’clock OR by pressing and holding down the
Crown button. Available function and button delay may vary depending on used device profile.
Make help request call – Crown button
Press the Crown button and hold down to initiate a help request call. The S1 vibrate shortly and the
display will show SOS with background animation. This function is active in Auto, Easy and Full profiles.
The Crown button is also used to access Menu in Easy and Full profiles. The default time limits for Crown
button are:
Profile
Crown delay
Action
UP
CALL / YES
Help request call / MENU button
Help request call button
CANCEL / NO

Navigil S1 user guide 1.06 Page 8 of 28
© 2016 Navigil Ltd - www.navigil.com
FULL / EASY
< 0,3 sec
Access Menu
FULL / EASY
> 0,8 sec
Make Help Request call
AUTO
> 0,3 sec
Make Help Request call
TRACK
Disabled
None
Make help request call – Bezel 6 o’clock
Press the bezel at 6 o’clock to initiate a help request call. When the button is pressed the S1 will vibrate
shortly and the display will show SOS with background animation. When the button has been pressed
down for 0,3 seconds the help request call is made. This button is active in Auto, Easy and Full profiles.
1.3.2 Menu button
Press the crown with your finger to access the menu. The menu is active in Easy and Full profiles. When
the crown is pressed briefly the YELLOW and RED LEDs start blinking to indicate that buttons near them
can be pressed.
The Crown button is also used to make a help request call by pressing it more than 0,8 seconds. See
details on Crown button delays in chapter 1.3.1.
1.3.3 Function buttons in the watch bezel
Buttons are located at 3 o’clock (CALL/YES), at 9 o’clock (CANCEL/NO) and at 12 o’clock (UP).

Navigil S1 user guide 1.06 Page 9 of 28
© 2016 Navigil Ltd - www.navigil.com
Please note that button functions are enabled or disabled depending on selected S1 profile. In Track
profile none of the buttons are operational. In Auto profile the 3 o’clock, 9 o’clock and 12 o’clock buttons
show the battery level in the display. In Easy and Full profile all buttons are operational.
Note: In some device configuration in the Auto profile the help request call is done
with the crown button only.
1.4 LEDs
The S1 has three LEDs that indicate the charging level of the internal battery and that help the wearer to
use the S1.
When the S1 is in idle state one of the three LEDs blinks at five second intervals. The blinking GREEN LED
at 3 o’clock indicates that the S1 internal battery status is OK. The blinking YELLOW LED at 12 o’clock
indicates that battery status is low and that the S1 should be charged soon. The blinking RED LED at 9
o’clock indicates that the S1 battery status is critical and that it should be charged immediately. The
respective statuses are also sent to the Rafael service so that caregivers know the state of the S1 battery.
When the S1 is in active state the blinking LED indicates that a button near the LED can be pressed.
1.5 Speaker and microphone
S1 has a powerful speaker directed towards the wearer. The microphone is located in the side of the
watch body at 2 o’clock. During a phone call please keep the S1 approximately 25 cm away from your
mouth if possible. This is an optimum position for best sound quality for the S1 speaker and microphone.
The speaker volume can be easily adjusted using the Rafael service.
1.6 Analog watch
The S1 has an analog watch function. The time shown by the S1 is synchronized with the Rafael service.
The time zone selection can be easily done with the Rafael service. The watch hands will move away from
the display area if there is something to be shown in the display. When the display is turned off the watch
hands resume their correct locations. Please note that there is a watch hand position sensor near the 9
o’clock LED in the watch face. Occasionally the S1 checks the position of the watch hands by moving the
hands over the sensor. The watch hand calibration may fail if a bright light impairs the sensor during
calibration. The watch will recalibrate the hands later automatically. It is also possible to initiate the
calibration process with the Rafael service if the time shown by the watch is incorrect.
1.7 Wearing the S1
The S1 has been built so that it can be used in everyday life without too many limitations. The wristwatch
itself is splash water proof but like any wristwatch it may fog up if exposed to extreme temperature
changes or submerged in water. It is not recommended that the S1 is worn in sauna or other
environments where similar extreme temperatures changes can occur. It is recommended that the S1 is
kept clean and dry. The mineral glass of the wristwatch may break if a direct impact hits the glass.
1.8 S1 display status icons
The S1 has a two row OLED display. The display is operational when a call is being made and when the
crown has been pressed in Easy and Full profiles. It is also operational for a short period of time when the
S1 is placed into the charging dock. The display icons are explained the in the table below.

Navigil S1 user guide 1.06 Page 10 of 28
© 2016 Navigil Ltd - www.navigil.com
Status icon
Icon name
What it means
Battery
Shows S1 battery level or charging status.
Home beacon
Device has a connection to a home beacon.
GPS
When the icon is steady the S1 has successfully acquired
a GPS location. When this icon is blinking, it means that
S1 is in the process of acquiring a GPS location.
Tracking
The icon is shown when tracking is activated.
Call
You have an active voice call ongoing.
Data transfer
When the icon is shown the device is uploading or
downloading data.
Mobile network
You are in range of the mobile network. S1 can make
and receive phone calls and it has connection to Rafael
service. Number of the coverage bars indicates the
strength of mobile network signal; more bars indicate
better signal strength.
Mobile network
If the S1 is not connected to a GSM network you will see
a network icon with a cross.
Flight mode
Your S1 is set to flight mode and all S1 radios are turned
off.
NAMES
Names menu
Access to speed dial name list (Easy and Full profiles).
MODE
Mode menu
Access to device mode menu (Full profile).

Navigil S1 user guide 1.06 Page 11 of 28
© 2016 Navigil Ltd - www.navigil.com
2 Getting Started
Warning: To avoid injury read section 4 Safety, Handling and Support before using
S1.
2.1 Charging
The S1 has an internal battery that provides power to the device. It must be charged regularly in order for
the S1 to work properly.
Connect the charger with the provided USB cable to the home beacon.
Connect the charger to a power outlet. The blue LED on the right will be lit for couple of seconds
when home beacon is first powered to indicate that the home beacon is working normally. The
blue LED will turn off automatically in order not to disturb the wearer during sleep if the home
beacon is placed on a night stand.
Place the home beacon onto a steady flat surface such as a table. Please keep the home beacon
dry and where possible away from direct sunlight and excess heat sources.
Do not touch the charging contacts in the charging dock as excess force may deform them.
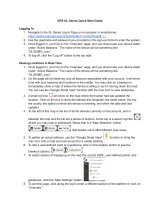
Prior to using the S1 device for the first time it must be charged. The initial charging time is approximately
one and half hours if the battery is completely empty.
Please place the S1 into the home beacon charging dock as shown in the picture above. Please
make sure that the S1 straps are folded back as shown so that the S1 will be properly seated in the
charging dock. The S1 will beep when it has been properly seated in the dock. The left home beacon
LED will be lit.
When the S1 is placed into the charging dock for the first time the S1 display will show SETUP.
During charging the S1 YELLOW LED at 12 o’clock is lit and the battery icon will show an animated
charging sequence. The left LED of the home beacon is RED when charging is taking place.
When the battery is fully charged in the battery icon all four battery level bars are lit and the S1
GREEN LED at 3 o’clock is lit. The left LED of the home beacon will turn GREEN when the S1 battery
is fully charged. Please note that the left LED of the home beacon may remain RED for a period of
time after S1 display shows BATT FULL.
When the S1 has been setup in the Rafael service the SETUP display will change either to
CHARGING or to BATT FULL. Please note that the S1 will calibrate the watch hands when leaving
from the SETUP state. Please refer to section 2.2 for instructions on how the set the S1 up in the

Navigil S1 user guide 1.06 Page 12 of 28
© 2016 Navigil Ltd - www.navigil.com
Rafael service by using the user name and password provided in the label inside the S1 delivery
box lid.
When the S1 is placed in the charging dock all bezel button functions are disabled and device screen
turns OFF after 10 seconds. By pressing the crown button the S1 display is turned ON for 10 seconds
to show the S1 status, network and battery level.
2.2 Setting up
In order to use the S1 it must configured using the Rafael service. A new S1 has been put into a SETUP
mode at the factory and powered off for shipment. The S1 will remain in SETUP mode until it has been
configured using the Rafael service.
2.2.1 S1 ready for setup
During the initial charging period the S1 display will show SETUP. This indicates that S1 is in a setup
mode. Please note that if you remove the S1 from the charging dock in SETUP mode the S1 will turn itself
off automatically. Please keep the S1 in the charging dock for the duration of the configuration. Please
wait until the S1 mobile network icon shows at least one bar and the battery is fully charged. The fully
charged state is indicated by GREEN LED on S1 dial near 3 o’clock and by steady battery icon with all four
bars visible. Please note that it is normal for the S1 to move the watch hands during the setup period.
NOTE: Connection to a mobile network is required in order to complete the S1 setup. If mobile network is
not available for S1 in a couple of minutes please move the S1 to another location where mobile network
is available.
2.2.2 Setting up Rafael service
Please login to the Rafael service (https://sfi1.navigil.com/) using the username and password which are
printed on the label inside the lid of the S1 package. The Rafael language can be select by clicking the
language flag.

Navigil S1 user guide 1.06 Page 13 of 28
© 2016 Navigil Ltd - www.navigil.com
2.2.2.1 Device wearer name
Please fill in the first and the last name of the person wearing the device and click next.
2.2.2.2 Define speed dial numbers
Define phone numbers which can receive help request calls from S1 and which can make calls to S1.
Define the name and phone number of the first person in the list of help request call recipients. Fill in the
name of the person into NAME field and the phone number into the TEL. field. The name is shown in the
log for calls and events. The phone number should be entered in the format cccnnnnnnn where the ccc is
the country code and the nnnnnnn is the phone number (for example 358400999999). Please don’t use
international call prefixes such as + or 00. Please click HELP REQUEST toggle ON. Click ADD NEW SPEED
DIAL NUMBER to enter additional speed dial entries.
You may add up to eight persons to speed dial list and individually define whether a person will be
receiving help request calls. Click ADD NEW SPEED DIAL NUMBER and enter required information. Turn
ON help request toggle for persons who wish to receive help request call. The help request call routing
logic will attempt to reach the persons in the order they appear in the speed dial list unless availability and
unavailability settings remove a person from the call routing sequence.
2.2.2.3 Activate call centre service
You may also activate the CALL CENTRE SERVICE by clicking the toggle to ON. A help request call will be
forwarded to a call centre in the event that none of the caregivers defined in the SPEED DIAL list is
reachable. Please note that this option is available only if your service provider offers such a service.

Navigil S1 user guide 1.06 Page 14 of 28
© 2016 Navigil Ltd - www.navigil.com
2.2.2.4 Define home beacon name and location
The S1 wristwatch uses the signal transmitted by a home beacon to determine if the assistee is at home.
The home beacon nickname will be shown in the event log. Please define the home beacon nickname by
entering it into the NICKNAME field and the home beacon location by entering the STREET ADDRESS
where it is located. The street address will be used to position the home beacon icon in the map view.
Please note that in order to correctly position the home beacon the map also city and country information
may be required in the STREET ADDRESS field.
2.2.2.5 Create user account
You need to create a user account for yourself in order to use the Rafael service after the set up. Please
enter your first name into FIRST NAME field and your last name into the LAST NAME field. Please enter
your e-mail address to the EMAIL field. The e-mail address will be used as your user name in subsequent
login into the Rafael service. Please define a password for yourself by entering you chosen password into
the PASSWORD field and REPEAT THE PASSWORD fields. The minimum length of the password is 6
characters. You may ask the Rafael service to send you the login and password information to you e-mail
by selecting the SEND LOGIN AND PASSWORD BY EMAIL.
2.2.2.6 Activation of the S1
Once you have entered required information and clicked ACTIVATE DEVICE Rafael service will send the
configuration information to the S1 and change the S1 state from setup to in use.
Note: Make sure that the S1 is fully charged and is showing a minimum of one bar in
the mobile network icon prior to clicking the ACTIVATE DEVICE button.

Navigil S1 user guide 1.06 Page 15 of 28
© 2016 Navigil Ltd - www.navigil.com
The Rafael service will send instructions to the S1 to download the speed dial list and other relevant
settings. This may take a few minutes. During this process the S1 will calibrate the watch hands. Once the
setup process is complete the S1 display will show either BATT FULL or CHARGING depending on the
state of the battery level.
Note: Depending on network carrier used by the S1 it may take few minutes to
complete the activation. If S1 is not activated after 5 minutes please login to Rafael
service and reinitiate the activation.
Note: The S1 display is automatically turned off after 10 seconds. Press the crown
button to turn on the display.
2.3 Using the Rafael service
Please check Ref #1 for more detail information how to use the Rafael service.

Navigil S1 user guide 1.06 Page 16 of 28
© 2016 Navigil Ltd - www.navigil.com
3 Using S1
This section describes how the S1 wristwatch is operated and features of the four S1 profiles.
3.1 S1 profiles
The S1 has four profiles which are tailored for each wearer group.
Track profile is best suited for persons with dementia or Alzheimer’s disease.
Auto profile is suited for persons with poor dexterity.
Easy profile is suited for persons with fair dexterity.
Full profile is suited for persons with good dexterity including lone workers.
3.1.1 Track profile
Track profile is intended for assistees who suffer from dementia or Alzheimer’s disease. In this profile the
device user interface is disabled. Thus the assistee can press any button as many times as they wish
without causing help request calls to be initiated and without concern on assistee being able to change
the device settings.
In the Track profile the device will automatically receive calls made by persons on the speed dial list or by
the alarm centre service personnel. The call can be only terminated by the caller.
In the Track profile the S1 will regularly check if a home beacon is in range. If no home beacon is found the
S1 will send an alarm to the Rafael service and turns the GPS receiver on. The S1 will send location reports
to the Rafael service so that a caregiver or a professional alarm centre operator can locate the assistee
using the map view.
When the assistee returns to the range of the home beacon the home beacon alarm is automatically
cleared.
It is also possible to use geofence regions as a source of automatic location alarms. In this case it is
advisable to turn off the HOME BEACON ALARM toggle in the advanced settings and rely on geofence
alarms. When using geofences please make sure that TRACKING OUTSIDE OF HB RANGE and REPORT
LOCATION ALWAYS toggle are turned ON (see more details on Ref #1).
Geofence areas are geographical areas defined by points that make up polygons, circles or paths. A
geofence can also be a combination of these elements. One polygon geofence area can have up to 4.000
points. Geofences can also have additional attributes such as time. Please refer to Ref #1 for further
details on how to use the geofence feature.
3.1.2 Auto profile
Auto profile is intended for assistees who have their full faculties but have poor dexterity. In this profile
the device user interface has just bare minimum functions enabled. The assistee can press either the
alarm button or the crown in the S1 to initiate a help request call. Other buttons in the S1 can be used to
check the battery status of the S1. As the assistee has no access to settings there is no concern on the
assistee being able to change the device settings by mistake.
In the Auto profile the device will automatically receive calls made by persons on the speed dial list or by
the alarm centre service personnel. A received call or a help request call can be terminated only by the
caregiver or the call centre operator.
By default the reports sent by the S1 include location information only in the help request call reports.

Navigil S1 user guide 1.06 Page 17 of 28
© 2016 Navigil Ltd - www.navigil.com
3.1.3 Easy profile
Easy profile is intended for assistees who have their full faculties and have good dexterity. In this profile
the device user interface has additional functions enabled. The assistee can press the alarm button or the
crown button to initiate a help request call. In idle state other buttons in the S1 can be used to check the
battery status of the S1. The assistee can press the crown briefly in order to access the speed dial NAMES
list. This enables the assistee to make normal calls to persons in the speed dial list. Please refer to section
3.3 for further information on how to use this feature. As the assistee has no access to settings there is no
concern on the assistee being able to change the device settings by mistake.
In the Easy profile the assistee has the option to either accept an incoming call by pressing YES or to reject
it by pressing NO. Please refer to section 3.4 for further information on how to answer calls. A call can be
terminated either by the assistee or by the other party.
By default the reports sent by the S1 include location information only in the help request call reports.
3.1.4 Full profile
Full profile is intended for lone workers and other S1 users. In this profile the S1 user interface has all
functions enabled. The end user can press the alarm button or the crown button to initiate a help request
call. In idle state other buttons in the S1 can be used to check the battery status of the S1. The S1 user can
press the crown briefly in order to access the speed dial NAMES list and MODE menus. This enables the
end user to make normal calls to persons in the speed dial list. Additionally the S1 user has the possibility
to set the S1 into SILENT, FLIGHT, NORMAL and STEALTH modes. Please see section 3.5 for further
information on how to change the mode.
In the Full profile the S1 user has the option to either accept an incoming call by pressing YES or to reject it
by pressing NO. A call can be terminated either by the S1 user or by the other party.
By default only the help request call reports include location information.
3.1.5 Profile default values
The Rafael service and the S1 software main features and their default values in each profile are described
in the tables below. User can modify the Rafael defaults value on device settings page. More information
can be found in Ref #1.
Rafael device settings profile default values:
Feature
Track
Auto
Easy
Full
Emergency Tracking (toggle on the device front page banner)
OFF
OFF
OFF
OFF
Home beacon alarm
ON
OFF
OFF
OFF
Tracking outside of HB range
ON
OFF
OFF
OFF
Speed dial
OFF
OFF
ON
ON
Report location always
ON
OFF
OFF
OFF
Report emergency location
ON
ON
ON
ON
Always on-line
ON
ON
ON
ON
Help request call confirmation
OFF
OFF
OFF
OFF
Statistics reporting enabled
OFF
OFF
OFF
OFF
Man down alarm enabled
OFF
OFF
OFF
OFF
No movement alarm enabled
OFF
OFF
OFF
OFF

Navigil S1 user guide 1.06 Page 18 of 28
© 2016 Navigil Ltd - www.navigil.com
The default values for the S1 device user interface settings are defined the in the table below.
Device profile default values:
Feature
Track
Auto
Easy
Full
Help request call enabled
User can make a help request call by pressing the help call button
OFF
ON
ON
ON
Help request call crown button
User can make a help request call by pressing the S1 device crown button
OFF
ON
ON
ON
Call auto answer
S1 answers automatically to all incoming calls
ON
ON
OFF
OFF
S1 Mode menu
S1 user can press the crown button to access the S1 Mode menu
OFF
OFF
OFF
ON
Disconnect call
S1 user can disconnect call
OFF
OFF
ON
ON
Note: The default values of the S1 can’t be changed by the wearer.
3.2 Making Help Request calls
One of the most useful features of the S1 is the ability to make help request calls by a single push of a
button. A help request call can be made by pressing the Help request call button located at 6 o’clock in the
S1 bezel or by pressing the crown. Please note that in the Track profile the Help request button has been
disabled and no help request calls can be made.
Each profile has a unique help request call initiation delay. This delay defines how long the user has to
press the help request or the crown button to make a help request call.
Profile
Help request call initiation delay
FULL
0,8 seconds
EASY
0,8 seconds
AUTO
0,3 seconds
TRACK
0,3 seconds
3.2.1 Help requests call in normal mobile network conditions
Press firmly the bezel at the 6 o’clock area or the crown. The S1 will vibrate briefly when the button has
been actuated. The display will show SOS with an animation turning the background white from left to
right. When the button has been pressed for the required time the animation reaches the right side of the
display and the help request call is initiated. If the button is released prior to the end of the animation the
help request call is not placed. This purpose of the short delay is to avoid accidental help request calls.

Navigil S1 user guide 1.06 Page 19 of 28
© 2016 Navigil Ltd - www.navigil.com
When the help request call is initiated the S1 will vibrate for a second to tell the wearer that the call is
being made. At the same time the display will show that the SOS call initiation is in progress.
Shortly afterwards the S1 speaker will play a beeping sound sequence until the dial tone is available from
the mobile network. Depending on the mobile network connection time and number of caregivers that
are being reached the call connection time may vary. Typical call connection time is a few seconds if the
first number in the call sequence is reachable.
3.2.2 Help requests call when S1 is not connected to a mobile network
In the event that the S1 is outside of mobile network coverage help request calls cannot be successfully
connected. The mobile network icon in the S1 display will show as shown in the picture below.
If the ALWAYS ON-LINE toggle in the Rafael service has been turned OFF the S1 turns off its mobile
network module in order to save power. This is also indicated by the icon. When a call is initiated
the S1 will attempt to connect to the GSM network. If the network connection can’t be achieved in 10
minutes an error message will be displayed.
If the call cannot be immediately connected it is advisable that the S1 user moves to a location where
mobile network coverage is available if at all possible. If the connection cannot be established during the
10 minutes period the help request call attempt will be given up and NO NETWORK will be shown in the
S1 display.
3.3 Making a speed dial call
In the Easy and Full profiles the S1 is enabled to make speed dial calls. Please press the crown to access
the NAMES menu. The S1 display will light up and show NAMES and the YELLOW and RED LEDs will start
blinking.

Navigil S1 user guide 1.06 Page 20 of 28
© 2016 Navigil Ltd - www.navigil.com
Press the UP button at 12 o’clock to scroll through the speed dial list entries. If the speed dial list has just
one entry only that name will be displayed.
When the correct name is displayed press CALL button at 3 o’clock to place the call. The call icon will
appear to the left of the mobile network signal strength icon and the S1 plays a connect sound.
The call is terminated by pressing the CANCEL button at 9 o’clock. The call can also be terminated by the
other party. The S1 display will be turned off.
/