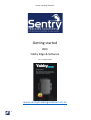
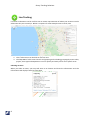
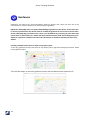
Sentry Yabby Edge: The ultimate independent GPS tracker with world-leading battery life, powered by the latest 4/5G IoT technology. Its IP67 housing ensures minimal maintenance and protection for your valuable assets. With GNSS, WiFi scanning, and 4G/5G connectivity, the device delivers precise location data even in challenging environments. Experience live tracking, geofencing, and comprehensive trip history. The robust construction and long battery life make it ideal for tracking vehicles, equipment, or any valuable assets that need to be monitored remotely.
Sentry Yabby Edge: The ultimate independent GPS tracker with world-leading battery life, powered by the latest 4/5G IoT technology. Its IP67 housing ensures minimal maintenance and protection for your valuable assets. With GNSS, WiFi scanning, and 4G/5G connectivity, the device delivers precise location data even in challenging environments. Experience live tracking, geofencing, and comprehensive trip history. The robust construction and long battery life make it ideal for tracking vehicles, equipment, or any valuable assets that need to be monitored remotely.


-
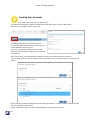
 1
1
-
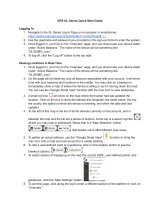
 2
2
-
 3
3
-
 4
4
-
 5
5
-
 6
6
-
 7
7
-
 8
8
-
 9
9
-
 10
10
-
 11
11
-
 12
12
-
 13
13
-
 14
14
-
 15
15
-
 16
16
-
 17
17
-
 18
18
-
 19
19
-
 20
20
-
 21
21
-
 22
22


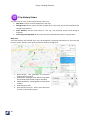
Sentry Yabby Edge: The ultimate independent GPS tracker with world-leading battery life, powered by the latest 4/5G IoT technology. Its IP67 housing ensures minimal maintenance and protection for your valuable assets. With GNSS, WiFi scanning, and 4G/5G connectivity, the device delivers precise location data even in challenging environments. Experience live tracking, geofencing, and comprehensive trip history. The robust construction and long battery life make it ideal for tracking vehicles, equipment, or any valuable assets that need to be monitored remotely.
Ask a question and I''ll find the answer in the document
Finding information in a document is now easier with AI
Other documents
-
CARTRACK GPS Vehicle and Fleet Mobile Application User guide
-
 Spycentre Security 9093 Quick start guide
-
GlobalStar BHG-SATTRACK-MICRO Owner's manual
-
MiniFinder Xtreme User guide
-
Amcrest AM-GL300 User manual
-
-
BrickHouse Security EON4 User manual
-
-
-
