Page is loading ...

L
80m
m
1:28
M
F
AF
1
1
4
4
2
2
22
2
0
0
5
ft
m
C
B
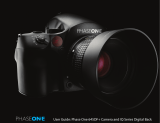
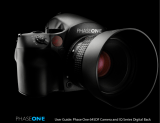
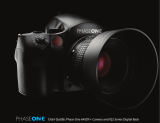
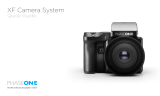
Quick Start Guide
1
Liquid Crystal Displays (LCD) - Main LCD
2
1. Attach Camera Battery
Line up the lens mount alignment
mark B with mark C on the camera
to fit the lens in place, then rotate it in
the direction of the arrow until it clicks
into place.
Remove the front body cap, just like
you would remove a lens, by pushing
the lens release button A backward
and then turn the front body cap
counter clockwise and lift out.
2. Attach and Remove a Lens
3. Attach Digital Back Battery
Remove the battery slot cover and slide the battery into the battery
bay on the bottom of the digital back
3
3. Turn on the Digital Back
Press and hold the On/Off button
on the camera back until the orange
light turns on, and then release the
On/Off button.
1. Turn on the Camera
Switch the drive dial to "S".
Choose your preferred exposure
mode using the exposure mode dial.
2. Insert and Format the
Compact Flash card
Insert the Compact Flash card and
format according to the Mamiya
DM User's Manual
Rubber eye piece
Auto bracketing icon Lens shutter icon
Synchro mode icon
AE lock icon
Program AE mode icon
Auto focus lock icon
Custom function icon
Aperture
User function icon
Repeat mode icon
Focal plane shutter icon
Mirror up mode icon
Focus area icon
Exposure compensation
Spot metering icon
Self timer icon
Dial lock ircon
Exposure compensation icon
Flash compensation icon
Remaining battery
power icon
Delay time
Auto focus assist infrared light
emission window
Self timer lamp
Self timer button
Interval button
Main LCD backlight button
Multiple exposure button
Focus point selector button
Set button
Flash auto adjustment
select button
Exposure
compensation button
Auto bracketing button
Diopter adjustment dial
Strap lug
Synchro terminal
Electronic shutter
release contact
Digital Back
AF lock button
Focus mode selector lever
Auto exposure lock button
AEL Exposure metering button
Lens release button
C
S
M.UP
L
Eyepiece shutter lever
Hot shoe
Main LCD
Exposure mode dial
Rear dial
Mirror*
*Do not touch the mirror
Strap lug
Electronic contacts
Front dial
Lens mount
alignment mark
Shutter release button
Drive dial
Depth of field preview
button
A
C
S
M.UP
L
Ensure the drive dial is set to L (off). Lift the battery case
and pull out the battery holder. Check batteries are
installed then return the battery holder and lock it.
• This Quick Start Guide shows the basic operations of your new
Mamiya DM System
• Download the Mamiya DM System User's Manual for advanced
operations of the camera, digital back and software
www.mamiya.com
www.phaseone.com
C
S
M.UP
L
2
1

6
Press the release button
a start shooting
7
8
1. Check exposure with the
Picker tool
2. Check exposure with the
Over-exposure and
Under-exposure alarms
1. Browse through your images
2. Roll the User Dial back and forward
to browse through your images
9
10
Capture One DB
Capture One DB software allows you to further optimize images
using highly advanced tools and quality to match any
photographer's daily workfow, whether tethered or untethered.
Download Capture One DB software:
www.phaseone.com
• Screen shots for MAC and Windows Capture One DB
license page
On Mac OS: On Window OS:
The user interface consists of four key sections:
i. The Menu and Tool Bar providing structured access to functions
found throughout the application.
ii. The Browser providing different views of images thumbnails,
different possibilities for rating, naming sorting and more.
iii. The Viewer providing a high quality rendition on the selected image,
all changes made to the image will instantly show.
iv. The Tool Tabs giving you access to all the core tools you need to
edit your images, such as color balance, exposure, sharpness etc.
1. Browse or Import Images
i. To import raw images into Capture One from anywhere
on your computer, select the library tool tab.
i
ii. When importing raw images from a Compact Flash
card, Capture One will open the import window
automatically.
3. Process
Select the output tab, defining format,
resolution and naming conventions.
After this hit 'Process' and your
modified images will be saved.
2. Adjustment
Adjust images by using
i. White balance, Color edit etc in Color tab.
ii. Exposure controls, Level adjustment in Exposure tab.
iii. Sharpness and details effects in Focus tab.
5. View information
i
iv iii
ii
ii
i ii iii
4. Set grey balance3. Check focus
P
A
v
T
v
M
X
C
F
C
1
C
2
C
3
2
2
2
5
2
.
2
5
0.7
0.
8
f
t
m
Camera
Settings
Shoot
View
Edit View
Set-up Menu
Remaining
Battery Power
Number of
remaining shots
Number of
images in the
current folder or
on the disk
Stylus
4
5
1. Select your interface language
2. Set the Date and Time
3. View and define camera settings
/