Page is loading ...

Chapter 1 - Basic info
9
Chapter 1 - Basic info
important care notes for the camera body
Maintenance and care of the camera
• Read instructions prior to use.
• Protect camera against shocks and falls by using the supplied neck strap whenever possible.
• Check the batteries frequently and always carry spares. The sealed batteries supplied with the
camera may have been subject to storage conditions which have reduced their service life.
• Wipe battery contacts before installation and watch correct polarity.
• Battery life varies, depending on frequency of use, type, age, storage condition, ambient
temperature (use external battery case in very cold weather), etc.
• Always remove the battery when camera is not used for a long period of time.
• Always keep covers on lenses and camera body.
• Do not store the camera at temperatures exceeding 40°C (105°F) and -10°C (15°F).
Avoid humid or sea air environments.
• Prolonged disuse shortens camera life. Periodically exercise the shutter (at different speeds),
lens diaphragms (at different apertures) and focusing mechanism.
• Protect camera against rain and moisture.
• Do not touch lens surfaces. Use blower or lens tissue to remove dust particles.
• Always test your equipment before going on important assignments.
The Importance of Proper Maintenance
The camera has mechanisms that are controlled by gears, levers, springs, etc., all of which
require occasional lubrication. Ambient conditins can also affect these mechanisms, as well as the
optical glass of the lenses. We recommend periodic servicing of the camera and lenses.

Chapter 1 - Basic info
11
GettinG to know your camera system
Product overview...........................................................................................................
Names of parts and functions.........................................................................................
LCD Displays.................................................................................................................
Viewfinder LCD..............................................................................................................
Liquid Crystal Display.....................................................................................................
Basic description of home screen on digital back.............................................................
Battery charger parts and functions.................................................................................
Note on batteries for camera (rechargeable vs. disposable)..............................................
Attaching the neckstrap..................................................................................................
Using the eyepiece shutter..............................................................................................
2
12
13
14
15
16
17
18
19
20
21

Chapter 1 - Basic info
12
Chapter 2 - Getting to know your camera system
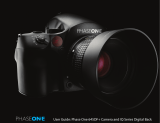
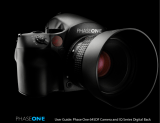
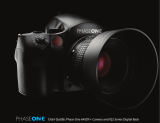
product overview
Mamiya DM Systems are digital solutions for photographers who take their art seriously and
passionately.
They have been manufactured to cater to photographers who want to take pro-level digital images
with a professional feel that only a medium format system can provide. The Mamiya DM Systems
boast 35mm handling and speed, fully customizable settings and top quality photographic results.
Images are shot in 16 bit RAW files with high resolution, exceptional color accuracy and exquisite
detail, of which not a single megapixel is squandered due to the premium quality 33, 28 and 22
megapixel sensors.
A comprehensive range of 16 precision lenses are available for the Mamiya DM System user,
all constructed drawing on over 60 years of experience and innovation.
For demanding daylight situations, there are three leaf shutter lenses, developed in collaboration
with renowned optical company Schneider Kreuznach.
For other photographic genres, there are lenses suited for landscapes, portraiture, fashion,
architecture, commercial and macro.

Chapter 1 - Basic info
13
Chapter 2 - Getting to know your camera system
names of parts and functions
Auto focus assist infrared light
emission window
Self timer lamp
Diopter adjustment dial
Strap lug
Synchro terminal
Electronic shutter release
contact
AF lock button
Focus mode selector lever
Lens release button
C
S
M.UP
L
Eyepiece shutter lever
Hot shoe
Main LCD
Exposure mode dial
Rear dial
Mirror*
*Do not touch the mirror
Strap lug
Electronic contacts
Front dial
Lens mount
alignment mark
Shutter release button
Drive dial
Depth of field preview
button

Chapter 1 - Basic info
14
Chapter 2 - Getting to know your camera system
names of parts and functions
lcd displays
Rubber eye piece
Self timer button
Interval button
Main LCD backlight button
Multiple exposure button
Focus point selector button
Set button
Flash auto adjustment
select button
Exposure
compensation button
Auto bracketing button
Digital back
Auto exposure lock button
AEL Exposure metering button
Auto bracketing icon Lens shutter icon
Synchro mode icon
AE lock icon
Program AE mode icon
Auto focus lock icon
Custom function icon
Aperture
User function icon
Repeat mode icon
Focal plane shutter icon
Mirror up mode icon
Focus area icon
Exposure compensation
Spot metering icon
Self timer icon
Dial lock ircon
Exposure compensation icon
Flash compensation icon
Remaining battery
power icon
Delay time

Chapter 1 - Basic info
15
Chapter 2 - Getting to know your camera system
viewfinder lcd
Auto focus area frame
During actual use, only the relevant icons and indicators are displayed.
During actual use, only the relevant icons and indicators are displayed.

Chapter 1 - Basic info
16
Chapter 2 - Getting to know your camera system
liquid crystal display
Liquid Crystal Display
Due to the limitations of the space and letters, words and letters on
the LCD are abbreviated.
Display examples of the main LCD
Display examples in the custom function mode

Chapter 1 - Basic info
17
Chapter 2 - Getting to know your camera system
basic description of home screen on diGital back
Camera
settings
Shoot
view
Edit view
Set-up menu
Remaining
battery power
Number of
remaining shots
Number of images
in the current folder
or on the disk
Stylus

Chapter 1 - Basic info
18
Chapter 2 - Getting to know your camera system
diGital back charGer and battery
The Mamiya DM System is sold with a Haenel MCL 103 battery charger with 12 volt DC power
supply and a set of 5 international socket plugs. The lithium ion battery is 2350Ah power.

Chapter 1 - Basic info
19
Chapter 2 - Getting to know your camera system
note on batteries for camera (rechargeable vs. disposable)
In addition to disposible alkaline or lithium batteries, rechargeable nickel-metal hydride (Ni-MH) or
nickel-cadium batteries can be used. In this case, custom setting 04 (battery type) on the camera
body must be changed to #1 (Ni-CD, Ni-MH). Do not mix different types of batteries or old ones
with new ones, and ensure the batteries are placed with the correct polarity.

Chapter 1 - Basic info
20
Chapter 2 - Getting to know your camera system
attachinG the neckstrap
Put the neck strap through the mounts and secure it using the buckle as illustrated.
After attaching the strap, pull it to make sure it does not loosen at the buckle.
Caution:
To ensure safety, pull the ends of the strap taut, and check that they are fastened securely to the
metal mounts on the camera.
C
M
.U
P

Chapter 1 - Basic info
21
Chapter 2 - Getting to know your camera system
usinG the eyepiece shutter
Close the eyepiece shutter when there is a strong light source behind the camera or
when pressing the shutter release button without looking through the viewfinder.
(This prevents exposure error due to light entering from the viewfinder.)
Turn the eyepiece shutter lever in the direction of the arrow.

Chapter 1 - Basic info
22

Chapter 1 - Basic info
23
preparinG the battery
and compact flash card
Inserting the camera batteries........................................................................................
Battery power icons.......................................................................................................
Camera sleep mode and battery care..............................................................................
Inserting and removing the digital back battery.................................................................
Charging the digital back battery.....................................................................................
Digital back battery power icons.....................................................................................
Formatting the compact flash card in MAC.......................................................................
Formatting the compact flash card in windows.................................................................
Inserting and removing the compact flash card................................................................
Attaching and removing a lens........................................................................................
Detaching the digital back..............................................................................................
Adjusting the camera diopter..........................................................................................
Replacing the diopter correction lens..............................................................................
Attaching to a tripod.......................................................................................................
3
24
25
26
27
28
29
30
31
32
34
36
37
38
39

Chapter 1 - Basic info
24
Chapter 3 - Preparing the battery and compact flash card
insertinG the camera batteries
1. Lift the battery case lock lever, turn
it counter clockwise and pull out the
battery holder.
2. Insert the batteries while ensuring
their polarities are properly aligned with
the and markings on the battery
case.
3. Return the battery holder to its
case and lock it by turning the lever
clockwise. Make sure it is fixed
firmly in place.
Set the drive dial to “L” to turn off the power.
Use six “AA” alkaline or lithium batteries.
C
S
M.UP
L

Chapter 1 - Basic info
25
The batteries are sufficiently charged.
Chapter 3 - Preparing the battery and compact flash card
battery power icons
Set the drive dial to “S” to turn on the power.
Check the battery condition in the lower right corner of the main LCD.
Flashing
Flashing
There is little power remaining. Have new batteries on hand.
Camera will still operate.
There is very little power remaining. Camera will stop
operating soon.
Set the shutter release mode selector lever to “L”
(to turn the power off) and replace the batteries with
new ones.
When the batteries are spent, “batt” flashes on the
main LCD and the viewfinder's LCD when the shutter
release button is pressed.
When replacing the batteries, be sure to use six new batteries of the same type. Do
not mix different types of batteries or old batteries with new ones.

Chapter 1 - Basic info
26
Chapter 3 - Preparing the battery and compact flash card
camera sleep mode and battery care
1. Battery life of the originally supplied batteries is dependant on storage conditions.
2. Blots and fingerprints on terminals may cause loose connections and corrosion.
Wipe the terminals before inserting the batteries.
3. We recommend carrying spare batteries in remote or foreign locations.
4. Battery performance decreases in low temperatures. Keep them warm when in cold
climates or locations.
External battery case PE401 is available as an optional accessory.
5. Store the batteries in a cool and dry place, away from direct sunlight.
6. Remove the batteries from the camera body when not in use for a long time.
7. Replace the batteries with new ones as soon as they are spent. Liquid leakage from the
battery may damage the camera.
8. Read the battery label warnings to ensure proper handling.

Chapter 1 - Basic info
27
1. Press the button on the underside of the Mamiya DM digital back to remove the battery
slot cover.
Removing the battery slot cover
2. Press the battery into the recess on the bottom of the Mamiya DM System digital back,
and then slide it across until it snaps into place.
Inserting the battery
Chapter 3 - Preparing the battery and compact flash card
insertinG and removinG the diGital back battery
2
1

Chapter 1 - Basic info
28
Chapter 3 - Preparing the battery and compact flash card
charGinG the diGital back battery
The lithium ion battery used with the Mamiya DM System digital back can be charged"using the
MCL103 battery charger provided.
Charging the Battery Using the Haenel MCL103
To charge the battery with the 12V DC Power Supply:
1. Connect one end of the 12V DC power supply cable to the Haenel
MCL103 battery charger.
2. Connect the 12V DC power supply to a wall outlet, using the correct socket plug for the region.
Attention: Do not use any power supply cables other than the cable provided.
Many factors contribute to the amount of shots that can be taken with a single battery. The
following will help increase the battery life:
1. Set the Mamiya DM System to enter sleep mode, or turn it off when not in use.
2. Set the backlight on the digital back to turn off after the camera has been idle for a certain
amount of time.
3. Avoid leaving the batteries in the Mamiya DM System when not in use.
4. Do not lock the mirror up unnecessarily.
5. Do not charge the Mamiya DM System batteries in extreme tempertures. Extreme temperature
environments will affect both battery power and charging capacities. The optimal temperature
for charging, using and storing batteries is 25°C/77°F.

Chapter 1 - Basic info
29
Chapter 3 - Preparing the battery and compact flash card
diGital back battery power status
Charging begins when the lithium ion battery is attached to the Haenel charger and the indicator
light turns on. The indicator light begins to blink when the battery is 95% charged. Charging is
complete when the indicator light turns off.
When charging the battery for the first time, be sure to charge the battery for 12 hours regardless
of the indicator light turning off.
The battery should not be left in the charger when the charger is not connected to a power
source. If a battery is left in an unpowered charger, the red indicator light on the charger and
the green indicator light on the power supply are illuminated on the charger, giving the false
impression that the battery is being charged. If the battery is not removed from the charger, the
battery will be discharged.
/