Page is loading ...

Remote ccess
V
TM
LT-0194 9/97
From
Digital Monitoring Products, Inc.

Remote Access User’s Guide Digital Monitoring Products, Inc.
ii 0194-8/98
Software License Agreement
Digital Monitoring Products, Inc.
This License Agreement is your proof of license. Treat it as valuable property.
This is a legal agreement between you (either an individual or entity) the end user, and Digital Monitoring
Products, Inc. If you do not agree to the terms of this Agreement, promptly return the disk package and
accompanying items for a full refund.
Digital Monitoring Products, Inc. Software License
Digital Monitoring Products, Inc., hereafter referred to as DMP, agrees to grant, and you agree to accept on
the following terms and conditions, a non-transferrable and non-exclusive license to the use of the software
program herein delivered.
License
This license authorizes you to:
1. Use the enclosed program on multiple computers within your company.
2. Copy the program in printed or machine readable form for the purpose of backup or
modification in support of your use of the program.
You may not use, copy, modify, or transfer the program or any copy or merged portion, in whole or in part,
except as expressly provided for in this license.
Terms
This Agreement is effective from the date you receive the program and shall remain in force until
terminated. You may terminate it at any time by destroying the program together with all copies and merged
portions in any form. This Agreement shall also be automatically terminated if you fail to comply with any
of the terms or conditions in this Agreement. You agree upon such termination, to destroy the program
together with all copies, modifications, and merged portions in any form.
Disclaimer of Warranty
DMP makes no Warranty of any kind, either expressed or implied, with respect to the use of the licensed
program. DMP expressly disclaims all implied Warranties of merchantability and fitness for a particular
purpose.
Limitation of Liability
In no event shall DMP be liable to you for any damages, including any lost profits, lost savings, or other
incidental or consequential damages arising out of the use or inability to use the program, even if DMP has
been advised of the possibility of such damages.

Digital Monitoring Products, Inc. Remote Access User’s Guide
iii
0194-8/98
General
You may not sublicense, assign or transfer this license or the program except as expressly provided in this
Agreement. You acknowledge that you have read this Agreement, understand it, and agree to be bound by its
terms and conditions.
You agree that this is the complete and exclusive statement of the Agreement between us, which supersedes
all proposals, oral or written, and all other communications between us relating to the subject matter of this
Agreement.
If any of the provisions, or portion thereof, of this Agreement are invalid under any applicable statute or rule
of law, they are to that extent to be deemed omitted.
This Agreement shall be governed by the laws of the State of Missouri. Should litigation arise concerning
this Agreement, the prevailing party shall be entitled to its attorney's fees and court costs, in addition to any
other relief it may be awarded.

Remote Access User’s Guide Digital Monitoring Products, Inc.
iv 0194-8/98
Remote Access™
Copyright 1994 - 1998
Digital Monitoring Products, Inc.
All Rights Reserved

Digital Monitoring Products, Inc. Remote Access User’s Guide
v
0194-8/98
Information furnished by DMP is believed to be accurate and reliable.
The information in this user's guide is subject to change without notice. The software
described herein is furnished under a license agreement. The software may be used or
copied only in accordance with the terms of the agreement.
No part of this document may be reproduced or transmitted in any form or by any
means, electronic or mechanical, including photocopying, recording, or information
storage and retrieval systems, for any purpose other than the purchaser's personal use,
without the express written permission of Digital Monitoring Products, Inc.
• IBM is a trademark of International Business Machines Corporation
• Windows™ is a trademark of Microsoft® Corporation
Unless otherwise noted, all names of companies, street addresses, and persons
contained herein are part of a completely fictitious scenario and are designed solely
to document the use of the Remote Access program.

Remote Access User’s Guide Digital Monitoring Products, Inc.
vi 0194-8/98
Table of Contents
Page
Hardware Setup ................................................................................................. 2-1
Description...........................................................................................................2-1
SCS-1 Firmware Requirements...........................................................................2-1
SCS-105 Firmware Requirements.......................................................................2-1
SCS-1 Receiver Hardware ..................................................................................2-2
Receiver output ports ......................................................................................2-2
CRT port ..........................................................................................................2-2
Host Output port ..............................................................................................2-2
Activity Log port ...............................................................................................2-2
Host cable specification...................................................................................2-3
Host Communication Specification......................................................................2-3
Host Failure Mode ...........................................................................................2-3
Additional Host Failure causes ........................................................................2-4
Enter SCS-1 activity ........................................................................................2-4
Remote Access printer output .........................................................................2-4
Host computer startup .....................................................................................2-4
Software Installation ........................................................................................... 3-1
Getting Started ....................................................................................................3-1
What's required................................................................................................3-1
What's included in the Remote Access package.............................................3-1
Install the program from the disks provided.....................................................3-1
Modifying your Autoexec.bat file......................................................................3-2
Loading Remote Access onto your computer's hard drive ..............................3-3
Starting the program........................................................................................3-3
Remote Access System Status ...........................................................................3-3
System Status Box fields.................................................................................3-4
Logging On ....................................................................................................... 4-1
Introduction..........................................................................................................4-1
Configuring Remote Access ................................................................................4-1
Remote Access Configuration .........................................................................4-1
SCS-1 System Configuration...........................................................................4-2
SCS-1 Line Configuration................................................................................4-2
File Menu .......................................................................................................... 5-1
Menu Options ......................................................................................................5-1
New .....................................................................................................................5-1
Using an existing account number file.............................................................5-2
Open....................................................................................................................5-2
Close ...................................................................................................................5-3
Print .....................................................................................................................5-3
Print Account Reports......................................................................................5-4
Print Panel Programming ................................................................................5-4
Print Activity Reports .......................................................................................5-5
Print Panel Event Buffer ..................................................................................5-5
Print Recall Failure List....................................................................................5-6

Digital Monitoring Products, Inc. Remote Access User’s Guide
vii
0194-8/98
File Menu continued
Database .............................................................................................................5-6
Purge ...............................................................................................................5-6
Compact ..........................................................................................................5-7
Repair ..............................................................................................................5-7
Convert SIMS Files..........................................................................................5-7
About ...................................................................................................................5-8
What's New..........................................................................................................5-8
Exit.......................................................................................................................5-8
System Menu ..................................................................................................... 6-1
Menu Options ......................................................................................................6-1
Alarm List.............................................................................................................6-1
Alarm List Display Description.........................................................................6-2
Resizing the Alarm List columns.....................................................................6-2
Option Buttons.................................................................................................6-3
Command Buttons...........................................................................................6-3
Log On/Off .......................................................................................................6-4
Configure .............................................................................................................6-5
Configuring the SCS-1 System........................................................................6-5
Configuring the SCS-1 Line Cards ..................................................................6-6
Configuring Remote Access ............................................................................6-7
Operator Passwords............................................................................................6-10
Operators with level 9 authority .......................................................................6-10
Deleting an operator record.............................................................................6-10
Viewing the operator list ..................................................................................6-10
Panel Menu ....................................................................................................... 7-1
Menu Options ......................................................................................................7-1
Connect ...............................................................................................................7-1
Disconnect...........................................................................................................7-3
Send ....................................................................................................................7-3
Retrieve ...............................................................................................................7-3
Request Events ...................................................................................................7-4
Printing the Event Buffer..................................................................................7-4
Trap .....................................................................................................................7-4
Manual Download............................................................................................7-4
Automatic Download........................................................................................7-5
Hangup ................................................................................................................7-6
Program Menu ................................................................................................... 8-1
Menu Options ......................................................................................................8-1
Communication....................................................................................................8-2
Device (Control) Setup ........................................................................................8-3
Remote Options...................................................................................................8-3
System Reports ...................................................................................................8-3
System Options ...................................................................................................8-4
Output Options ....................................................................................................8-4
Menu Display.......................................................................................................8-4
Status List............................................................................................................8-4
Printer Reports ....................................................................................................8-4
Area Information ..................................................................................................8-5

Remote Access User’s Guide Digital Monitoring Products, Inc.
viii 0194-8/98
Program Menu continued
Loop Information..................................................................................................8-5
Holiday Dates ......................................................................................................8-5
Schedules............................................................................................................8-5
User Codes..........................................................................................................8-6
Access Code .......................................................................................................8-6
Command Menu ................................................................................................. 9-1
Menu Options ......................................................................................................9-1
Arm/Disarm..........................................................................................................9-1
Alarm Silence ......................................................................................................9-3
Sensor Reset.......................................................................................................9-3
Door Access ........................................................................................................9-4
Outputs On/Off ....................................................................................................9-4
Loop Bypass/Reset .............................................................................................9-5
Set Time and Date...............................................................................................9-5
Send Message.....................................................................................................9-6
Diagnostics ..........................................................................................................9-6
Inquiry Menu ..................................................................................................... 10-1
Menu Options ......................................................................................................10-1
Loop Status .........................................................................................................10-1
Output Status.......................................................................................................10-2
System Status .....................................................................................................10-2
Help Menu ......................................................................................................... 11-1
Menu Options ......................................................................................................11-1
About ...................................................................................................................11-1
What's New..........................................................................................................11-1
Remote Programming ......................................................................................... 12-1
Creating a new account file .................................................................................12-2
Deleting an Open Account File ............................................................................12-3
Creating a programming file ................................................................................12-3
Opening an existing account file..........................................................................12-4
Using account file templates................................................................................12-4
Connecting with a Panel......................................................................................12-5
Sending a file to a panel ......................................................................................12-5
Retrieving a file from a panel...............................................................................12-6
Requesting saved events from a panel ...............................................................12-6
Trapping a panel..................................................................................................12-7
Hanging up on a panel ........................................................................................12-7
Changing a panel's access code.........................................................................12-7
Cold calling a new panel......................................................................................12-8
Appendix A ....................................................................................................... A-1
Keyboard shortcuts..............................................................................................A-1
Menu keys ...........................................................................................................A-2
Editing keys .........................................................................................................A-2
Dialog box keys ...................................................................................................A-2
SCS-1 System Configuration Record Sheet........................................................A-3
SCS-1 Line Configuration Record Sheet.............................................................A-3
Remote Access Configuration record sheet ........................................................A-3
Operator Passwords Record Sheet.....................................................................A-4

Digital Monitoring Products, Inc. Remote Access User’s Guide
ix
0194-8/98
Appendix A continued
SCS-1 Receiver Record Sheets ..........................................................................A-5
NET Network Definitions Record Sheet .............................................................A-5
OPC Operator Codes .........................................................................................A-5
CON SCS-1 Configuration Record Sheet...........................................................A-5
LSU Line Setup Record Sheet for Lines 1 to 5...................................................A-5
LSU Host Configuration Record Sheet...............................................................A-6
Appendix B ....................................................................................................... B-1
Introduction..........................................................................................................B-1
Frequently Asked Questions................................................................................B-1
Glossary of Terms................................................................................................B-3
System Messages ...............................................................................................B-5
System Error Messages ......................................................................................B-6
Authority Level Tables .........................................................................................B-7
Index ............................................................................................................. Index-1

Digital Monitoring Products, Inc. Remote Access User’s Guide
Getting Started
0194-8/98
Getting Started
• About Remote Access™ 1.1
• Hardware Setup 2.1
• Software Installation 3.1
• Logging On 4.1
Getting Started Menus Operation Appendices

Remote Access User’s Guide Digital Monitoring Products, Inc.
Getting Started 0194-8/98
About Remote Access™
Notes:

Digital Monitoring Products, Inc. Remote Access User’s Guide
Getting Started 1-1
0194-8/98
About Remote Access
Introduction The Remote Access™ program from Digital Monitoring Products, Inc. is the
software that will transform the way in which you manage your subscriber
accounts. Its easy to use Microsoft® Windows™ interface, combined with the
power of complete panel programming, signal processing, and fast downloading,
will save you hours of on-site installation and service time. We're confident you'll
be impressed by its capability and by its simplicity.
Remote Access and Remote Access +
There are two versions of the Remote Access program.
Remote Access - allows remote programming of DMP Command Processor™
panels. This version also allows limited monitoring of system events but does not
store that information for future retrieval.
Remote Access + (plus) - provides the full remote programming capability of
Remote Access and additionally allows you to monitor the alarm and system
reports transmitted by your subscriber's DMP panels.
About this guideChapter 1, Getting Started, gives you a general introduction to Remote Access
and then takes you through the necessary hardware setup and software
installation. An additional section shows you how to log onto Remote Access and
configure the program on your computer.
Chapters 5 through 11 detail the specific menu options found in the File, System,
Panel, Program, Command, Inquiry, and Help menus. Each of the menu chapters
first lists the menu options with a brief description of their use followed by a
"When to use" statement. This is intended to let you determine as quickly as
possible whether this chapter contains the information you're seeking.
Remote Programming
Chapter 12 provides you with details on performing specific tasks associated
with the remote programming of panels.
Special note Throughout this guide only the name Remote Access is used when referring to
functions common to both program versions. When referring to any of the
additional functions found in Remote Access +, that product name is used and/or
a Remote Access + logo is placed in the left margin. See example at left.
If you are unable to access an
operation described in this guide,
verify you have the correct
authority level and the
appropriate version software.
Remote ccess
V
+
TM

Remote Access User’s Guide Digital Monitoring Products, Inc.
1-2 Getting Started 0194-8/98
About Remote Access™
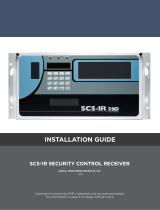
How to find your information on the page
At the beginning of each menu chapter, there is a screen image of what the menu
looks like when pulled down. Below that are bullet list descriptions of the various
Menu Options within that menu. These can help you determine whether you're
looking in the right chapter. When to use is a general description of what the
menu and its options are used for.
After this introductory information, each of the individual menu options are
described in order of their appearance in the menu.
Recommended documentation
Before using Remote Access, you should read and be familiar with the following
documents:
•Remote Access User's Guide - This guide is the basic installation and
operation instruction book for the Remote Access program. The Remote
Access User's Guide takes you from the Hardware Setup through a
description of each program menu item and its function.
•Command Processor Programming Guides - There is a programming guide
for each DMP Command Processor panel that fully details the various
programming options available. For a complete list of guides, or to order a
guide, call DMP Customer Service at 1-800-641-4282 or contact your
regional DMP Sales Representative.
Using Microsoft WindowsThis guide assumes you are familiar with the Microsoft Windows program and
how it operates. If you have not used Windows before, or would like to refresh
your skills, we recommend you read through the Microsoft Windows User's
Guide included along with the Microsoft Windows program. The Windows
program also contains an excellent on-line tutorial that easily teaches you how to
use the various menus, boxes, and utilities to make your use of Remote Access
more productive.
File Menu
Digital Monitoring Products, Inc. Remote Access User’s Guide
0194-0197 Menus 5-1
File Menu
Menu Options
• New - Allows you to create a new account or programming file
• Open - Opens new or existing account or programming files
• Close - Closes an open programming file
• Print - Allows you to print subscriber and system information
• Database - Allows you to manage account and programming files
• About - Displays version and licensing information for this program
• What's New - Shows new changes since last revision
• Exit - Quits the Remote Access program
When to use
Use the File menu when creating a new subscriber account or programming file
or when opening or closing an existing file. The File menu also allows you to
print specific account information and manage Remote Access database files.
New
Authority Level: 3
After logging onto the Remote Access system, the New option in the File menu
becomes active. Selecting New opens the New Account Number box in which
you enter the account number for the new
account file.
Enter the new account number in the Account
box. You can only enter an account number
that is not already on file.
After entering the account number, select the correct panel type and choose
Open. Remote Access opens a blank Account Information box for you to enter
the new account's information.
Enter an new account
number to start an account
or programming file.
Refer to Creating a new
account file in the Remote
Programming section of this
guide (section 11).
When you create a new
account, Remote Access
opens both a new account file
and a new programming file.
Actual screen images from the
Remote Access program at the
beginning of each chapter show
you the various options contained
in the menu.
Each menu option is described in
a short bullet to help you easily
locate the information you need.
The When to use section gives
you a summary of what the
options in this menu allow you to
do.
Callouts in the margins give you
descriptions of screen elements
or concise versions of helpful
information found elsewhere in
the guide.
The chapter heading helps
you locate the chapter
you're looking for when
going through the pages.
The authority level shows
you at a glance the level
required to access this
menu option.
Screen images are used
throughout the user's
guide to highlight and help
explain specific features or
options of the program.

Digital Monitoring Products, Inc. Remote Access User’s Guide
0194-0197 Getting Started 2-1
Hardware Setup
Hardware Setup
Description There are two main components required to operate the Remote Access program,
an IBM compatible 486 or higher computer and a DMP SCS-1 Receiver or SCS-
105 Single Line Receiver.
The SCS-1 Receiver consists of the receiver and main processor board,
monochrome SCS-CRT display, keyboard, and activity printer. The SCS-105 is a
single line receiver that connects the Remote Access computer to an incoming
phone line and allows remote connection to DMP Command Processor™ panels.
SCS-1 Firmware Requirements
The SCS-1 Receiver must contain firmware revision level 801 or higher. If your
receiver firmware level is less than 801, contact DMP for an SCS-1 Firmware
Update kit.
If you're not sure which revision level your receiver is currently running, follow
the steps below:
1. Open the front of the receiver by turning the four quick disconnect screws
counterclockwise.
2. Remove the plexiglass cover and press the Processor Restart button on the far
left side of the SCS-120 Power Supply board.
The receiver restarts and displays its firmware revision level on the CRT for
about three seconds before returning to the Operator Sign On screen.
SCS-105 Firmware Requirements
The SCS-105 Receiver must contain firmware revision level 204 or higher. If
your SCS-105 firmware level is less than 204, contact DMP for an SCS-105
Firmware Update kit.
If you're not sure which revision level your SCS-105 is currently running, follow
the steps below:
1. Remove power from the SCS-105 and disconnect all cables.
2. Open the front of the SCS-105 by removing the two machine screws.
3. Gently tilt the SCS-105 face down and hold the processor board as it slides
out.
The SCS-105 firmware chip is located about two inches above the internal
speaker. On top of the chip is a label with the firmware revision number.

Remote Access User’s Guide Digital Monitoring Products, Inc.
0194-0197
2-2 Getting Started
Hardware Setup
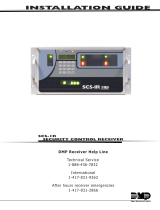
SCS-1 Receiver Hardware
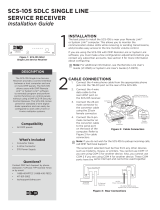
Receiver output ports On the back of the SCS-1 Receiver there are three DB-25 output ports used to
connect the receiver with Remote Access or a host computer, a CRT, and a local
printer. See below:
CRT port This port is where you connect the monochrome monitor (SCS-CRT) shipped
with the receiver to review account activity as it’s being received. The SCS-1
Receiver system keyboard connects into the back of the monitor and allows you
to set up the SCS-1 for proper operation
Host Output port The Host Output port is a standard RS-232 connection that operates at either
1200 or 9600 baud, eight bits per character, no parity, and two stop bits.
The specific Host Output port pinouts are listed below:
Pin 1 Shield ground
Pin 2 Receive data Host Connector
Pin 3 Transmit data
Pin 7 Signal ground
Activity Log port This port allows you to connect the Okidata 184T serial printer (SCS-PTR) to the
SCS-1 Receiver and maintain a printed record of all account activity.
CRT
HOST OUTPUT
ACTIVITY LOG
Connect the RS-232 cable from
your automation computer to the
Host Output port.
You can connect a serial printer
to the Activity Log port for hard
copy records of report activity.
Connect the receiver system
monitor to the CRT port.
PIN 1
PIN 25 PIN 14
PIN 13

Digital Monitoring Products, Inc. Remote Access User’s Guide
0194-0197 Getting Started 2-3
Hardware Setup
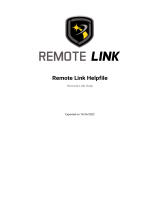
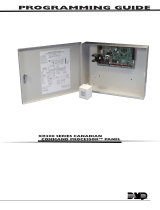
Host cable specification The SCS-204 Host Cable allows you to connect the Host Output port on the back
of the SCS-1 Receiver to the serial port on the Remote Access computer or host
automation computer. The Host Cable can be purchased separately from DMP.
Refer to the diagram below for Host Output port pinout descriptions.
When using the SCS-105, connect the cable shipped with the modem to the
computer's serial port. See System Menu/Configuration.
Host Communication Specification
During communication between the host computer and the SCS-1, Remote
Access responds with an ACKNOWLEDGE (ACK) character to each signal it
receives. If the Remote Access program cannot interpret the signal from the
receiver, it responds with a NOT ACKNOWLEDGE (NAK) character. The
receiver then displays a Host Failure message on its CRT display and reverts to
requiring a manual acknowledge from the operator's receiver keyboard.
The communication failure is also logged on the Activity Log printer. The
receiver's change to manual operation is referred to as the Host Failure Mode.
Note: The SCS-105 Receiver is unable to display a Host Failure and should not
be used as a primary receiver.
Host Failure Mode While in the Host Failure Mode, the SCS-1 Receiver continues to send its
messages to the host computer. Only alarm messages are displayed on the
receiver CRT. All other messages are printed on the local printer only.
Alarm messages are sent only once and, if not accepted by the host computer,
remain on the receiver CRT to be acknowledged by an operator.
If there is another message pending when the operator acknowledges a message,
it is removed from the CRT display allowing the next message to be displayed.
This process of allowing manual acknowledgment helps prevent a memory
backlog from occurring in the SCS-1 during a Host Failure.
Caution: Do not disconnect the
Host Cable while the SCS-105
modem is powered. Doing so
can cause damage to the
modem.
To SCS-1
Receiver To Host
Computer
87
5
43
2
1
7
3
2
DB25P DB25S
Cable Shield

Remote Access User’s Guide Digital Monitoring Products, Inc.
0194-0197
2-4 Getting Started
Hardware Setup
Additional Host Failure causes
Another cause of the Host Failure Mode occurs when the SCS-1 Receiver does
not receive any response to its communication from the Remote Access program.
When the receiver first sends a message to the host computer, it waits five
seconds for a response. If there is no response, it again sends the message. The
receiver makes a total of five attempts to send its message to the host computer
after which it reverts to the Host Failure Mode. This Host Failure is also logged
on the Activity Log printer.
To verify the Remote Access program is continuing to operate during low activity
hours, the SCS-1 sends an SCS-1 Test Signal (S99) every minute. If it receives a
NOT ACKNOWLEDGE or no response from the host computer, it enters the
Host Failure Mode. This Host Failure is logged on the Activity Log printer.
Enter SCS-1 activity During a Host Failure Mode, you can manually enter account activity directly
into the Remote Access system by using the Alt+F10 command from the Remote
Access computer keyboard.
This can help maintain the account activity on record until communication
between the Remote Access program and the SCS-1 Receiver can be restored.
When communication is fully restored, acknowledgment capability of alarm
system reports returns to the Remote Access program. Both the Host Failure and
Host Restore events are logged on the Activity Log printer.
Remote Access printer output
In addition to the printer connected to the SCS-1 receiver, you can also have a
parallel printer connected to the Remote Access computer. This is referred to as
the Remote Access Report Printer.
The Report Printer connects to the first parallel port (LPT1) on the host computer
and is used by Remote Access to print all reports for the various system
programs. Refer to the Print Manager section of the Microsoft Windows User's
Guide.
Remote Access does not provide the parallel printer or printer cable.
Host computer startup The Remote Access program requires DOS version 5.0 or higher, Microsoft
Windows version 3.1 or higher, and at least 4MB of RAM on the host computer
to operate properly.

Digital Monitoring Products, Inc. Remote Access User’s Guide
0194-0997 Getting Started 3-1
Software Installation
Software Installation
Getting Started Installing the Remote Access software is relatively simple and should only take
about 10 minutes for most installations. Before you begin please take a moment
and read through this chapter. It's important that you are familiar with the system
requirements of Remote Access and the procedure for properly loading it into
your computer.
If you're not familiar with loading programs through Windows, refer to the
Microsoft Windows User's Guide for detailed instructions.
What's required Before installing Remote Access, make sure your computer meets the following
basic requirements:
• IBM compatible with a 486 or greater CPU, up to 20MB of available hard
drive space, and a 1.44MB 3.5" floppy disk drive
• A minimum of 4MB of RAM (8MB recommended)
• At least one Com port, two for pass-through
• A Video Graphics Adaptor (VGA) or better monitor
• Microsoft Windows version 3.1 or Windows 95
• A mouse
What's included in the Remote Access package
Your Remote Access package contains the following items:
• Two 3.5" floppy disks
• A Remote Access User's Guide (LT-0194)
Install the program from the disks provided
Install the Remote Access program onto your computer directly from the original
disks. After installing the program, we recommend you store the disks in a
secure, dry place.
If you're installing the Remote Access program onto a computer where the DMP
Security Information Management System (SIMS) is installed, you must make
sure the SIMS programming and account files are located in the C:\SIMS
directory. Failure to do this may result in incomplete conversions of the SIMS
database files.
Important!

Remote Access User’s Guide Digital Monitoring Products, Inc.
0194-0997
3-2 Getting Started
Software Installation
Modifying your Autoexec.bat file
When installing Remote Access onto your computer, you must make some slight
modifications to your autoexec.bat file. These modifications consist of using the
Windows Notepad to add the Share program to your autoexec file and set the
files and locks to levels required by Remote Access.
How to do it
Turn on your computer and start the Windows program (your system may start
Windows automatically). If your computer is already running, quit any open
applications and return to the Windows Program Manager.
Follow the instructions below:
(The diagrams on this page follow the sequence of steps detailed below.)
1. From the File menu in the Windows Program Manager, select Run. The Run
dialog box appears.
2. Type in the following: c:\windows\notepad.exe and press Enter. (You can also
just double-click on the Notepad icon from the Windows Program Manager.)
3. In Notepad, click on the File menu and then on the Open option. ( Alt+F, O)
This brings up the Open dialog box. (Before making changes to the
autoexec.bat file, you should make a duplicate and name it autoexec.old. This
allows you to restore the file if necessary.)
4. In the File Name text box, type in c:\autoexec.bat and press Enter. Notepad
will open a copy of your computer's autoexec.bat file in which you can make
the necessary changes.
5. Position your cursor at the far right end of the line that starts with the word
"PATH" and press Enter. There should now be a space between the PATH line
and the next line of text.
6. Place your cursor to the left in the blank space and type in the following:
C:\dos\share.exe /L:750 /F:8000
7. From the Notepad File menu select Save. This saves the modified autoexec.bat
file to your computer.
Quit Notepad and return to the Windows Program Manager.
Note: You must restart your computer for the changes to take effect.
2
In the Run box, type c:\windows\notepad.exe
3
1
Click on the File menu and select Run.
Add this line only to the
autoexec.bat file.
6
In the autoexec.bat file,
place your cursor at the
end of the Path line.
Press Enter.
5
Click on the File menu and select Open.
In the File Name box, type
c:\autoexec.bat and press Enter.
4

Digital Monitoring Products, Inc. Remote Access User’s Guide
0194-0997 Getting Started 3-3
Software Installation
Loading Remote Access onto your computer's hard drive
Once back at the Program Manager, you're ready to install the Remote Access
program.
Follow the instructions below:
1. Insert the Remote Access disk #1 into the computer's 3.5" drive. On most
computers, this is drive "a".
2. From the Windows Program Manager File menu, select Run. The Run dialog
box appears.
3. Click once on the Run option.
4. Type "a:setup" and choose OK.
If you inserted the Remote Access disk into another drive besides "a", use its
letter designation in place of the "a" in the example given above.
The install program on the Remote Access disks automatically loads the program
and program icon onto your computer's hard drive under a separate group icon.
Follow the on-screen instructions for additional installation information.
Starting the program Once Remote Access is installed, you can start the program from the Windows
Program Manager by double-clicking its icon.
As the program loads, it displays a start-up screen followed by the Remote
Access application window. This window contains the menu bar with the
program's menu titles shown. The Program, Command, and Inquiry menus are
grayed out until you open a file or connect with a panel.
Chapters 5 to 11 in this guide detail the operation and use of each menu item
option in the Remote Access program.
Remote Access System Status
This option is available in the Remote Access + version only. When the Remote
Access+ program starts, the Remote Access System Status box is displayed on
screen. This status box provides you with important information about your
system and any account information currently in the Alarm List.
The next page contains descriptions of the various fields on the status box.
Double-click on the
Remote Access icon to
start the program.
Remote ccess
V
+
TM
/