Page is loading ...

SCS-150/CONVERT
Installation Guide
DESCRIPTION
AUXILIARY
HOST OUTPUT
ACTIVITY LOG
The SCS‑150 is the main system
processor for the SCS‑1R Security
Control Receiver and controls the
line cards, LCD display, data output
to a host automation system,
and printers. It also contains the
receiver’s software.
The SCS‑150 can be programmed
from the front panel, with
Remote Link, or with a browser if
compatible.
What is Included?
• One SCS‑150 Processor PCB
• One SCS‑203 Convenience Panel
• One Set of Keypad and Line Card
connection cables (SCS‑206)
1REMOVE THE SCS‑1062
The SCS‑1062 is the bottom PCB in the receiver lower rack.
1. Power down the receiver.
2. Disconnect all cables from the front of the SCS‑1062 PCB,
including line card and keypad cables.
3. Push the ejection levers on each side of the processor PCB.
4. Pull the SCS‑1062 out of the receiver rack.
REPLACE SCS‑202 WITH SCS‑203
OPTIONAL: CONFIGURE SCS‑101 CARDS
21. At the back of the receiver, remove the two screws that
hold the SCS‑202 Convenience Panel in place (the plate
that contains two 25‑pin serial ports).
2. Remove the SCS‑202 and the two attached ribbon cables
by pulling the cables under all of the components and out
through the back of the receiver.
3. Route the three ribbon cables from the new SCS‑203
Convenience Panel (the plate with three 25‑pin serial
ports) from the back of the receiver rack, below the
components, along the bottom, and to the front of the
receiver. These cables are labeled A1, A2, and A3.
4. Position the SCS‑203 on the back panel and secure it with
the two screws.
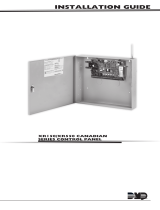
If SCS‑101 Network Line Cards are installed,
set the jumpers on the SCS‑101 card to
Transmit Data (TXD) on pin #2 and Receive
Data (RXD) on pin #3.
Compatibility
• Remote Link programming:
SCS‑150 Version 101 and higher
with Remote Link 1.45 or higher
• Browser programming:
SCS‑150 Version 101 and higher
• SCS‑100 or SCS‑104 Line
Cards: Level E hardware,
Version 200 and higher
• DMP’s full line of SCS Line
Cards and accessories
OVERVIEW
To convert an SCS‑1062 to an SCS‑150, this guide walks you through these
required steps:
1. Remove the SCS‑1062.
2. Replace the SCS‑202 with the SCS‑203.
3. Install the SCS‑150.
TXD RXD
2
3
3
2
J3 J4
Figure 1: TXD/RXD
Headers

Designed, engineered, and
manufactured in Springfield, MO
using U.S. and global components.
LT-1030 21061
INTRUSION • FIRE • ACCESS • NETWORKS
2500 North Partnership Boulevard
Springfield, Missouri 65803-8877
800.641.4282 | DMP.com
© 2021
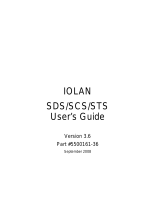
When installing the SCS‑150 and connecting cables, refer to Figure 2, Figure 3, and Figure 4. When connecting
cables, follow these guidelines:
• If the card is horizontal, connect with blue stripe (pin 1) right
• If the card is vertical, connect with blue stripe (pin 1) up
Note: Other versions of these ribbon cables may be rainbow colored with the light brown wire
at pin 1.
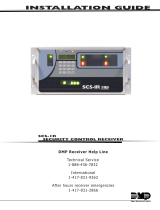
1. Ensure the DIP switches on the SCS‑150 are set to the o position for normal
operation.
2. Connect the LCD cable to the LCD keypad board.
3. Connect the bottom cable from the LCD keypad connector to the SCS‑150
RECEIVER LCD MEMBRANE KEYPAD header, then connect the top cable to the
SCS‑110 Modem Power Supply card.
4. Connect the cables labeled A1, A2, and A3 to the matching edge contacts on the
SCS‑150.
5. Slide the SCS‑150, component side up, into the lowest
position in the receiver rack. Ensure the edge contacts
seat properly in the main board sockets, then press the
board into place.
6. Connect the line card connector with ribbons 1 ‑ 5 to the
right line card edge contact with ribbon 1 on the right.
7. Connect the line card connector with ribbons 6 ‑ 8 to the
left line card edge contact with ribbon 6 to the right.
8. Install line cards, then connect additional wires or cables
as needed, like Ethernet or line card cables.
9. Power up the SCS‑1R.
For full SCS‑1R and SCS‑150 installation and programming
details, refer to SCS‑1R Installation Guide (LT‑1037).
3INSTALL THE SCS‑150
ON
1 2 3 4
Figure 2: All DIP
Switches O
Figure 3: LCD Cable Detail
RECEIVER
LCD MEMBRANE
KEYPAD
SCS-105
SCS-110
LCD Keypad
1
678
A3A2
A1
To SCS-203
To Line Cards
To Line Cards
234
5
SCS-150
SCS-110
SCS-104
Keypad and
LCD Display
Ethernet
Figure 4: Full Wiring Detail
/