Page is loading ...

INSTALLATION INSTRUCTIONS
Page 1 of 6
Left and Right LED
Light Brackets
BODY ARMOR 2007-2019 WRANGLER ROOF RACK
PART #5160
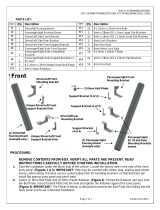
PARTS LIST:
1
Front Air Deflector Logo Panel
36
8-1.25mm x 25mm Button Head Bolts
1
Front Rack Panel
2
8-1.25mm x 16mm Button Head Bolts
1
Rear Rack Panel
58
8mm x 24mm x 2mm Flat Washers
1
Driver/left Rack Side Panel
36
8mm Lock Washers
1
Passenger/right Rack Side Panel
18
8-1.25mm Hex Nuts
4
Cross Rails
2
8mm Nylon Lock Nuts
1
Driver/left Front Bar Style Light Bracket
8
6-1.00 x 20mm Button Head Bolts
1
Passenger/right Front Bar Style Light Bracket
12
6mm x 18mm x 1.6mm Flat Washers
2
Rear Light Brackets (cube style lights)
8
6mm Lock Washers
8
8mm Double Nut Plates for Cross Rails
4
6-1.00mm Nylon Lock Nuts
2
6mm Double Nut Plate for Front Logo Panel
1
5mm Allen Wrench (8mm)
1
4mm Allen Wrench (6mm)
Passenger/right
Side Panel
(2) Rear Light
Brackets
(8) 8mm Double Nut
Plates for Cross Rails
(4) Cross Rails
Driver/left
Side Panel
Front Panel
Rear Panel
Air Deflector
(2) 6mm Double
Nut Plates

INSTALLATION INSTRUCTIONS
Page 2 of 6
PROCEDURE:
REMOVE CONTENTS FROM BOX. VERIFY ALL PARTS ARE PRESENT. READ INSTRUCTIONS
CAREFULLY BEFORE STARTING INSTALLATION. ASSISTANCE IS HIGHLY RECOMMENDED.
1. Select the driver/left Side Panel and Front Panel. Slide the end of the Front Panel into the
forward end of the Side Panel, (Figure 1). Attach the Side Panel to the top and side of the Front
Panel with the included (3) 8mm x 25mm Button Head Bolts, (6) 8mm Flat Washers, (3) 8mm
Lock Washers and (3) 8mm Hex Nuts, (Figures 1 & 2). NOTE: Tighten the (2) side bolts first,
then tighten the top bolt.
2. Move to the remaining end of the Side Panel. Select the Rear Panel. Attach the Side Panel to
the top, bottom and side of the Rear Panel with the included (4) 8mm x 25mm Button Head
Bolts, (8) 8mm Flat Washers, (4) 8mm Lock Washers and (4) 8mm Hex Nuts, (Figures 3 & 4).
NOTE: Tighten the (2) side bolts first, then tighten the top and bottom bolts.
3. Next, select the passenger/right Side Panel. Repeat Steps 1 & 2 to attach the passenger/right
Side Panel to the Front and Rear Panels.
4. After assembling the sides of the Cargo Rack, level and fully tighten all hardware. Make sure
the Roof Basket is square and flat before tightening.
5. Next, select (1) Cross Rail and (2) 8mm Double Nut Plates. Place the Cross Rail in place over
the forward slots in the Side Rails. Insert (1) 8mm Double Nut Plate into the open bottom of the
Cross Rail, (Figure 5). Attach the driver/left end of the Cross Rail with Nut Plate to the
driver/left Side Panel with (2) 8mm x 25mm Button Head Bolts, (2) 8mm Lock Washers and (2)
8mm Flat Washers. Repeat to attach the passenger/right end of the Cross Rail to the
passenger/right Side Panel. Do not fully tighten hardware.
6. Repeat Step 5 to attach the remaining (3) Cross Rails to the Side Panels, (Figure 5).
7. Adjust location of all (4) Cross Bars as required for proper load carrying capability and fully
tighten all hardware.
8. With assistance, carefully place the assembled Cargo Rack onto the previously installed front
and rear Brackets. Refer to Bracket installation instructions to attach the Rack to the Brackets,
(Figures 6 & 7).
Front Air Deflector Installation.
a. Select the Air Deflector Panel. Attach the outer ends of the Deflector Panel to the Front
Panel with (4) 6mm Button Head Bolts, (8) 6mm Flat Washers. (4) 6mm Lock Washers
and (4) 6mm Hex Nuts, (Figure 8). Do not fully tighten hardware at this time.
b. Select (1) 6mm Double Nut Plate. Hold the Nut Plate up behind the Front panel. Attach
the Deflector Panel to the Double Nut Plate with (2) 6mm Button Head Bolts, (2) 6mm
Lock Washers and (2) 6mm Flat Washers, (Figure 8). Repeat this Step to attach the
Deflector to the Front Panel and remaining 6mm Nut Plate.
c. Adjust and fully tighten Air Deflector hardware.
Front LED Bar Style Light installation w/o Air Deflector, (light available separately).
a. Select the driver/left LED “L” Bracket, (Figure 9). Attach the “L” Bracket to the inside top
of the Front Panel with (1) 8mm Button Head Bolt, (2) 8mm Flat Washers and (1) 8mm
Nylon Lock Nut, (Figure 9). Do not tighten hardware at this time.
b. Repeat the previous Step to attach the passenger/right LED “L” Bracket.
c. Follow the instructions included with the bar style light, (available separately), to attach
the light to the “L” Brackets. NOTE: Option-use the included (2) 8mm x 16mm Button
Head Bolts, (2) 8mm Lock Washers and (2) 8mm Flat Washers to attach the light to the
Brackets, (Figure 9).

INSTALLATION INSTRUCTIONS
Page 3 of 6
d. Adjust the light and Brackets and fully tighten all hardware.
e. IMPORTANT: If wind deflector installation is desired, flip “L” Brackets side to side and
attach the LED bar style light to the top of the front panel.
Rear Cube Style LED Light installation, (lights available separately).
a. Select (1) U-Bend Light Bracket, (Figure 10). Attach the Bracket to the bottom of the
light. NOTE: It may be necessary to remove the hex bolt from the bottom of the light if
equipped. Mounting bolt on light should go through U-Bend Bracket first then up through
bracket supplied with light.
b. Attach light with Bracket to the slot in the Rear Panel with the included (2) 8mm Button
Head Bolts, (4) 8mm Flat Washers, (2) 8mm Lock Washers and (2) 8mm Hex Nuts,
(Figure 11). Adjust location and fully tighten hardware.
c. Repeat the previous Steps to attach the remaining rear facing light if desired.
Side facing lights, (lights available separately)
d. Attach any side facing lights directly to top of Cross Rails as desired. NOTE: Slots have
been provided for additional light installation, (lights not included). Lights can be installed
in multiple locations along the front, sides and rear of the Cargo Rack.
9. Do periodic inspections to the installation to make sure that all hardware is secure and tight.
To protect your investment, wax this product after installing. Regular waxing is recommended to
add a protective layer over the finish. Do not use any type of polish or wax that may contain abrasives
that could damage the finish. Mild soap may be used to clean the Cargo Rack.
(2) 8mm x 25mm Button Head Bolts
(4) 8mm Flat Washers
(2) 8mm Lock Washers
(2) 8mm Hex Nuts
Front
(Fig 1) Attach driver/left Side Panel to Front Panel
(Fig 2) Attach Side Panel to top of Front Panel
Front
8mm x 25mm Button Head Bolt
(2) 8mm Flat Washers
8mm Lock Washer
8mm Hex Nut
Front Panel
Side
Panel

INSTALLATION INSTRUCTIONS
Page 4 of 6
(Fig 4) Attach Side Panel to top
and bottom of Rear Panel
(Fig 5) Insert 8mm Double Nut Plate into Cross
Rail. Attach Cross Rails to slots in Side Panels
(Fig 6) Attach rear of Cargo Rack to Rear Brackets
(Fig 3) Attach Side Panel to side of Rear Panel
Front
Front
Front
(2) 8mm x 25mm Button Head Bolts
(4) 8mm Flat Washers
(2) 8mm Lock Washers
(2) 8mm Hex Nuts
Front
Cross Rail
(2) 8mm x 25mm Button Head Bolts
(2) 8mm Lock Washers
(2) 8mm Flat Washers
8mm Nut Plate
(2) 8mm x 25mm Button Head Bolts
(4) 8mm Flat Washers
(2) 8mm Nylon Lock Nuts
Rear Panel
Side
Panel
Rear Panel
Side
Panel

INSTALLATION INSTRUCTIONS
Page 5 of 6
8mm x 16mm Button Head Bolt
8mm Lock Washer
8mm Flat Washer
Front
(Fig 8) Attach Air Deflector to Front Panel
(Fig 9) Attach “L” Light Bracket to inside of
Front Panel. “L” Brackets can also be
installed on top of Front Panel if desired
Front
(Fig 7) Attach front of Cargo Rack to front Brackets.
Slide front Brackets forward or rearward to line up
with front mounting holes in Cargo Rack
(2) 8mm x 25mm Button Head Bolts
(2) 8mm Lock Washers
(2) 8mm Flat Washers
Attach outer ends of Air Deflector
(2) 6mm x 20mm Button Head Bolts
(4) 6mm Flat Washers
(2) 6mm Lock Washers
(2) 6mm Hex Nuts
Attach inner Air Deflector
(2) 6mm x 20mm Button Head Bolts
(2) 6mm Lock Washers
(2) 6mm Flat Washers
6mm Double Nut Plate
Front
8mm x 25mm Button Head Bolt
(2) 8mm Flat Washers
8mm Nylon Lock Nut

INSTALLATION INSTRUCTIONS
Page 6 of 6
CAUTION: Do not exceed the weight rating for the roof rack (including basket) as specified by vehicle and/or
rack manufacturer. Too much weight will greatly reduce the stability of the vehicle and increase the vehicle’s
tendency to overturn. The manufacturer makes no representation or warranty as to the amount of weight that
the vehicle can safely carry. For guidance, we recommend that you consult the vehicle manufacturer. Secure all
payloads properly for safe transportation.
Rear
(Fig 11) Attach light with Bracket to Rear Panel
(2) 8mm x 25mm Button Head Bolts
(4) 8mm Flat Washers
(2) 8mm Lock Washers
(2) 8mm Hex Nuts
(Fig 10) Attach Mounting Bracket to
cube light (light available separately)
/


