Page is loading ...

www.rynoskinauto.com Page 1 of 16 5/20/22(LS)
DO NOT OVER TORQUE. PLEASE FOLLOW THE TIGHTEN OPERATING
LOAD STANDARD BELOW:
6mm BOLTS & NUTS: FROM 7 TO 8.5 FOOT POUND.
8mm BOLTS & NUTS: FROM 18 TO 20 FOOT POUND.
10mm BOLTS & NUTS: FROM 35 TO 40 FOOT POUND.
12mm BOLTS & NUTS: FROM 60 TO 70 FOOT POUND.
.
120-210 min
Installation time is
different according
to individual person.
Cutting Not Required
TO PROTECT YOUR INVESTMENT, DO NOT USE ANY TYPE OF POLISH
OR WAX THAT MAY CONTAIN ABRASIVES THAT COULD DAMAGE THE
FINISH. MILD SOAP MAY BE USED TO CLEAN THE PRODUCT.
TOOLS REQUIRED
Flat SCREW DRIVER
RATCHET
SOCKET SET
TORQUE WRENCH
ALLEN WRENCH (PROVIDED)
PARTS LIST:
Description
Qty
Image
Remark
LD Bumper
1
Bull Nose Hoop
1
DS/left LED “L” Top
Bracket (for BN Hoop)
1
PS/right LED “L” Top
Bracket (for BN Hoop)
1
DS/left LED “L” Bottom
Bracket (for BN Hoop)
1
PS/right LED “L”
Bottom Bracket (for BN
Hoop)
1
DS/left LED “L” Bracket
(center light bar)
1
PS/right LED “L”
Bracket (center light
bar)
1
FB2 Mid Width Front Bumper w/o Winch Frame
INSTALLATION INSTRUCTIONS
PART NO.
RS-FFB-001
Fits:
2021-2023 FORD BRONCO
Drilling Not Required

FB2 Mid Width Front Bumper w/o Winch Frame
2021-2023 FORD BRONCO
www.rynoskinauto.com Page 2 of 16 5/20/22 (LS)
Description
Qty
Image
Remark
Center Mesh Fill Panel
(center light bar)
1
Mesh Fill Panels (Cube
LED)
2
DS/Left Inner Frame
Support Bracket
1
PS/Right Inner Frame
Support Bracket
1
DS/Left Outer Frame
Support Bracket
1
PS/Right Outer Frame
Support Bracket
1
ACC Mounting Bracket
1
ACC Plastic Sensor
Cover
1
Sensor Cover Kits
6
Plastic Sensor Hole
Plugs
4
Sensor Retaining Caps
4
20mm x 10mm Foam
Spacers
4
15.5mm x 25mm x
2mm Foam Sensor
Seals
4
License Plate Bracket
1
Plastic Plugs for
License Plate
2
12mm x 55mm Single
Bolt Plates
2
12mm x 55mm Double
Bolt Plates
2
12mm Plastic
Retainers
6

FB2 Mid Width Front Bumper w/o Winch Frame
2021-2023 FORD BRONCO
www.rynoskinauto.com Page 3 of 16 5/20/22 (LS)
Description
Qty
Image
Remark
12mm x 32mm x 3mm
Flat Washers
6
12mm Lock Washers
6
12mm Hex Nuts
6
10-1.5mm x 110mm
Hex Bolts
2
10mm x 30mm x
2.5mm Flat Washers
4
10mm Lock Washers
2
10mm Hex Nuts
2
8-1.25mm x 25mm
Button Head Bolts
4
8-1.25mm x 25mm Hex
Bolts
6
8-1.25mm x 16mm Hex
Bolts
4
8mm x 24mm x 2mm
Flat Washers
20
8mm Lock Washers
14
8mm Hex Nuts
6
8mm Flanged Nuts
4
6-1.0mm x 25mm
Button Head Bolts
7
6-1.0mm x 20mm
Button Head Bolts
2
6mm x 20mm Button
Head Combo Bolts
4
6mm x 18mm x 1.6mm
Flat Washers
10
6mm x 12mm x 1.6mm
Flat Washers
4

FB2 Mid Width Front Bumper w/o Winch Frame
2021-2023 FORD BRONCO
www.rynoskinauto.com Page 4 of 16 5/20/22 (LS)
Description
Qty
Image
Remark
6mm Lock Washers
7
6mm Hex Nuts
7
6mm Flanged Nuts
4
6mm Nylon Lock Nuts
2
Allen Wrench S=5
1
Allen Wrench S=4
3
4mm Self Tapping
Screws
8
Nylon Wire Ties
10
Use for wire
tightening.
PROCEDURE:
REMOVE CONTENTS FROM BOX AND VERIFY ALL PARTS ARE PRESENT. READ INSTRUCTIONS
CAREFULLY. ASSISTANCE IS RECOMMENDED.
1. Start installation from under the front of the vehicle and remove the splash guard, (Figure 1).
2. Determine if the vehicle is equipped with plastic bumper cover or steel option bumper.
Models with plastic bumper cover:
a. Remove the plastic covers from the front of the bumper, (Figures 1 & 2).
Models with optional steel bumper:
a. Remove the covers surrounding the tow hooks, (Figure 3).
3. Unplug the wiring harness leading to the front bumper. NOTE: Harness plug is located behind the
driver/left side of the bumper below the headlight, (Figure 3).

FB2 Mid Width Front Bumper w/o Winch Frame
2021-2023 FORD BRONCO
www.rynoskinauto.com Page 5 of 16 5/20/22 (LS)
4. From the front, remove the factory hex bolts attaching the bumper assembly to the end of the frame,
(Figures 2—4). NOTE: Use assistance to hold the bumper in place while removing the mounting bolts.
5. On models with plastic bumper only, remove the seals around the lower tow hooks.
6. Temporarily unplug and remove the shutter assembly, (Figure 4—6).
Models with ACC (adaptive cruise control) sensor.
a. Remove the sensor from the front of the shutter assembly, (Figure 5).
b. Release the wiring harness from the clips on the back of the shutter assembly, (Figure 6).
c. Reroute the ACC plug end of the harness down through the hole in the top of the shutter assembly
and out through the front, (Figure 7).
7. Remove the plastic nuts attaching the triple nut plate to the back of the driver/left bumper mounting
flange on the end of the frame, (Figure 8). Remove the triple nut plate.
8. Select the driver/left inner and outer Support Brackets, (Figure 9). Attach the Support Brackets to the
sides of the frame with the included (1) 10mm x 110mm Hex Bolt, (2) 10mm Flat Washers, (1) 10mm
Lock Washer and (1) 10mm Hex Nut, (Figures 9 & 10). Push Support Brackets up against back of
flange on frame, (Figure 10).
9. Repeat Steps 7 & 8 to attach the passenger/right Inner and Outer Support Brackets.
10. Reinstall the shutter assembly to the vehicle. IMPORTANT: Replace the (2) factory hex bolts attaching
the upper shutter brackets to the top of the frame with the factory included (2) 6mm x 20mm Hex Bolts,
(2) 6mm Lock Washers and (2) 6mm Flat Washers, (Figure 11).
11. Carefully unwrap the Bumper. Temporarily remove (6) 6mm Button Head Combo Bolts and (6) 6mm
Flange Nuts that attach the center Cover Plate to the bumper. Save this hardware for later, (Figure
12)
12. Determine if the vehicle is equipped with ACC sensor (Adaptive Cruise Control), and parking sensors.

FB2 Mid Width Front Bumper w/o Winch Frame
2021-2023 FORD BRONCO
www.rynoskinauto.com Page 6 of 16 5/20/22 (LS)
Models with ACC sensor:
a. Gently pull the end of the harness out from the shutter assembly, (Figure 13). Do not pull out the
harness, only extend the plug end of the harness.
b. Select the rectangular Sensor Mounting Bracket, (Figure 14). Attach the ACC sensor to the
Bracket with the included (3) 6mm x 25mm Button Head Bolts, (6) 6mm x18mm Flat Washers, (3)
6mm Lock Washers and (3) 6mm Hex Nuts, (Figure 15).
c. Attach the ACC sensor and Bracket assembly along with the Plastic Cover with the included (4)
6mm x 25mm Button Head Bolts, (4) 6mm x18mm Flat Washers, (4) 6mm Lock Washers and (4)
6mm Hex Nuts to the mount bracket on the front of the Bumper assembly, (Figures 16 & 17). The
ACC sensor and bracket assembly will mount to the back of the Bumper bracket and the plastic
cover will mount to the front. Center the assembly in the slots of the Bumper mount bracket and
fully tighten hardware.
Models without parking sensors:
a. From the front of the bumper, push the included Plastic Plugs into the Sensor Mounts, (Figure 18).
Models with parking sensors:
a. Remove sensors and wiring harness from the factory bumper. Note the location of each sensor for
proper reinstallation.
b. Remove the silicone seal from the end of the sensor. Slide the included larger Sensor Seal over
front of sensor, (Figure 19).
c. Insert sensor with Seal into sensor mount on back of Bumper, (Figure 20).
d. Place Foam Spacer over end of sensor. Push Sensor Retaining Cap onto sensor mount and
secure the assembly with the included (2) Self Tapping Screws (Figure 20).
e. Repeat previous Steps to install remaining sensors.
f. Install the factory wiring harness and plug into sensors. Attach harness to back of Bumper.

FB2 Mid Width Front Bumper w/o Winch Frame
2021-2023 FORD BRONCO
www.rynoskinauto.com Page 7 of 16 5/20/22 (LS)
13. Select driver/left LED “L” Bracket for center LED light. Attach the LED bracket to the bumper with (1)
8mm x 25mm Hex Bolt, (2) 8mm Flat Washers, (1) 8mm Lock Washer, and (1) 8mm Hex Nut. Repeat
this step to attach the passenger/right LED “L” Bracket, (Figure 21)
14. Determine if Mesh Fill Panels or LED accessory lights will be installed. NOTE: Lights not included.
Mesh Fill Panel installation (do not install lights with Fill Panels):
a. Select driver/left Fill Panel. Attach Fill Panel to tabs on back of Bumper with the included (2) 6mm
Button Head Combo Bolts and (2) 6mm Flange Nuts, (Figure 22). Repeat this Step to attach the
passenger/right Fill Panel.
b. Select the center Fill Panel. Attach Fill Panel to the LED “L” Brackets from Step 13 with (2) 8mm x
25mm Hex Bolts, (4) 8mm Flat Washers, (2) 8mm Lock Washers, and (2) 8mm Hex Nuts, (Figure
23)
Light installation (do not install Mesh Fill Panels):
a. Attach cube style lights to tabs at top of square openings in Bumper, (Figure 21).
b. Attach bar style LED light to LED “L” Brackets from Step 13 with (2) 8mm x 16mm Hex Bolts, (2)
8mm Lock Washers, and (2) 8mm Flat Washers,(Figure 24) Note: This location is designed to fit a
standard 20in Single Row bar style LED light
15. Attach the Top Hoop to the top of the Bumper with the included (4) 8mm x 25mm Button Head Bolts, (4)
8mm Flat Washers, (4) 8mm Lock Washers and (4) 8mm Flanged Nuts, (Figure 25). NOTE: Hoop
must be installed before Bumper is attached to vehicle. Fully tighten Hoop hardware.
16. Insert (1) 12mm Single Bolt Plate through the outer mounting hole in the Mounting Bracket and Bumper,
(Figure 26). Thread (1) 12mm Plastic Retainer onto the Bolt Plate to help hold it in place, (Figure 26).
Repeat this Step to attach (1) 12mm Double Bolt Plate to the (2) inner mounting holes, (Figure 26).
NOTE: Plastic Retainers are supplied to help with Bumper installation, use is not mandatory.
17. Repeat Step 16 to attach the Bolt Plates to the passenger/right side of the Bumper.
18. With assistance, hold the Bumper assembly up to the end of the frame and Support Brackets. Guide
the Bolt Plates through the frame and Brackets. Attach the driver/left end of the Bumper to the frame

FB2 Mid Width Front Bumper w/o Winch Frame
2021-2023 FORD BRONCO
www.rynoskinauto.com Page 8 of 16 5/20/22 (LS)
and Brackets with the included (3) 12mm Flat Washers, (3) 12mm Lock Washers and (3) 12mm Hex
Nuts, (Figure 27—29). Repeat this Step to attach the passenger/right side of the Bumper.
19. Center the Bumper to the vehicle and fully tighten all hardware.
20. Models with ACC sensor, plug wiring harness into sensor, (Figure 30)
21. Models with front license plate, attach the included License Plate Bracket onto the center Cover Panel
with (2) 6mm x20mm Button Head Bolts, (4) 6mm x12mm Flat Washers, and (2) 6mm Nylon Lock Nuts,
(Figure 31). Snap the included (2) Plastic Plugs into the Bracket.
22. Reinstall the center Cover Panel onto the bumper assembly using the hardware from Step 12 (Figure
32)
23. Determine if bar style LED light will be installed on Hoop. NOTE: Light not included.
Upper LED Light Installation with Hoop, (LED Light Bar and Hoop installation optional):
Models without Front License Plate:
a. Select the Left and Right “L” Top Brackets. Attach Brackets below Hoop with the included (2) 8mm
x 25mm Hex Bolts, (4) 8mm Flat Washers, (2) 8mm Lock Washers and (2) 8mm Hex Nuts, (Figure
33).
b. Attach the LED Light Bar to the Brackets with the included (2) 8mm x 16mm Hex Bolts, (2) 8mm
Lock Washers and (2) 8mm x 24mm Flat Washers, (Figure 33).
Models with Front License Plate:
a. Select the Left and Right “L” Bottom Brackets. Attach Brackets above Hoop with the included (2)
8mm x 25mm Hex Bolts, (4) 8mm Flat Washers, (2) 8mm Lock Washers and (2) 8mm Hex Nuts,
(Figure 34).
b. Attach the LED Light Bar to the Brackets with the included (2) 8mm x 16mm Hex Bolts, (2) 8mm
Lock Washers and (2) 8mm x 24mm Flat Washers, (Figure 34).
24. All models, reinstall the lower splash guard.
Do periodic inspections to the installation to make sure that all hardware is secure and tight.

FB2 Mid Width Front Bumper w/o Winch Frame
2021-2023 FORD BRONCO
www.rynoskinauto.com Page 9 of 16 5/20/22 (LS)
Driver/left Side Installation Pictured
(Fig 1) Remove splash guard (arrow).
Model with plastic bumper cover pictured.
(Fig 2) Models with plastic bumper cover
(see Fig 1), remove bumper pads from
bumper (driver/left side pictured)
(Fig 4) Remove factory hex bolts from
front to remove bumper assembly
(Fig 5) Remove the shutter assembly.
Models with ACC sensor (pictured),
unplug and remove sensor from shutter
assembly
Unplug wiring harness leading to the front
bumper. Remove hex bolts to remove
bumper
(Fig 3) Model with steel bumper, remove
cover from bumper (driver/left side
pictured)

FB2 Mid Width Front Bumper w/o Winch Frame
2021-2023 FORD BRONCO
www.rynoskinauto.com Page 10 of 16 5/20/22 (LS)
Driver/left Side Installation Pictured
(Fig 6) Models with ACC sensor, remove
the wiring harness to the sensor (arrows)
(Fig 7) Models with ACC sensor, insert the
ACC plug end down through the hole in
the top of the shutter assembly and out
through the front (arrow-also see Fig 11)
Front
Front
(Fig 8) Remove plastic nuts to remove the
triple nut plates (arrows). Passenger/right
side pictured
Front
(Fig 10) Driver/left side Outer Support
Bracket pictured
Front
(1) 10mm x 110mm Hex Bolt
(2) 10mm Flat washers
(1) 10mm Lock Washer
(1) 10mm Hex Nut
(Fig 9) Attach driver/left Inner and Outer
Support Brackets to end of frame
Inner
Bracket
Outer
Bracket

FB2 Mid Width Front Bumper w/o Winch Frame
2021-2023 FORD BRONCO
www.rynoskinauto.com Page 11 of 16 5/20/22 (LS)
Driver/left Side Installation Pictured
(Fig 12) Temporarily remove center cover plate
Front
(Fig 13) Gently pull end of harness out
through front of shutter assembly until it
stops
(3) 6mm x 25mm Button Head Bolts
(6) 6mm x 18mm Flat Washers
(3) 6mm Lock Washers
(3) 6mm Hex Nuts
(Fig 14) Models with ACC sensor, attach
sensor to back of Mounting Bracket
Front
(Fig 15) ACC sensor attached to Bracket
(1) Factory 6mm x 20mm Hex Bolt
(1) Factory 6mm Lock Washer
(1) Factory 6mm Flat Washer
(Fig 11) Reinstall shutter assembly.
Replace factory top bolts (circle-1 per
side) with included hardware.
Passenger/right pictured

FB2 Mid Width Front Bumper w/o Winch Frame
2021-2023 FORD BRONCO
www.rynoskinauto.com Page 12 of 16 5/20/22 (LS)
Driver/left Side Installation Pictured
(Fig 17) ACC sensor assembly attached to back
of Bumper
(Fig 18) Models without parking
sensors, push the included Plugs into
sensor mounts
Front
Front
Plastic Cover
Bumper
Bracket
(4) 6mm x 25mm Button Head Bolts
(4) 6mm x 18mm Flat Washers
(4) 6mm Lock Washers
(4) 6mm Hex Nuts
(Fig 16) Model with ACC sensor, attach Plastic Cover to front side of
Bumper Bracket and attach sensor and Mounting Bracket to back of
Bumper Bracket.

FB2 Mid Width Front Bumper w/o Winch Frame
2021-2023 FORD BRONCO
www.rynoskinauto.com Page 13 of 16 5/20/22 (LS)
Driver/left Side Installation Pictured
(Fig 23) Attach center Mesh Fill Panel to driver/left
side of Bumper
(1) 8mm x 25mm Hex Bolt
(2) 8mm Flat Washers
(1) 8mm Lock Washer
(1) 8mm Hex Nut
(Fig 22) Attach Mesh Fill Panel or cube light
(light not included) to driver/left side of Bumper
(2) 6mm Combo Bolts
(2) 6mm Flange Nuts
Front
(Fig 20) Push sensor and Seal into back of
Mount. Place Foam Spacer over sensor. Snap
Retaining Cap onto sensor mount and secure
the assembly with (2) Self Tapping Screws.
Front
(Fig 21) Attach driver/left “L” bracket
onto bumper
(1) 8mm x 25mm Hex Bolt
(2) 8mm Flat Washers
(1) 8mm Lock Washer
(1) 8mm Hex Nut
Foam Sensor Seal
Sensor
(Fig 19) Remove factory seal from end of
sensor. Push Foam Seal onto end of
sensor.
(1) Retaining Cap
(1) Foam Sensor
Seal
(1) Foam Spacer
(2) Self Tapping
Screws
Front

FB2 Mid Width Front Bumper w/o Winch Frame
2021-2023 FORD BRONCO
www.rynoskinauto.com Page 14 of 16 5/20/22 (LS)
Driver/left Side Installation Pictured
(Fig 28) Driver/left side of Bumper attached to
Double Bolt Plate pictured from below
Front
(Fig 25) Attach Hoop to top of Bumper
(2) 8mm x 25mm Button Head Bolts
(2) 8mm Lock Washers
(2) 8mm Flat Washers
(2) 8mm Flanged Nuts
Front
(Fig 24) Attach bar style LED light to
center “L” brackets in Bumper
(1) 8mm x 16mm Hex Bolt
(1) 8mm Lock Washer
(1) 8mm Flat Washer
(Fig 27) Attach driver/left side of Bumper to end
of frame and Support Brackets
(3) 12mm Flat Washers
(3) 12mm Lock Washers
(3) 12mm Hex Nuts
Front
(Fig 26) Insert 12mm Bolt Plates into Bumper
mount bracket and thread 12mm Plastic
Retainers onto Bolt Plates to help hold in place
(3) Plastic Retainers
Front
(1) 12mm Single Bolt
Plate
(1) 12mm Double Bolt
Plate

FB2 Mid Width Front Bumper w/o Winch Frame
2021-2023 FORD BRONCO
www.rynoskinauto.com Page 15 of 16 5/20/22 (LS)
Driver/left Side Installation Pictured
(Fig 29) Driver/left side of Bumper attached to
outer Single Bolt Plate pictured from below
Front
(Fig 30) Plug ACC harness connector into
ACC sensor
(Fig 32) Reinstall center Cover Plate
(Fig 31) Attach License Plate Bracket to front of
center Cover Panel (optional)
(2) 6mm x 20mm Button Head Bolts
(4) 6mm x 12mm Flat Washers
(2) 6mm Nylon Lock Nuts
(2) Plastic Plugs
Front

FB2 Mid Width Front Bumper w/o Winch Frame
2021-2023 FORD BRONCO
www.rynoskinauto.com Page 16 of 16 5/20/22 (LS)
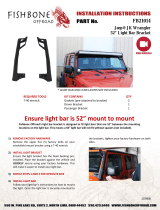
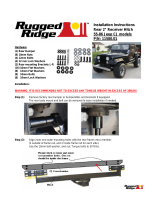
(Fig 34) Attach top LED L Brackets above tab on back
of Hoop (optional) (with license plate)
(1) 8mm x 25mm Hex Bolt
(2) 8mm Flat Washers
(1) 8mm Lock Washer
(1) 8mm Hex Nut
(1) 8mm x 16mm Hex Bolt
(1) 8mm Lock Washer
(1) 8mm Flat Washer
Front
Front
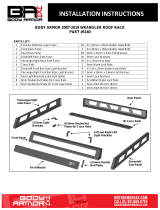
Installation is complete (Lights not included). The
provided (6) Sensor Cover Kits can be stuck on top of
sensors if customer need to eliminate sensor wave.
(Fig 33) Attach bottom LED L Brackets below tab
on back of Hoop (optional) (No license plate)
(1) 8mm x 25mm Hex Bolt
(2) 8mm Flat Washers
(1) 8mm Lock Washer
(1) 8mm Hex Nut
(1) 8mm x 16mm Hex
Bolt
(1) 8mm Lock Washer
(1) 8mm Flat Washer
/