Page is loading ...

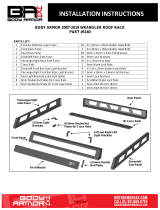
INSTALLATION INSTRUCTIONS
Page 1 of 3
Left and Right LED
Light Brackets
2007-2020 WRANGLER JK, JL INTERIOR CARGO RACK
PART #5147
PARTS LIST:
1 Center Rack Tray 10 8-1.25mm x 25mm Button Head Bolts
1 Driver/left Side Panel 20 8mm x 24mm x 2mm Flat Washers
1 Passenger/right Side Panel 10 8mm Nylon Lock Nuts
1 Driver/left Side Panel Base Seal 1 5mm Wrench
1 Passenger/right Side Panel Base Seal
PROCEDURE:
REMOVE CONTENTS FROM BOX. VERIFY ALL PARTS ARE PRESENT. READ
INSTRUCTIONS CAREFULLY BEFORE STARTING INSTALLATION. ASSISTANCE IS HIGHLY
RECOMMENDED.
1. Move to the driver/left rear side of the vehicle. Remove the (2) factory bolts attaching the side of
the top to the vehicle, (Figure 1).
2. Select the driver/left Side Panel. Apply the driver/left Adhesive Backed Base Seal to the bottom
of the Side Panel, (Figure 2).
3. Reuse the factory bolts to attach the driver/left Side Panel to the inside of the top, (Figure 3).
Do not fully tighten hardware at this time.
4. Select the passenger/right Side Panel. Repeats Step 1—3 to install the passenger/right Side
Panel, (Figure 7).
5. Select the Center Tray. Slide the Tray into position between the Side Panels. Attach the Tray to
the Side Panels with the included (10) 8mm x 25mm Button Head Bolts, (20) 8mm Flat
Washers and (10) 8mm Nylon Lock Nuts, (Figures 4—7). NOTE: Tighten the Tray to Side
Panel bolts first, then tighten the factory hardware attaching the Side Panels to inside of top.
6. Do periodic inspections to the installation to make sure that all hardware is secure and tight.
To protect your investment, Do not use any type of polish or wax that may contain abrasives that could damage the
finish. Mild soap may be used to clean the Inside Cargo Rack.
Passenger/right
Side Panel
Driver/left Side Panel
Base Seal
Center Rack Tray
Passenger/right Side
Panel
Base Seal
Driver/left Side
Panel

INSTALLATION INSTRUCTIONS
Page 2 of 3
(Fig 4) Attach Center Tray to driver/left Side Panel
Front
Front
(Fig 1) Remove (2) factory bolts attaching side
of top to body (driver/left side pictured)
(5) 8mm x 25mm Button Head Bolts
(10) 8mm Flat Washers
(5) 8mm Nylon Lock Nuts
(Fig 3) Reuse (2) factory bolts to attach driver/left
Side Panel to inside of top. Repeat to install the
remaining passenger/right Side Panel
Front
(Fig 2) Attach adhesive backed Seal
to bottom of driver/left Side Panel

INSTALLATION INSTRUCTIONS
Page 3 of 3
(Fig 6) Attach Tray to passenger/right Side Panel
Front
Front
Front
(5) 8mm x 25mm Button Head Bolts
(10) 8mm Flat Washers
(5) 8mm Nylon Lock Nuts
(Fig 7) Passenger/right side of Rack installed
(5) 8mm x 25mm Button Head Bolts
(10) 8mm Flat Washers
(5) 8mm Nylon Lock Nuts
(Fig 5) Attach Center Tray to driver/left Side Panel
/