Page is loading ...

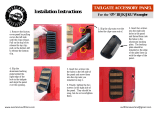
Installation Instructions
Trektop NX
Vehicle Application:
Jeep Wrangler Unlimited (JK) 4 Door
2007 – Current
Part Number: 56823
Before you begin installing your new Trektop NX, please read
all the instructions thoroughly.
For a smooth fit:
For easier installation, the top should be installed at a temperature above
72º F. Below this temperature, the fabric may contract an inch or more,
making it difficult to fit the vehicle.
It is normal for the fabric to contract and wrinkle when stored in the ship-
ping carton. Within a few days after installation, the fabric will relax and the
wrinkles will disappear.
Installation Tips
Safety glasses should be worn at all
times when installing this product.
This product is designed primarily to enhance the appearance of the vehicle and to shield the occupants from ordinary weather conditions. Do not rely in
any way on the components of this product to contain the occupants within the vehicle, or to protect against injury or death in the event of an accident, This product will not protect
the occupants from falling objects. Never operate the vehicle in excess of manufacturer’s specications.
WEAR SEAT BELTS AT ALL TIMES
Read and follow, precisely, all installation instructions provided when installing this product. Failure to do so may result in a poor t and could place occupants of the vehicle in a
potentially dangerous situation.
Tools Installation Time
Skill Level
2 Hours
2 - Moderately Easy
Phillips
Screwdriver
13mm SocketUtility Knife Ratchet
Safety
Glasses

Installation Instructions
Trektop NX
Vehicle Application:
Jeep Wrangler Unlimited (JK) 4 Door
2007 – Current
Part Number: 56823

Installation Instructions
Trektop NX
Vehicle Application:
Jeep Wrangler Unlimited (JK) 4 Door
2007 – Current
Part Number: 56823
Parts List
- Required parts for each installation section - Page number in Installation Guide
Sections 1 & 2
Section 3
Cable Brackets & Rear Bow Brackets
Rear Door Surrounds
Pages 6 to 9 of Guide
Page 10 of Guide
Cable Bracket Qty - 1
Part # 484.99 - Left
Cable Bracket Qty - 1
Part # 484.98 - Right
Rear Bow Bracket
Qty - 1
Part # 484.87 - Left
Rear Bow Bracket
Qty - 1
Part # 484.86 - Right
Rear Door Surround
Qty - 1
Part # 486.67 - Left
Rear Door Surround
Qty - 1
Part # 486.66 - Right
M8 x 75mm Knob
Qty - 2
Part # 478.90

Installation Instructions
Trektop NX
Vehicle Application:
Jeep Wrangler Unlimited (JK) 4 Door
2007 – Current
Part Number: 56823
Parts List
- Required parts for each installation section - Page number in Installation Guide
Sections 4 & 5
Sections 6, 7, 8 & 9
Knobs, Front Door Surrounds & Sunrider Brackets
Front & Rear Top Arches, Tailgate Bar Mounts & Side Bows
Pages 10, 11 & 12 of Guide
Pages 13 to 18 of Guide
Front Door Surround
Qty - 1
Part # 479.87 - Left
Front Door Surround
Qty - 1
Part # 479.86 - Right
M8 x 30mm Knob
Qty - 2
Part # 480.22
M8 x 75mm Knob
Qty - 2
Part # 478.90
Sunrider Bracket
Qty - 1
Part # 485.51 - Left
Sunrider Bracket
Qty - 1
Part # 485.50 - Right
Front Top Arch
Qty - 1
Part # 483.24
Rear Top Arch
Qty - 1
Part # 483.27
Tailgate Bar Mount
Qty - 1
Part # 488.47 - Left
Tailgate Bar Mount
Qty - 1
Part # 488.46 - Right
#8 x /12" Screw
Qty - 8
Part # 393.79
Side Bow
Qty - 2
Part # 485.47

Installation Instructions
Trektop NX
Vehicle Application:
Jeep Wrangler Unlimited (JK) 4 Door
2007 – Current
Part Number: 56823
Parts List
- Required parts for each installation section - Page number in Installation Guide
Sections 10, 12 & 13
Sections 14 & 19
Foam Seals, Middle Bow, Bow Clip & Web Strap
Rear Bow, Tailgate Bar, Fabric Top and Windows
Pages 19, 21 & 22 of Guide
Pages 16 to 31 of Guide
Web Strap with
Snap Hook
Qty - 2
Part # 460.37
Middle Bow
Qty - 1
Part # 486.21
Foam Tape Strips
Qty - 2
Part # 417.43
Foam Seals
Qty - 1 per side
Part # 457.76 (R) & 457.77 (L)
Bow Clip
Qty - 1,
Part # 479.22
Tailgate Bar
Qty - 1
Part # 489.46
Rear Bow
Qty - 1
Part # 486.18
Deck, Header Assembly, & Fabric Top
Right Side Window
Left Side Window
Rear Window

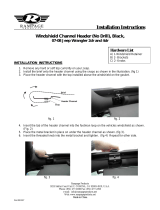
Page 6
Install Cable Brackets
Section 1
Step 1 484.98 Step 2
Step 1
Step 2
Unzip the upper rear and rear leg sport bar covers
and locate the upper sport bar bolt. Use a 13mm
socket and ratchet to remove the bolt and set it
aside to be reused.
Cut a horizontal slit the same width as the
Cable Bracket in the sport bar cover 1/4"
below the zipper and aligned with the bolt
hole.

Page 7
Install Cable Brackets (cont.)
Section 1
Step 3 484.98
Hardware
Cable Bracket Qty - 1
# 484.99 - Left
Cable Bracket Qty - 1
Part # 484.98 - Right
Step 3
Use the bolt that was removed to mount the
Cable Bracket to the sport bar through the
sport bar cover.
Repeat on both sides of the vehicle.

Page 8
Install Rear Bow Brackets
Section 2
Step 1 Step 2484.86
Hardware
Rear Bow Bracket
Qty - 1
Part # 484.87 - Left
Rear Bow Bracket
Qty - 1
Part # 484.86 - Right
Step 1 Step 2
Locate the rear sport bar bolt. Use a 13mm socket
and ratchet to remove the bolt and set it aside to be
reused.
Loosely install the Rear Bow Bracket with
the sport bar bolt. Mark where the bracket
contacts the sport bar cover and remove the
bracket.

Page 9
Install Rear Bow Brackets (cont.)
Section 2
Step 3 Step 4484.86
Step 3 Step 4
Cut a horizontal slit the same width as the
Rear Bow Bracket at this point.
Reinstall the Rear Bow Bracket through the
cover and tighten the bolt.
Zip all sport bar covers.
Repeat on both sides of the vehicle.

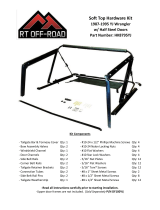
Page 10
Rear Door Surround
Qty - 1 per side
486.66 Right (shown)
486.67 Left
Install Rear Door Surrounds
Section 3
Step 1 Step 2486.66 478.90
Hardware
M8 x 75mm Knob
Qty - 1 per side
Part # 478.90
Insert the pin in the bottom of the Rear Door
Surround into the hole in the belt rail behind the
rear door opening. Press the channel along the top
of the Rear Door Surround around the horizontal
sport bar. Insert an M8 x 75mm Knob into the rear
position on the Door Surround.
Repeat on the other side of the vehicle.
Insert an M8 x 75mm Knob into the rear
position on the Door Surround.
Repeat on the other side of the vehicle.
Step 1 Step 2

Page 11
Install Front Door Surrounds
Section 4
Step 1 479.86 478.90
Hardware
Front Door Surround
Qty - 1 per side
479.86 Right (shown)
479.87 Left
M8 x 75mm Knob
Qty - 1 per side
Part # 478.90
Insert an M8 x 75mm Knob into the rear
position on the Door Surround.
Repeat on the other side of the vehicle.
Step 1 Step 2
Position the Front Door Surround on the sport bar
above the driver’s door and press it into place as
with the rear.

Page 12
Install Sunrider Bracket
Section 5
Step 1 Step 2485.50 480.22
Hardware
Sunrider Bracket
Qty - 1 per side
485.50 Right (shown)
485.51 Left
M8 x 30mm Knob
Qty - 1 per side
Part # 480.22
Step 1 Step 2
Place the Left Sunrider Bracket over the hole where
the Front and Rear Door Surrounds join.
Secure it with the M8 x 30mm Knob. Repeat
with the Right Sunrider Bracket. Repeat on
both sides.

Page 13
Install Front Top Arch
Section 6
Step 1 Step 2483.24
Hardware
Front Top Arch
Qty - 1
Part # 483.24
Step 1 Step 2
Insert one end of the Front Top Arch in to the slot
in the middle of one of the Front Door Surrounds.
Push the other end inward to flex the bow and
insert it into the slot on the other side of the vehicle.
Remove and dispose of paper film.

Page 14
Install Rear Top Arch
Section 7
Step 1
Step 2
483.27
Hardware
Rear Top Arch
Qty - 1
Part # 483.27
Step 1 Step 2
Insert one end of the Rear Top Arch in to the slot in
the middle of one of the Rear Door Surrounds. Push
the other end inward to flex the bow and insert it
into the slot on the other side of the vehicle.
Remove and dispose of paper film.

Page 15
Install Tailgate Bar Mounts
Section 8
Step 1 488.46
Hardware
Tailgate Bar Mount
Qty - 1 per side
488.46 Right (shown)
488.47 Left
Step 1
Orient the Tailgate Bar Mounts on the vehicle.
Hook the bottom of one mount under the
ledge and roll the mount toward the outside
of the vehicle until it clips into place under the
belt rail. Repeat this with both Tailgate Bar
Mounts.

Page 16
Attach Side Bows to Header/Fabric Assembly
Section 9
Step 1
Step 2
485.47
Hardware
Side Bow
Qty - 1 per side
Part # 485.47
Step 1 Step 2
Remove the screws in the Header Assembly and
set aside to be reused.
Insert Side Bows into Header Assembly on
each side.
Pivot quick release knobs to face toward
inside of assembly.

Page 17
Attach Side Bows to Header/Fabric Assembly (cont.)
Section 9
Step 3 485.47 393.79
Hardware
#8 x /12" Screw
Qty - 4 per side
Part # 393.79
Step 3 Step 4
Use #8 x 1/2" Screws to mount a Side Bow to
each side of the Header Assembly.
Rotate the Header Assembly and insert #8 x
1/2" Screws on each side.

Page 18
Attach Side Bows to Header/Fabric Assembly (cont.)
Section 9
Step 5
Step 5
Rotate the Header Assembly back into
position and reinstall the screws removed
in Step 1.

Page 19
Install Foam Tape Strips and Foam Seals
Section 10
Step 1 Step 2417.43 457.76
Hardware
Foam Tape Strips
Qty - 1 per side
Part # 417.43
Foam Seals
Qty - 1 per side
457.76 (R) shown
457.77 (L)
Peel the backing off the Foam Sea; and
install it on the passenger side of the
Header. Repeat on the driver side.
Step 1 Step 2
Peel the backing off the Foam Tape Strips
and install them on each side of the
Header.

Page 20
Mount Header Assembly to Sunrider Bracket
Section 11
Step 1 Step 2
Step 1 Step 2
Fold the Top Fabric toward the front of the
Header. Place the Header Assembly on
vehicle, with the backing up and the Side
Bows on top of the Door Surrounds.
Pull back on the quick release knob on the
Side Bow and slide the Side Bow over the
Sunrider Bracket. Repeat on the other side
of the vehicle.
/