Page is loading ...

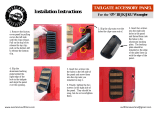
Installation Instructions
Trek Top PRO 2
Vehicle Application:
Jeep® Wrangler Unlimited 2007-2017
Part Number 54863
For a Smooth fit and easier installation, the top should,be installed at a
tenperature above 72°F. Below this temperature, the fabric may contract
an inch or more, making it difficulet to fit to the vehicle.
It is normal for the fabric to contract and wrinkle when stored in the ship-
ping carton. Within a few days after installation, the fabric will relax and
the wrinkles will disappear.
Do not rely in any way on the components of this product to protect
against injury or death in the event of an accident. Never operate the vehicle in excess of
manufacturer’s specications.
Read and follow, precisely, all installation instructions provided when installing this product.
Failure to do so may result in a poor t and could place occupants of the vehicle in a potentially
dangerous situation.
WEAR SEAT BELTS AT ALL TIMES
Safety glasses should be worn at all
times when installing this product.
WARNING
Installation Tips
Installation TimeTools
Skill Level
3 - Moderately Difcult
4 hours
#2 Phillips
Screwdriver
Utility Knife
Safety
Glasses
4mm Allen
Wrench
13mm Socket
Ratchet
10mm & 13mm
Wrenches

Vehicle Application:
Jeep® Wrangler Unlimited 2007-2017
Part Number 54863
Installation Instructions - Trek Top PRO 2
© 2018 Bestop, Inc.
Parts List
- Required parts for installation - Page number in Installation Guide
Installation Instructions
Trek Top PRO 2
M5 x 35mm Screw
Part #514.62
Qty. 2
M6 x 25mm Screw
Part #431.62
Qty. 12
M6 Nylon Lock Nut
Part #494.01
Qty. 22
M6 Flat Washer
Part #257.93
Qty. 22
M6 x 14mm Screw
Part #517.63
Qty. 10
M8 x 20mm Screw
Part #493.96
Qty. 2
M8 Lock Nut
Part #434.12
Qty. 2
M8 Flat Washer
Part #433.98
Qty. 4
Plastic Bushing
Part #473.40
Qty. 4
M5 Nylon Lock Nut
Part #526.76
Qty. 2
All Sections Hardware and Fasteners
#10-24 x 3/8”
Machine Screw
Part #195.92
Qty. 4
M5 Flat Washer
Part #575.27
Qty. 2

Vehicle Application:
Jeep® Wrangler Unlimited 2007-2017
Part Number 54863
Installation Instructions - Trek Top PRO 2
© 2018 Bestop, Inc.
Parts List
- Required parts for installation - Page number in Installation Guide
Installation Instructions
Trek Top PRO 2
Sections 1 & 2 Window Carriers, Cable Bracket & Rear Brackets
Section 3 Rear Door Surrounds
Window Carrier - Left
Part #510.55
Qty. 1
Rear Door Surround - Right
Part #486.66
Qty. 1
Rear Door Surround - Left
Part #486.67
Qty. 1
Window Carrier - Right
Part #510.56
Qty. 1
Rear Bracket - Left
Part #510.97
Qty. 1
Rear Bracket - Right
Part #510.96
Qty. 1
Cable or Spring
Bracket
Part #547.91
Qty. 2

Vehicle Application:
Jeep® Wrangler Unlimited 2007-2017
Part Number 54863
Installation Instructions - Trek Top PRO 2
© 2018 Bestop, Inc.
Parts List
- Required parts for installation - Page number in Installation Guide
Installation Instructions
Trek Top PRO 2
Sunrider Pivot Bracket
#544.18 - Right (shown)
#544.19 - Left
Qty. 1 of each
Strut Bracket - Left
Part #509.63
Qty. 1
Strut Bracket - Right
Part #509.64
Qty. 1
Halo - Right
Part #509.76
Qty. 1
Halo - Left
Part #509.77
Qty. 1
Halo Frame
Part #509.82
Qty. 1
Halo Center
Part #509.80
Qty. 1
Sections 4 & 5 Knobs, Front Door Surrounds & Sunrider Brackets
Sections 7 to 10 Halo Frame, Halo and Strut Brackets
M8 x 75mm Knob
Part #478.90
Qty. 4
M8 x 30mm Knob
Part #480.22
Qty. 2
Front Door Surround - Left
Part #479.87
Qty. 1
Front Door Surround - Right
Part #479.86
Qty. 1

Vehicle Application:
Jeep® Wrangler Unlimited 2007-2017
Part Number 54863
Installation Instructions - Trek Top PRO 2
© 2018 Bestop, Inc.
Parts List
- Required parts for installation - Page number in Installation Guide
Installation Instructions
Trek Top PRO 2
Sections 11 to 15 Seals & Struts
Sections 20 to 24 Center & Rear Arch Bows; #2 Bow Assembly
Halo Seal (Long)
Part #510.17
Qty. 1
Strut
Part #510.16
Qty. 2
Rear Seal (Short)
Part #511.87
Qty. 1
Upper TG Panel Seal
Part #514.04
Qty. 2
Lower TG Panel Seal
Part #514.05
Qty. 2
#2 Bow Assembly
#541.18
Qty. 1
Rear Arch Bow
#510.49
Qty. 1
Center Arch Bow
#483.27
Qty. 1
#2 Bow Pivot Bracket
#541.88 - Right (shown)
#541.87 - Left
Qty. 1 per side

Vehicle Application:
Jeep® Wrangler Unlimited 2007-2017
Part Number 54863
Installation Instructions - Trek Top PRO 2
© 2018 Bestop, Inc.
Parts List
- Required parts for installation - Page number in Installation Guide
Installation Instructions
Trek Top PRO 2
Foam Tape Strips
Qty - 2
Part # 417.43
Foam Seals
Qty - 1 per side
Part # 457.76 (R) & 457.77 (L)
Jumper Harness
Qty - 1
Part # 510.18
Deck, Header Assembly, & Fabric Top
Right Side Window
Left Side Window
Rear Window
Sections 22 to 29 Foam Seals, Jumper Harness, Fabric Top and Windows

Installation Instructions - Trek Top PRO 2
© 2018 Bestop, Inc.
Section 1 Install Cable or Spring Bracket to Window Carrier
Step 1 510.56
494.01
10mm Wrench
4mm Allen
Wrench
510.55
257.93
547.91
Window Carrier - Right
Part #510.56
Qty. 1
Window Carrier - Left
Part #510.55
Qty. 1
M6 Nylon Lock Nut
Part #494.01
Qty. 2
M6 Flat Washer
Part #257.93
Qty. 2
M6 Screw
Part #517.63
Qty. 2
517.63
HardwareTools
Step 1
Install a Cable Bracket #547.91 onto each
Window Carrier #510.55 & 510.56.
Attach the Cable Bracket using the hole
in the Window Carrier closest to the front
(the end with the molded cap).
Install the M6 Screw #517.63 and Flat
Washer #257.93 from the top and the M6
Nylon Lock Nut #494.01 from underneath
the Window Carrier and tighten.
Cable or Spring
Bracket
Part #547.91
Qty. 2
M6 Nylon
Lock Nut
M6 Screw
M6 Flat Washer
Window Carrier

Installation Instructions - Trek Top PRO 2
© 2018 Bestop, Inc.
Section 2 Install Rear Brackets
13mm Wrench
Step 2
Utility Knife
Step 1
Step 2
Unzip the upper rear and rear leg sport
bar covers and locate the upper sport bar
bolt. Use a 13mm wrench to remove the
bolt and set it aside for later use.
Repeat on both sides of the vehicle.
Cut two horizontal slits the same width
as the Rear Bracket tab in the sport bar
cover 1/4” below the zipper and aligned
with the bolt hole.
Step 1

Installation Instructions - Trek Top PRO 2
© 2018 Bestop, Inc.
Section 2 Install Rear Brackets (cont.)
13mm Wrench
510.97510.96
Step 3 Hardware
Use the bolts that were removed in Step 1
to mount the Rear Brackets #510.96 and
#510.97 to the sport bar on each side of
the vehicle, through the slits cut in the
sport bar cover.
Tighten the bolts just snug so that the
bracket can be adjusted in the slots for
side-to-side movement.
All bolts and screws will be tightened later
in the installation process.
Step 3
Rear Bracket - Left
Part #510.97
Qty. 1
Rear Bracket - Right
Part #510.96
Qty. 1

Installation Instructions - Trek Top PRO 2
© 2018 Bestop, Inc.
Section 3 Install Rear Door Surrounds
486.67 478.90486.66
Step 1 Step 2Hardware
Rear Door Surround
Part #486.66 RIght (shown)
Part #486.67 (left)
Qty. 1 of each
M8 x 75mm Knob
Part #478.90
Qty. 1 per side
Insert the pin in the bottom of the Rear
Door Surround #486.66 into the hole in
the belt rail behind the rear door opening.
Press the channel along the top of the Rear
Door Surround around the the horizontal
sport bar.
Passenger (right) side shown.
Repeat on the driver (left) side of the
vehicle.
Insert an M8 x 75mm Knob #478.90 into
the rear position on the Door Surround,
and tighten the knob.
Passenger side (right) shown.
Repeat on the driver (left) side of the
vehicle.
Step 1
Step 2

Installation Instructions - Trek Top PRO 2
© 2018 Bestop, Inc.
Section 4 Install Front Door Surrounds
Step 1
Hardware
Step 2
478.90 480.220544.19 479.87 195.92544.18 479.86
Step 1
Step 2
Attach the right Sunrider Pivot Bracket
#544.18 to the right Front Door Rail
#479.86 using two (2) #195.92 Screws.
Repeat on the left side of the vehicle,
using the #544.19 Left Sunrider Bracket.
Open the front door.
Position the right Front Door Rail
#479.86 on the sport bar above the
passenger side door and press it into
place on the sport bar.
Secure the Front Door Rail in place
with one (1) M8 x 75mm Knob
#478.90 at the front, and one
M8 x 30mm Knob #480.22 at the rear,
where the Front Door Rail and Rear
Door Rail overlap.
Repeat on the left side of the vehicle.
Sunrider Pivot Bracket
#544.18 - Right (shown)
#544.19 - Left
Qty. 1 per side
Front Door Rail
#479.86 - Right (shown)
#479.87 - Left
Qty. 1 per side
M8 x 75mm Knob
#478.90
Qty. 2
M8 x 30mm Knob
#480.22
Qty. 2
#10-24 x 3/8”
Machine Screw
Part #195.92
Qty. 4
1
2
#2 Phillips
Screwdriver

Installation Instructions - Trek Top PRO 2
© 2018 Bestop, Inc.
Section 6 Install Window Carrier
Step 1
Hardware
510.55 257.93 517.63510.56 494.01
Window Carrier
Assembly - Right
Part #510.56
Qty. 1
Window Carrier
Assembly - Left
Part #510.55
Qty. 1
M6 Flat Washer
Part #257.92
Qty. 4
M6 Nylon Lock Nut
Part #494.01
Qty. 4
M6 x 14 Screw
Part #517.63
Qty. 4
10mm Wrench
4mm Allen
Wrench
Step 1
Install the RIght Window Carrier
#510.56 to the Rear Bracket.
The plastic cap with the “B” logo goes
toward the front and the open end of
the Carrier goes toward the rear.
Tighten all fasteners just snug at this
time. All fasteners will be tightened
later in the installation process.
Repeat on the other side of the vehicle.

Installation Instructions - Trek Top PRO 2
© 2018 Bestop, Inc.
Section 7 Install Halo Frame
10mm Wrench
4mm Allen
Wrench
Step 1 Step 2
Hardware
494.01 517.63509.82 257.93
M6 Flat Washer
Part #257.92
Qty. 2
M6 x 14 Screw
Part #517.63
Qty. 2
Halo Frame
Part #509.82
Qty. 1
M6 Nylon Lock Nut
Part #494.01
Qty. 2
Step 1
Step 2
Install the Halo Frame #509.82 to the
Window Carrier.
Secure each Halo Frame to the Window
Carrier using two (2) M6x14 Screws
#517.63 and two (2) M6 Flat Washers
#257.93 from the outside and two (2) M6
Nylon Lock Nuts #494.01 from the inside.
Tighten fasteners just snug at this time.
All fasteners will be tightened later in the
installation process.
Repeat on both sides of the vehicle.

Installation Instructions - Trek Top PRO 2
© 2018 Bestop, Inc.
Section 8 Install Halo Center
Step 1
Hardware
509.80
Halo Center
Part #509.80
Qty. 1
Step 1
Position the Halo Center #509.80 on
the Halo Frame.
No fasteners are required for this step.
You may need assistance to hold the
Halo Center in place for the next
section of this installation.

Installation Instructions - Trek Top PRO 2
© 2018 Bestop, Inc.
Section 9 Install Halo
Step 1
Install the Right and Left Halo, #509.76
and #509.77 to the Window Carrier.
Install the tab feature on the upper
section of the Halo in the open end of
the Window Carrier. Secure with two (2)
M6x25 Screws #431.62 and two (2) M6
Flat Washers #257.93 from the out-
side, and two (2) M6 Nylon Lock Nuts
#494.01 from the inside in the outer-
most holes on each side.
Tighten screws just snug at this time so
that the Halo can be adjusted.
All fasteners will be tightened later in
the installation process.
10mm Wrench
4mm Allen
Wrench
Step 1
Hardware
494.01 431.62
509.77509.76 257.93
M6 Flat Washer
Part #257.92
Qty. 2
M6 x 25 Screw
Part #431.62
Qty. 2
Halo - Left
Part #509.77
Qty. 1
Halo - Right
Part #509.76
Qty. 1
M6 Nylon Lock Nut
Part #494.01
Qty. 2

Installation Instructions - Trek Top PRO 2
© 2018 Bestop, Inc.
Section 10 Install Halo Strut Bracket
Step 2
10mm Wrench
4mm Allen
Wrench
Step 1
494.01 431.62
509.64509.63 257.93
M6 Flat Washer
Part #257.92
Qty. 4
M6 x 25 Screw
Part #431.62
Qty. 4
Strut Bracket - Left
Part #509.63
Qty. 1
Strut Bracket - Right
Part #509.64
Qty. 1
M6 Nylon Lock Nut
Part #494.01
Qty. 4
Step 1
Step 2
Hook each Strut Bracket #509.63
and #509.64 under the vehicle belt
rail inside the vehicle and rotate the
bracket up.
Secure each Strut Bracket to the Halo
and belt rail using two (2) M6x25
Screws #431.62, two (2) M6 FLat Wash-
ers #257.93, and two (2) M6 Nylon Lock
Nuts #494.01.
Tighten screws just snug at this time,
so that Halo can be adjusted later as
necessary.
All fasteners will be tightened later in
the installation process.
Repeat on both sides of the vehicle.
Hardware

Installation Instructions - Trek Top PRO 2
© 2018 Bestop, Inc.
Section 11 Install Halo Lower Screw
M8 Flat Washer
Part #433.98
Qty. 4
M8 x 20 Screw
Part #493.96
Qty. 2
M8 Nylon Lock Nut
Part #434.12
Qty. 2
Ratchet
13mm Socket
13mm Wrench
Step 1
433.98493.96 434.12
Hardware
Step 1
Use two (2) M8x20 Screws #493.96,
four (4) M8 Flat Washers #433.98, and
two (2) M8 Nylon Lock Nuts #434.12 to
secure the Halo to the vehicle belt rail.
It may be easier to install the screw
from the bottom and the lock nut from
the top.
Tighten screws just snug at this time so
that the Halo can be adjusted.
All fasteners will be tightened later in
the installation process.
Repeat on both sides of the vehicle.

Installation Instructions - Trek Top PRO 2
© 2018 Bestop, Inc.
Section 12 Install Halo Seal
Step 1
510.17
Hardware
Halo Seal (Long)
Part #510.17
Qty. 1
Step 1
Install the Halo Seal #510.17 on the
Halo. Start at the bottom on each side
and work toward the center.
Align the bottom of the Seal to match
the angle on the tailgate opening.

Installation Instructions - Trek Top PRO 2
© 2018 Bestop, Inc.
Section 13 Install Rear Window Glass
Hardware
10mm Wrench
4mm Allen
Wrench
M6 Flat Washer
Part #257.93
Qty. 4
M6 x 25 Screw
Part #431.62
Qty. 4
M6 Nylon Lock Nut
Part #494.01
Qty. 4
Close the tailgate.
With at least two people, install the Rear
Window Glass onto the Halo. Rest the
bottom of the glass on the tailgate, with
one person holding the glass in place.
Secure the glass with two (2) M6x25
Screws #431.62 and two (2) M6 Flat
Washers #257.93 from the outside, and
two (2) M6 Nylon Lock Nuts #494.01 from
the inside, in holes for the hinges on each
side.
If the hinge holes don’t align, insert a
screwdriver in the hole to align the parts.
Take a close look at the window installation.
Make sure the window is centered in the
opening, and has an even gap from the glass
to Halo on all sides.
Adjust the hinge mounting or Halo fasteners to
achieve an even gap between glass and Halo
Step 1
257.93494.01 431.62
Step 1
Step 2
Important
2 or more people are required to
install the Rear Window Glass.
Take extra care fastening the gas strut brackets
and the upper hinge plates to safety glass hatch.
Over tightening may result in cracking or breaking
the glass hatch.

Installation Instructions - Trek Top PRO 2
© 2018 Bestop, Inc.
Section 14 Install Struts
Take extra care fastening the gas strut brackets
and the upper hinge plates to safety glass hatch.
Over tightening may result in cracking or breaking
the glass hatch.
CAUTION
Strut
Part # 510.16
Qty. 2
To Remove
Step 1
510.16
Hardware
Flat Blade
Screwdriver
Step 1 To Remove
To install the Struts #510.16:
1 Secure the top (tube section) of
each Strut to the Rear Window Glass by
pressing the end onto the round stud.
2 Secure the bottom to the lower
Strut Bracket.
You may have to rotate the end of the
Strut to align properly with the stud.
Repeat with both Struts.
1 Use a screwdriver to pry up the
retainer.
2 Pull the end off the round stud to
remove the Strut.
Repeat with both Struts.
/