Page is loading ...

5. Capacity:
Dimmer Approx. No. Max.
Model of lamps Current*
AYF-103P 20 8A
DVF-103P 20 8A
DVSCF-103P 20 8A
AYF-103P-277 40 6A
DVF-103P-277 40 6A
DVSCF-103P-277 40 6A
* As measured from incoming hot wire
(blue) on dimmer. To determine total
load on the dimmer circuit, refer to
ballast label. Each ballast has an
associated input current. The total load
is found by adding up all the ballast
currents for all ballasts on the dimmer.
6. Use only the lamp types listed on the
label of the ballast. Compact fluorescent
lamps must have 4 pins for dimming.
7. AYF-103P, DVF-103P, and DVSCF-
103P operate at 120V only. AYF-103P-
277, DVF-103P-277, and DVSCF-103P-
277 operate at 277V only.
8. In multi-phase applications, use a
separate neutral for each dimmer circuit.
If further information is necessary,
contact the Lutron Hotline 1-800-523-
9466.
9. Do not use two dimmers in the same 3-
way circuit.
10. Wire dimmer in accordance with all
national and local electrical codes.
11. This dimmer is designed to operate in
temperatures between 0
°
C and 40
°
C
(32
°
F to 104
°
F).
12. The Diva® dimmer is compatible with
designer-style and Lutron screwless
Claro® wallplates. The Ariadni® dimmer
is compatible with standard wallplates
and Lutron FassadaTM wallplate.
Wallplates are not included.
13. The wire connectors provided are
suitable for copper wire only. They can
be used to join one No. 18, 16, 14, 12,
or 10 gauge wire with one or two No. 14
or 12 gauge wires.
14. Clean dimmer with a
soft damp cloth
only
. Do not use any chemical cleaners.
Package Contents
• Single-pole/3-way dimmer
• Mounting screws (2)
• Wire connectors:
single-pole cap off (1,small)
single-pole/3-way (6)
Important Notes
1. CAUTION: To reduce the risk of
overheating and possible damage to
other equipment, do not use to control
receptacles, motor-operated appliances,
or transformer-supplied appliances.
2. These dimmers require a neutral
connection in the wallbox. If your
wallbox does not have a neutral, one
must be run. The dimmers will not
operate without one.
3. When no “grounding means” exist within
the wallbox then the NEC® 2002, Article
404-9 allows a dimmer without a
grounding connection to be installed as
a replacement, as long as a plastic,
noncombustible wallplate is used. For
this type of installation, cap or remove
the green ground wire on the dimmer
and use an appropriate wallplate such
as Lutron's Claro® or FassadaTM series
wallplates.
4. Use with Lutron Hi-lume® FDB or Eco-
10TM Electronic Fluorescent Dimming
Ballasts only. Do not use with any other
ballasts.
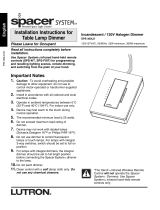
Preset Fluorescent Dimmer
Installation Instructions
Please Leave for Occupant
Single-Pole/3-Way
277V Models:
AYF-103P-277
DVF-103P-277
DVSCF-103P-277
120V Models:
AYF-103P
DVF-103P
DVSCF-103P
Ariadni® Diva®

4A. Single-pole wiring
(See Single-Pole Wiring Diagram)
• Connect the bare or green ground wire
of the dimmer to the bare or green
ground wire in the wallbox.
• Using a wire connector provided, cap off
the violet wire. This wire is only used in
a 3-way installation.
• Connect the white dimmer wire to the
neutral wire in the wallbox.
• Connect the blue dimmer wire to the
120V or 277V supply (hot) wire.
• Connect the red dimmer wire to the wire
going to the black wire of the ballasts.
• Connect the yellow dimmer wire to the
wire going to the orange wire of the
ballasts.
4B. 3-way wiring
(See 3-Way Wiring Diagram)
• Connect the bare or green ground wire
of the dimmer to the bare or green
ground wire in the wallbox.
• Connect the white dimmer wire to the
neutral wire in the wallbox.
• Connect the blue dimmer wire to one of
the two wires coming from the other
switch location.
• Connect the violet dimmer wire to the
second wire coming from the other
switch location.
• Connect the red dimmer wire to the wire
going to the black wire of the ballasts.
• Connect the yellow dimmer wire to the
wire going to the orange wire of the
ballasts.
5. Mount and align dimmer. Do not pinch
wires.
6. Screw on faceplate.
7. Turn power ON.
ON
OFF
ON
OFF
ON
OFF
ON
OFF
ON
OFF
ON
OFF
1/2"or 5/8"
Before Installation
CAUTION: Check new installations for short
circuits BEFORE installing the fluorescent
dimmer. Turn power OFF at circuit breaker
or fusebox. Connect a standard switch as
shown in the Test Switch Wiring Diagram.
Turn power ON. If lights do not come on, a
break in the wiring exists. If the breaker
trips, there is a short in the wiring. If
necessary, turn power OFF and correct any
wiring problems, recheck the circuit, then
proceed to Installation. Warranty is void if
dimmer is turned ON in a shorted circuit.
Installation
1. WARNING: Turn power OFF at circuit
breaker or remove fuse.
2. Remove test switch from wallbox.
3. Strip insulation or trim wires to expose
1/2" or 5/8" of wire:
1/2" for 10, 12, and 14 gauge.
5/8" for 16 and 18 gauge.
Remove all inner side sections
(shaded) in any ganged installation.
Do not remove outer side sections.
Multigang Installations
Dimmers can be grouped together or with
standard switches under a common
wallplate. When ganging these dimmers,
remove the inner side sections. No capacity
derating is required for these dimmers.

Test Switch Wiring Diagram
120V, 60Hz
or
277V, 60Hz
Lutron Dimming Ballast
WHITE
ORANGE
BLACK
Lutron Dimming Ballast
WHITE
ORANGE
BLACK
HOT
NEUTRAL
Standard
Switch
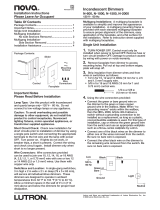
Single Pole Wiring Diagram
120V, 60Hz
or
277V, 60Hz
Lutron Dimming Ballast
Yellow
White
White
Orange
Black
Lutron Dimming Ballast
White
Orange
Black
Red
Green or
Bare
Blue
Violet
Hot
Neutral
Ground
Cap off
Diva or Ariadni
Dimmer
Yellow
White
Blue
Green or Bare
Red
Violet
To additional Lutron Dimming Ballasts
To additional Lutron Dimming Ballasts
3-Way Wiring Diagram
120V, 60Hz
or
277V, 60Hz
Lutron Dimming Ballast
Yellow
White
White
Orange
Black
Lutron Dimming Ballast
White
Orange
Black
Red
Green or
Bare
Blue
Violet
Hot
Neutral
Ground
Ground
3-way
Switch
Diva or Ariadni
Dimmer
To additional Lutron Dimming Ballasts
Yellow
White
Red
Green or Bare
Violet
Blue
Ground
Ground
Note: Wire location will vary by
product. Reference wires by color,
not location.
Note: Wire location will vary by
product. Reference wires by color,
not location.

Technical Assistance
If you have questions concerning the
installation or operation of this
product, call the
Lutron Technical
Support Center
. Please provide
exact model number when calling.
(800) 523-9466 (U.S.A., Canada,
and the Caribbean)
Other countries call (610) 282-3800
Fax (610) 282-3090
Internet: www.lutron.com
Lutron Electronics Co., Inc.
7200 Suter Road
Coopersburg, PA 18036-1299
Made and printed in the U.S.A. 10/03 P/N 031-159 Rev. C
Limited Warranty
Lutron will, at its option, repair or replace any unit
that is defective in materials or manufacture within
one year after purchase. For warranty service,
return unit to place of purchase or mail to Lutron at
7200 Suter Rd., Coopersburg, PA 18036-1299,
postage pre-paid.
THIS WARRANTY IS IN LIEU OF ALL OTHER
EXPRESS WARRANTIES, AND THE IMPLIED
WARRANTY OF MERCHANTABILITY IS LIMITED
TO ONE YEAR FROM PURCHASE. THIS
WARRANTY DOES NOT COVER THE COST OF
INSTALLATION, REMOVAL OR
REINSTALLATION, OR DAMAGE RESULTING
FROM MISUSE, ABUSE, OR DAMAGE FROM
IMPROPER WIRING OR INSTALLATION. THIS
WARRANTY DOES NOT COVER INCIDENTAL
OR CONSEQUENTIAL DAMAGES.
This warranty gives you specific legal rights, and
you may have other rights which vary from state to
state. Some states do not allow the exclusion or
limitation of incidental or consequential damages,
or limitation on how long an implied warranty may
last, so the above limitations may not apply to you.
This product may be covered by one or more of
the following U.S. patents: 4,803,380; 4,835,343;
4,876,498; 4,954,768; 5,207,317; 5,262,678;
5,359,231; DES 342,234; DES 364,141 and
corresponding foreign patents. U.S. and foreign
patents pending. Lutron, Ariadni, Claro, Diva,
and Hi-lume are registered trademarks and Eco-
10 and Fassada are trademarks of Lutron
Electronics Co., Inc. NEC is a registered
trademark of the National Fire Protection
Association, Quincy, Massachusetts.
© 2003 Lutron Electronics Co., Inc.
Lamp Aging
Best dimming performance is
achieved after new lamps have been
aged (burned-in) by running at full
intensity for at least 100 hours.
Minimum Light Level
Adjustment
This unit is factory calibrated and
does not normally require low-end
light level adjustment. If lamps flicker
or drop out at the minimum dimming
level, there may be an installation
error or the low-end light level may
need to be reset. Continued use of
the system in this mode will cause
premature lamp failure. If this is
occurring, call the
Lutron Technical
Support Center
at: 1-800-523-9466
Ariadni® Operation
True 3-way.
A 3-way dimmer and a standard 3-
way switch provide preset switching
from both locations and light level
control from the dimmer.
Diva® Operation
True 3-way.
A 3-way dimmer and a standard 3-
way switch provide preset switching
from both locations and light level
control from the dimmer.
Slider
moves up
to brighten
and down
to dim
lights to
desired
level.
Paddle
switch
turns
lights on
to preset
level.
Toggle
switch
turns lights
on to preset
level.
Slider
moves up to
brighten
and down to
dim lights to
desired
level.
/