Page is loading ...

Decorative 3” Round In-Ground Mailbox Post (Model 7507)
Assembly Instructions
Thank you for purchasing this premium mailbox post. If you have any questions about how to
assemble or install this product, or if you need any replacement parts, please call us directly at
(800) 464-7491 or contact us at www.architecturalmailboxes.com.
The method for installing the
mailbox onto the post and the post
into the ground depends on the
type of mailbox being used. Please
refer to the instructions included
with your mailbox for the remainder
of the installation. Use the large
bolts, nuts and washers to attach
the mailbox to the post.
4
Tools
Two Crescent or Open
End Wrenches
(not included)
- or -
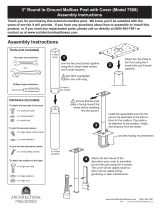
1
Slide the Top Plate onto the Post
end until the bolt holes are aligned.
2
Attach the Top Plate to the Post
using the 4 small bolts, small
washers and small nuts.
Hardware
x 8, large washers
x 4, large nuts
x 4, large hex bolts used for
mounting to top of plate
x 8, small washers
x 4, small nuts
x 4, small hex bolts
To attach the mailbox to the top plate:
© 2008, Architectural MailboxesRev. B
www.architecturalmailboxes.com (800) 464-7491
3
Attach the Decorative Post Cover to the post as
shown using the 4 screws. Make sure to partially
screw in all screws before tightening them to help
align the two halves of the post cover. DO NOT
twist or move the cover on the post after it is
tightened - this may scratch the post.
This step can be performed before or after the
mailbox is attached to the top of the post.
The Decorative Post Cover rests against the
ground and does not require any further attachment
to the post or any other part.
Phillips head
screwdriver
(not included)
screws x 4
pads x 4
Optional: If desired, attach the
self-adhesive rubber pads to the cover
or to the post where the two parts meet
to prevent rattling or rubbing.
To attach the post cover to the post:
To attach the plate to the post:
R
x 4, long screws used for
mounting to side of plate
x 4, wing nuts
x4, spacers
(not used for all configurations)
/


