Page is loading ...

SALSBURY INDUSTRIES
1010 East 62
nd
Street, Los Angeles, CA 90001-1598
Phone: 1-800-624-5269 Int’l Phone: 323-846-6700
Fax: 1-800-624-5299 Int’l Fax: 323-846-6800
Installation instructions are provided as general guidelines. It is advised that a professional installer be consulted. Salsbury Industries assumes no product assembly or installation liability.
Copyright © 2011 Salsbury Industries. All rights reserved. (Rev. 01, 11/1/11)
Eagle Rural Mailboxes – 4855E
Eagle Newspaper Holder on Standard or Decorative
Mailbox Post Installation Instructions
U.S.P.S. APPROVED
Thank you for selecting Salsbury’s 4855E eagle rural mailbox. This instruction sheet is for installing the 4855E eagle rural mailbox along with a 4815E eagle
newspaper holder on a standard or decorative mailbox post. Other installation instructions are available for installing the mailbox on a standard mailbox post, or on a
decorative mailbox post, installing the mailbox on spreaders, and installing the post in a concrete footing.
When you install a curbside or roadside mailbox, make sure that it is easily accessible to the mail carrier. By regulation it should be 41” to 45” from the ground or
street surface up to the inside floor of the mailbox. The door should be set back 6” to 8” back from the front face of the curb or the road edge. However, you should
check with your local postmaster to ensure that the mailbox is installed according to local regulations.
Newspaper Holder to Standard Mailbox Post Installation
Install four (4) 5/16”-18 x 2” long pan head bolts provided with the post
through the four (4) square holes shown in the inside floor of the newspaper
holder and through the four (4) tapped holes on the top plate of the standard
mailbox post. Insert a Phillips head screw driver through each square hole
directly above, and in the top of the newspaper holder, to tighten the pan head
bolts.
Mailbox Installation on a Newspaper Holder and Standard
Mailbox Post
All hardware to attach the mailbox to the newspaper holder is included with
the newspaper holder. To attach the mailbox to the newspaper holder, install
four (4) 5/16”-18 X 3/4” long carriage bolts into (4) square holes in the floor of
the mailbox and through the four (4) square holes shown on the top of the
newspaper holder. Install 5/16” flat washers and 5/16”-18 hex nuts on the
ends of the four (4) bolts protruding below the top of the newspaper holder.
Cover the hex nuts with cap plugs. Installation is complete. Additional
hardware provided is not needed and may be discarded.
Newspaper Holder to Decorative Mailbox Post Installation
All hardware to attach the newspaper holder to the post is included with the
post. To install the newspaper holder to the post, install six (6) 5/16”-18 X
3/4” long carriage bolts through the (6) square holes shown in the inside floor
of newspaper holder and through the six (6) square holes on the top plate of
the decorative post arm. Install 5/16” flat washers and 5/16”-18 hex nuts on
the ends of the six (6) bolts protruding below the top plate of the decorative
post arm. Cover the hex nuts with cap plugs.
Mailbox Installation on a Newspaper Holder and Decorative
Mailbox Post
All hardware to attach the mailbox to the newspaper holder is included with
the newspaper holder. To attach the mailbox to the newspaper holder, install
four (4) 5/16”-18 X 3/4” long carriage bolts into (4) square holes in the floor of
the mailbox and through the four (4) square holes shown on the top of the
newspaper holder. Install 5/16” flat washers and 5/16”-18 hex nuts on the
ends of the four (4) bolts protruding below the top of the newspaper holder.
Cover the hex nuts with cap plugs. Installation is complete. Additional
hardware provided is not needed and may be discarded.

SALSBURY INDUSTRIES
1010 East 62
nd
Street, Los Angeles, CA 90001-1598
Phone: 1-800-624-5269 Int’l Phone: 323-846-6700
Fax: 1-800-624-5299 Int’l Fax: 323-846-6800
Installation instructions are provided as general guidelines. It is advised that a professional installer be consulted. Salsbury Industries assumes no product assembly or installation liability.
Copyright © 2011 Salsbury Industries. All rights reserved. 11/1/11
Eagle Rural Mailboxes – 4855E
Eagle Newspaper Holders on Deluxe Mailbox Post
Installation Instructions
U.S.P.S. APPROVED
Installing Newspaper Holders on Deluxe Mailbox
Posts
Thank you for selecting Salsbury Industries 4855E eagle rural mailbox.
This instruction sheet is for installing 4855E mailbox(es) on a Salsbury
deluxe mailbox post with 4815E eagle newspaper holder(s). Other
installation instructions are available for installing the mailboxes on a
standard mailbox post or on a decorative mailbox post, installing the mailbox
on spreaders, and mounting the post in a concrete footing.
When you install a curbside or roadside mailbox, make sure that it is easily
accessible to the mail carrier. By regulation it should be 41” to 45” from the
ground or street surface up to the inside floor of the mailbox. The door
should be set back 6” to 8” from the front face of the curb or the road edge.
However, you should check with your local postmaster to ensure that the
mailbox is installed according to local regulations.
Newspaper Holder Installation to Deluxe Post
Installation of newspaper holders to each deluxe post, 4870 one-sided, or
4872 and 4874 two-sided, is the same. Attach one newspaper holder to the
4870 one-sided post. Attach one additional newspaper holder to the 4872
two-sided post and three additional newspaper holders to the 4874 two-sided
post. All hardware required to assemble the newspaper holders(s) to the
deluxe mailbox post is provided with the post. To attach a newspaper holder
to the post, install four (4) 5/16”-18 x 2” long pan head bolts through the four
(4) square holes shown in the inside floor of the newspaper holder and
through the four (4) tapped holes in the arm of the deluxe mailbox post.
Insert a Phillips head screw driver through each square hole directly above,
and in the top of the newspaper holder, to tighten the pan head bolts.
Repeat these steps for the other newspaper holder(s).
Mailbox Installation to Newspaper Holders
Installation of the mailbox to the newspaper holder on each deluxe post,
4870 one-sided, or 4872 and 4874 two-sided, is the same. Attach one
mailbox to the 4870 one-sided post. Attach one additional mailbox to the
4872 two-sided post and three additional mailboxes to the 4874 two-sided
post. All hardware to attach the mailbox(es) to the newspaper holder(s) is
included with the newspaper holder(s). To attach a mailbox to a newspaper
holder, open the front door of the mailbox and install four (4) 5/16”-18 X 3/4”
long carriage bolts into (4) square holes in the floor of the mailbox and
through the four (4) square holes shown on the top of the newspaper holder.
Install 5/16” flat washers and 5/16”-18 hex nuts on the ends of the four (4)
bolts protruding below the top of the newspaper holder. Cover the hex nuts
with cap plugs. Repeat these steps for the other mailbox(es). Installation is
now complete. Additional hardware provided is not needed and may be
discarded.
Note: On the 4870 deluxe mailbox post, the longer mounting arm which
accommodates the newspaper holder and mailbox can be on either the left
or right side. When attaching the post to the ground, position the post so the
longer mounting arm is on the side desired. Then mount the newspaper
holder and mailbox on the mounting arm with the mailbox facing the street or
roadway.

SALSBURY INDUSTRIES
1010 East 62
nd
Street, Los Angeles, CA 90001-1598
Phone: 1-800-624-5269 Int’l Phone: 323-846-6700
Fax: 1-800-624-5299 Int’l Fax: 323-846-6800
Installation instructions are provided as general guidelines. It is advised that a professional installer be consulted. Salsbury Industries assumes no product assembly or installation liability.
Copyright © 2011 Salsbury Industries. All rights reserved. 11/1/11
Eagle Rural Mailboxes – 4855E
2-Wide and 4-Wide Spreader with Eagle Newspaper Holders
on a Standard Mailbox Post Installation Instructions
U.S.P.S. APPROVED
Installing Mailboxes on 2-Wide & 4-Wide Spreader
with Newspaper Holders on a Standard Mailbox Post
Thank you for selecting Salsbury’s 4855E eagle rural mailbox.
This instruction sheet is for installing 4855E eagle rural mailboxes on 2-wide
and 4-wide spreaders with 4815E eagle newspaper holders and a standard
mailbox post. A different instruction sheet is available for installing 4855E
eagle rural mailboxes on a 3-wide spreader with 4815E eagle newspaper
holders and a standard mailbox post. Other installation instructions are
available for installing the mailboxes and spreaders with newspaper holders
on a modern decorative mailbox post, mounting a single mailbox on a
decorative or standard mailbox post, mounting a single newspaper holder,
and mounting the post in a concrete footing.
When you install a curbside or roadside mailbox, make sure that it is easily
accessible to the mail carrier. By regulation it should be 41” to 45” from the
ground or street surface up to the inside floor of the mailbox. The door
should be set back 6” to 8” back from the front face of the curb or the road
edge. However, you should check with your local postmaster to ensure that
the mailbox is installed according to local regulations.
Spreader Installation to Standard Post
The installation of the 2-wide or 4-wide spreader to the standard mailbox
post is the same. All hardware to attach the spreader to the standard
mailbox post is included with the spreader. To attach the spreader to the
standard mailbox post, install four (4) 5/16”-18 X 1” long hex flange head
bolts through the four (4) center square holes of the spreader and through
the four (4) tapped holes on the top plate of the standard mailbox post.
Cover the hex flange head bolts with cap plugs.
Newspaper Holders Installation to Spreader
Installation of newspaper holders to the 2-wide or 4-wide spreader is the
same. Attach two (2) additional newspaper holders to the 4-wide spreader.
All hardware to attach the newspaper holders to the spreader is included with
the spreader. To attach a newspaper holder to the spreader, install four (4)
5/16”-18 x 1-3/4” long carriage bolts through the four (4) square holes shown
in the inside floor of the newspaper holder and through the four (4)
corresponding holes on the spreader. Install 5/16” flat washers and 5/16”-18
hex nuts on the ends of the four (4) bolts protruding below the bottom of the
spreader. Repeat these steps for the other newspaper holder(s).
Mailbox Installation to Newspaper Holders
Installation of the mailbox to the newspaper holder is the same on the 2-wide
or 4-wide spreader. Attach two (2) additional mailboxes to the newspaper
holders on the 4-wide spreader. All hardware to attach the mailboxes to the
newspaper holders is included with the newspaper holders. To attach a
mailbox to a newspaper holder, install four (4) 5/16”-18 X 3/4” long carriage
bolts into (4) square holes in the floor of the mailbox and through the four (4)
square holes shown on the top of the newspaper holder. Install 5/16” flat
washers and 5/16”-18 hex nuts on the ends of the four (4) bolts protruding
below the top of the newspaper holder. Cover the hex nuts with cap plugs.
Repeat these steps for the other mailbox(es). Installation is now complete.
Additional hardware provided is not needed and may be discarded.

SALSBURY INDUSTRIES
1010 East 62
nd
Street, Los Angeles, CA 90001-1598
Phone: 1-800-624-5269 Int’l Phone: 323-846-6700
Fax: 1-800-624-5299 Int’l Fax: 323-846-6800
Installation instructions are provided as general guidelines. It is advised that a professional installer be consulted. Salsbury Industries assumes no product assembly or installation liability.
Copyright © 2011 Salsbury Industries. All rights reserved. 11/1/11
Eagle Rural Mailboxes – 4855E
3-Wide Spreader with Eagle Newspaper Holders
on a Standard Mailbox Post Installation Instructions
U.S.P.S. APPROVED
Installing Mailboxes on Spreader with Newspaper
Holders on a Standard Mailbox Post
Thank
you for selecting Salsbury’s 4855E eagle rural mailbox.
This instruction sheet is for installing 4855E eagle rural mailboxes on a 3-
wide spreader with 4815E eagle newspaper holders and a standard mailbox
post. A different instruction sheet is available for installing 4855E eagle rural
mailboxes on 2-wide and 4-wide spreaders with 4815E eagle newspaper
holders and a standard mailbox post. Other installation instructions are
available for installing the mailboxes and spreaders with newspaper holders
on a modern decorative mailbox post, mounting a single mailbox on a
decorative or standard mailbox post, mounting a single newspaper holder,
and mounting the post in a concrete footing.
When you install a curbside or roadside mailbox, make sure that it is easily
accessible to the mail carrier. By regulation it should be 41” to 45” from the
ground or street surface up to the inside floor of the mailbox. The door
should be set back 6” to 8” back from the front face of the curb or the road
edge. However, you should check with your local postmaster to ensure that
the mailbox is installed according to local regulations.
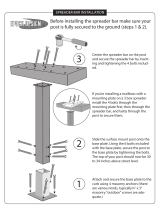
Spreader and Newspaper Holders Installation to
Standard Post
Attaching the spreader to the standard mailbox post requires simultaneously
attaching the center newspaper holder to the spreader and to the standard
mailbox post. Start by installing four (4) 5/16”-18 x 2” long pan head bolts
provided with the post through the four (4) square holes shown in the inside
floor of the center newspaper holder, through the four (4) center square
holes in top of the spreader, and through the four (4) tapped holes on the top
plate of the standard mailbox post. Insert a Phillips head screw driver
through each square hole directly above, and in the top of the newspaper
holder, to tighten the pan head bolts.
All hardware to attach the remaining two newspaper holders to the spreader
is included with the spreader. To attach an additional newspaper holder,
install four (4) 5/16”-18 x 1-3/4” long carriage bolts through the four (4)
square holes shown in the inside floor of the newspaper holder and through
the corresponding square holes in top of the spreader. Install 5/16” flat
washers and 5/16”-18 hex nuts on the ends of the four (4) bolts protruding
below the bottom of the spreader. Repeat these steps for the remaining
newspaper holder.
Mailbox Installation to Newspaper Holders
All hardware to attach the mailboxes to the newspaper holders is included
with the newspaper holders. To attach a mailbox to a newspaper holder,
install four (4) 5/16”-18 X 3/4” long carriage bolts into (4) square holes in the
floor of the mailbox and through the four (4) square holes shown on the top
of the newspaper holder. Install 5/16” flat washers and 5/16”-18 hex nuts on
the ends of the four (4) bolts protruding below the top of the newspaper
holder. Cover the hex nuts with cap plugs. Repeat these steps for the other
mailboxes. Installation is now complete. Additional hardware provided is not
needed and may be discarded.

SALSBURY INDUSTRIES
1010 East 62
nd
Street, Los Angeles, CA 90001-1598
Phone: 1-800-624-5269 Int’l Phone: 323-846-6700
Fax: 1-800-624-5299 Int’l Fax: 323-846-6800
Installation instructions are provided as general guidelines. It is advised that a professional installer be consulted. Salsbury Industries assumes no product assembly or installation liability.
Copyright © 2012 Salsbury Industries. All rights reserved. (Rev. 1, 2/27/12)
Eagle Rural Mailboxes – 4855E
2-Wide Spreader with Eagle Newspaper Holders on a
Modern Decorative Mailbox Post Installation Instructions
U.S.P.S. APPROVED
Installing Mailboxes on a 2-Wide Spreader with Newspaper
Holders on a Modern Decorative Mailbox Post
Thank you for selecting Salsbury’s 4855E eagle rural mailbox.
This instruction sheet is for installing 4855E eagle rural mailboxes on a 2-
wide spreader with 4815E eagle newspaper holders and a modern
decorative mailbox post. A different instruction sheet is available for
installing 4855E eagle rural mailboxes on a 3-wide spreader with 4815E
eagle newspaper holders and a modern decorative mailbox post. Other
installation instructions are available for installing the mailboxes and
spreaders with newspaper holders on a standard mailbox post, mounting a
single mailbox on a decorative or standard mailbox post, mounting a single
newspaper holder, and mounting the post in a concrete footing.
When you install a curbside or roadside mailbox, make sure that it is easily
accessible to the mail carrier. By regulation it should be 41” to 45” from the
ground or street surface up to the inside floor of the mailbox. The door
should be set back 6” to 8” back from the front face of the curb or the road
edge. However, you should check with your local postmaster to ensure that
the mailbox is installed according to local regulations.
Spreader Installation to Modern Decorative Mailbox Post
All hardware to attach the spreader to the modern decorative post is included
with the post. To attach the spreader to the modern decorative mailbox post,
install four (4) 5/16”-18 X 2-3/4” long hex flange head bolts through the four
(4) center square holes of the spreader, through the square spacer and
through the four (4) square holes in the top plate of the modern decorative
post arm. Install 5/16” flat washers and 5/16”-18 hex nuts on the ends of the
four (4) bolts protruding below the bottom of the modern decorative post arm.
Cover the hex flange head bolts and nuts with cap plugs.
Newspaper Holders Installation to Spreader
All hardware to attach the newspaper holders to the spreader is included with
the spreader. To attach a newspaper holder to the spreader, install four (4)
5/16”-18 x 1-3/4” long carriage bolts through the four (4) square holes shown
in the inside floor of the newspaper holder and through the four (4)
corresponding holes on the spreader. Install 5/16” flat washers and 5/16”-18
hex nuts on the ends of the four (4) bolts protruding below the bottom of the
spreader. Repeat these steps for the other newspaper holder.
Mailbox Installation to Newspaper Holders
All hardware to attach the mailboxes to the newspaper holders is included
with the newspaper holders. To attach a mailbox to a newspaper holder,
install four (4) 5/16”-18 X 3/4” long carriage bolts into (4) square holes in the
floor of the mailbox and through the four (4) square holes shown on the top
of the newspaper holder. Install 5/16” flat washers and 5/16”-18 hex nuts on
the ends of the four (4) bolts protruding below the top of the newspaper
holder. Cover the hex nuts with cap plugs. Repeat these steps for the other
mailbox. Installation is now complete. Additional hardware provided is not
needed and may be discarded.

SALSBURY INDUSTRIES
1010 East 62
nd
Street, Los Angeles, CA 90001-1598
Phone: 1-800-624-5269 Int’l Phone: 323-846-6700
Fax: 1-800-624-5299 Int’l Fax: 323-846-6800
Installation instructions are provided as general guidelines. It is advised that a professional installer be consulted. Salsbury Industries assumes no product assembly or installation liability.
Copyright © 2012 Salsbury Industries. All rights reserved. (Rev. 1, 2/27/12)
Eagle Rural Mailboxes – 4855E
3-Wide Spreader with Eagle Newspaper Holders on a
Modern Decorative Mailbox Post Installation Instructions
U.S.P.S. APPROVED
Installing Mailboxes on Spreader with Newspaper
Holders on a Modern Decorative Mailbox Post
Thank
you for selecting Salsbury’s 4855E eagle rural mailbox.
This instruction sheet is for installing 4855E eagle rural mailboxes on a 3-
wide spreader with 4815E eagle newspaper holders and a modern
decorative mailbox post. A different instruction sheet is available for
installing 4855E eagle rural mailboxes on 2-wide spreaders with 4815E eagle
newspaper holders and a modern decorative mailbox post. Other
installation instructions are available for installing the mailboxes and
spreaders with newspaper holders on a modern decorative post, mounting a
single mailbox on a decorative or standard post, mounting a single
newspaper holder, and mounting the post in a concrete footing.
When you install a curbside or roadside mailbox, make sure that it is easily
accessible to the mail carrier. By regulation it should be 41” to 45” from the
ground or street surface up to the inside floor of the mailbox. The door
should be set back 6” to 8” back from the front face of the curb or the road
edge. However, you should check with your local postmaster to ensure that
the mailbox is installed according to local regulations.
Spreader and Newspaper Holders Installation to
Modern Decorative Mailbox Post
All hardware to attach the spreader to the modern decorative mailbox post is
included with the post. Attaching the spreader to the modern decorative
mailbox post requires simultaneously attaching the center newspaper holder
to the spreader and to the modern decorative mailbox post. Start by
installing four (4) 5/16”-18 x 3” long carriage bolts through the four (4) square
holes shown in the inside floor of the center newspaper holder, through the
four (4) center square holes in top of the spreader, through the square
spacer and through the four (4) square holes in the top plate of the modern
decorative mailbox post arm. Install 5/16” flat washers and 5/16”-18 hex nuts
on the ends of the four (4) bolts protruding below the bottom of the top plate
on the modern decorative mailbox post arm.
All hardware to attach the remaining two newspaper holders to the spreader
is included with the spreader. To attach an additional newspaper holder,
install four (4) 5/16”-18 x 1-3/4” long carriage bolts through the four (4)
square holes shown in the inside floor of the newspaper holder and through
the corresponding square holes in top of the spreader. Install 5/16” flat
washers and 5/16”-18 hex nuts on the ends of the four (4) bolts protruding
below the bottom of the spreader. Repeat these steps for the remaining
newspaper holder.
Mailbox Installation to Newspaper Holders
All hardware to attach the mailboxes to the newspaper holders is included
with the newspaper holders. To attach a mailbox to a newspaper holder,
install four (4) 5/16”-18 X 3/4” long carriage bolts into (4) square holes in the
floor of the mailbox and through the four (4) square holes shown on the top
of the newspaper holder. Install 5/16” flat washers and 5/16”-18 hex nuts on
the ends of the four (4) bolts protruding below the top of the newspaper
holder. Cover the hex nuts with cap plugs. Repeat these steps for the other
mailboxes. Installation is now complete. Additional hardware provided is not
needed and may be discarded.
/