ELCRF_08_15
Installaon Instrucons
English
1
Tape measure
Power Screwdriver and Phillips Bit
Pencil
Tools Required
Item Quanty Descripon
A. 1 ReFlex-rotang metal mount
B. 1 Wood Plaorm
C. 4 ReFlex Mounng Screws 2.5”
D. 1 #2 Square Bit
E. 4 Mailbox Side Mounng Screws 1.25”
F. 4 Mailbox Side Mounng Screws 2.25”
G. 4 Mailbox Spacers (Oponal)
H. 4 Mailbox Internal Mounng Screws .75”
Parts Included with this Product
Congratulaons on your purchase of Eye Level’s ReFlex-rotang mailbox mount.
Before you begin, please refer to the parts list to ensure all materials needed for assembly have been received.
Quesons? Contact your local Eye Level Dealer or Eye Level Customer Service at 888.782.1760, opon 3.
Eye Level Representaves are available weekdays 8:00 a.m. to 5:00 p.m. EST.
B.
A.
E.
G.
F. C.
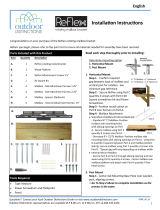
Read each step thoroughly prior to installing:
Determine mounng opon
1. Horizontal Mount
2. Post Mount
1. Horizontal Mount
Step 1 - Conrm required
gap between back of mailbox and
vercal post for rotaon. See
minimum gap reference.
Step 2 - Secure ReFlex using Part C
quanty 4 screws with Part D #2
Square screwdriver bit and Power
Screwdriver.
Step 3 - Posion round cutout on
Part B over fulcrum on Part A.
Step 4 - Mailbox Aachment
Side Mount Mailbox (Preferred Method)
Standard 6” T1 Mailbox: Posion
mailbox side mounng holes
with oblong openings on Part
A. Secure mailbox using Part E
quanty 4 screws into Part B.
Oversized 8”+ T2/T3 Mailbox: Posion mailbox side
mounng holes with oblong openings on Part A. Using Part
G quanty 4 spacers between Part A and mailbox boom
side lip, secure mailbox using Part F quanty 4 screws into
Part B. *Spacer spacing will vary depending on mailbox
width.
Internal Mount Mailbox
- Secure Part B to Part A through oblong opening and into
wood using Part E quanty 4 screws. Center mailbox over
mailbox plaorm and aach with Part H quanty 4 Pan-
head screws.
2. Post Mount
Step 1 - Center 4x4 Mounng Base Plate over wooden
post, aligning corners.
Go To Step 2 above to complete installaon as the
process is the same.
2.
1.
6” T1 Mailbox = 1” Minimum
8” T2 Mailbox = 1.5” Minimum
Step 2
Step 3
Step 1
2.
H.
D.


