Page is loading ...

5”/6” LED Rotatable Retrofit-Kit Installation Guide
MRL - 611505, MRL-611505B, MRL-611555, MRL-611555B
www.maxximastyle.com
3 YEAR WARRANTY
Maxxima extends a 3 year limited warranty to the original purchase that the products listed are free from defects in material and/or
workmanship only. Maxxima will replace any warrantied product to the original consumer/purchaser if the product fails because of defects
due to workmanship and/or materials within the limited warranty period. Limited warranty is not transferable and applies to the original
installation of the Maxxima product. This offer does not constitute in any way a product guarantee and Maxxima does not hereby assume
any obligation whatsoever beyond sending a free replacement product.
• Risk of electric shock or fire - Disconnect power at the source
before installation.
• If you are unsure about the installation or the maintenance
of the fixture, please consult an electrician.
• Do not make or alter any holes in the wiring enclosure or
modify any electrical componentry.
• To prevent wiring damage or abrasion, do not expose wiring
to edges of sheet metal or other sharp objects.
CAUTIONS
• The fixture must be wired in accordance with
the National Electric Code (N.E.C) standards and
any applicable local codes or ordinances.
• This fixture is suitable for DAMP locations.
• This fixture is designed for use with 120Vac, 50/60Hz only.
• The retrofit kit is accepted as a component of a luminaire
where the suitability of the combination shall be determined
by CSA or authorities having jurisdiction.
WARNINGS
Electrical Parameters:
Model
MRL-611505/B
Input
Voltage
120 VAC
Input
Frequency
60 Hz
Input
Current
92 mA
Input
Wattage
11 W
MRL-611555/B
Figure 2
Figure 6
2700K
3000K
3500K
4000K
5000K
Figure 1
1. Ensure the power has been turned off by switching the circuit breaker
to the off position or by removing the fuse from the fuse panel.
2. If replacing an existing fixture remove and disconnect the
existing fixture from the housing.
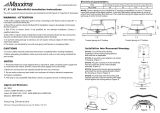
3. Select the desired color temperature by moving the selector switch shown
in figure 1.
4. Twist the E26 adapter into the housing as shown in figure 2.
5. Connect the orange connector to the E26 adapter as shown in figure 3.
6. If using a 5” can, secure the torsion arms to the inner most position. Default
location is for 6“ can. See figure 4.
7. Squeeze the torsion springs and install in the torsion spring brackets. As seen
in figure 5.
8. With the torsion springs in position push, ensure wires are safely tucked into the
junction box. Push the fixture up until flush with the ceiling, as shown in figure 6.
9. Restore power and the light is now operational.
Product Dimensions:
INSTALLATION INSTRUCTIONS
7.3”
3.3”
Figure 3
56
Back of light, torsion arm
Figure 4 Figure 5
/