Page is loading ...

1056-S4
1056-SE4
1056-LE4
Alemite LLC
167 Roweland Drive, Johnson City, Tennessee 37601
www.alemite.com
Copyright
©
2010 by Alemite LLC
This document contains confidential information that is the property of Alemite LLC
670599 and is not to be copied, used, or disclosed to others without express written permission. Revision (11-10)
SER 1056-S4
Service Guide
Description
Each model gun is designed for 3-way loading;
cartridge, loader pump, and suction. Refer to Page 4 for
details.
The guns are spring-primed and contain an air bleed
valve to aid the priming process. Each gun is also
equipped with a Loader Fitting that allows filling directly
from a hand-operated loader pump. See Figure 6.
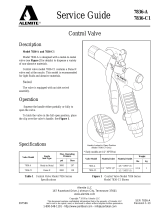
Lever-Operated Grease Gun
The Lever of the gun is adjustable. Set the gun to the
volume position and operate the Lever fully to deliver 1
ounce (28.4 grams) of grease in 16 strokes. Set it to the
pressure position to develop up to 10,000 psi (690 Bars).
See Figures 1 and 7.
The gun’s Lever is also variable-stroke. Grease
dispenses with a stroke as short as 1/2 " (12.7 mm).
These guns are designed with Buna-N (Nitrile) seals
for compatibility with petroleum-based greases.
Figure 1 Lever-Operated Grease Gun Model 1056 Series - Models 1056-SE4 and 1056-LE4 Shown
Gun Model
Rigid
Extension
with Coupler
Cylinder
Capacity
Cartridge
Size
Delivery/Stroke Maximum Operating Pressure
Volume Position Pressure Position Volume Position Pressure Position
Ounces Grams Ounces Ounce Grams Ounce Grams psi Bars psi Bars
1056-S4 Not Included
16 454
14 0.06 1.78 0.04 1.14 6000 414 10,000 6901056-SE4
Included
1056-LE4 24 682
1-800-548-1191 - http://www.partdeal.com - [email protected]

SER 1056-S4 Lever-Operated Grease Gun
Revision (11-10) 2 Alemite LLC
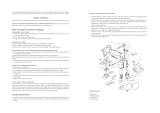
Figure 2 Lever-Operated Grease Gun Model 1056 Series - Exploded View
1-800-548-1191 - http://www.partdeal.com - [email protected]

Lever-Operated Grease Gun SER 1056-S4
Alemite LLC 3 Revision (11-10)
Repair Kits
Part No. Kit Symbol Description
393604 Kit, Repair, Follower [Contains five (5) of items 17 and 18 and two (2) of item 19]
339820 Kit, Cylinder (Assembled) [for models 1056-S4 and 1056-SE4]
393525 Kit, Follower (Assembled) [for model 1056-LE4]
Item
No.
Part No. Description Qty Notes
1 Stem, Bleed Valve 1
2
Spring 1
4
6304-B Coupler 1 Model 1056-S4 & 1056-SE4
5 53986 Extension 1
Model 1056-S4 & 1056-SE4
6Head Assembly 1
7
O-Ring, 1/8 " ID x 1/4 " OD 1
8Spring 1
9 Ball, 9/32 " Dia 1
10 Gasket (Aluminum) 2
11 Seat, Ball 1
12 336523 Gasket (Nitrile) 1
13 Ball, 7/16 " Dia 1
14 Spring 1
15 Plug, 9/16 " -20 1
16
Cylinder, 10-3/4 " Long 1
Model 1056-S4 & 1056-SE4
Cylinder, 15 " Long 1
Model 1056-LE4
17 Pushnut 1
Kit contains a quantity of 5
18 Follower (Nitrile) 1
Kit contains a quantity of 5
19 Plate, Back-Up 1
Kit contains a quantity of 2
20
Spring, 13-1/4 " Long 1
Model 1056-S4 & 1056-SE4
Spring, 18 " Long 1
Model 1056-LE4
21
Cap 1
22
Rod and Handle (Single-Notch) 1
Model 1056-S4 & 1056-SE4
23 Rod and Handle (Double-Notch) 1
Model 1056-LE4
24 B322610 Fitting Assembly, Loader 1
Legend:
Part numbers left blank are not available separately
designates a repair kit item
1-800-548-1191 - http://www.partdeal.com - [email protected]

SER 1056-S4 Lever-Operated Grease Gun
Revision (11-10) 4 Alemite LLC
Loading the Gun
IMPORTANT: Warranty may be void if these
procedures are not explicitly followed.
Cartridge Loading
1. Unscrew the Head Assembly from the Cylinder.
2. Pull the Follower Rod outward from the Cylinder Cap.
3. Engage the groove* in the Follower Rod with the slot
in the Cylinder’s Cap. See Figure 3.
4. Remove the plastic cap from the cartridge and discard.
5. Apply a film of grease to the exposed inside surface of
the cartridge.
NOTE: This is only necessary for a virgin
gun.
6. Insert the cartridge into the Cylinder (open end first)
until the metal lip seats.
7. Remove the tabbed seal from the cartridge and discard.
8. Screw the Head Assembly onto the Cylinder.
• Tighten the Head Assembly securely to the Cylinder.
9. Disengage the Follower Rod from the slot in the
Cylinder’s Cap.
10. Push and rotate the Follower Rod into the Cylinder.
11. Prime the gun. Refer to the section entitled Priming
the Loaded Gun for details.
Loading the Gun from a Loader Pump
WARNING
The gun is equipped with a low-pressure Loader
Fitting. Do not substitute with a high-pressure
grease fitting. Personal injury can occur due to
excessive pressure.
The use of a grease fitting will void the warranty.
1. Wipe the Loader Fitting with a clean cloth.
* Engage the first groove on Model 1056-LE4. The
second groove is used when filling from a loader pump or
suction loading.
CAUTION
The Loader Fitting on the gun must mate with the
loader coupler. The pump may not operate if the
components are not compatible.
2. Pull the Follower Rod outward from the Cylinder Cap.
At the same time, rotate the Rod to allow the Locking
Tabs access through the Back-Up Plate. See Figure 4.
3. Rotate the Rod and allow the Locking Tabs to contact
the Back-Up Plate. See Figure 5.
4. Remove the cap on the pump’s loader coupler.
5. Seat the Loader Fitting into the loader coupler. See
Figure 6.
Figure 3 Follower Rod Engaged in Cylinder Cap Slot
Figure 4 Follower Rod Locking Tabs Aligned
with Back-Up Plate
1-800-548-1191 - http://www.partdeal.com - [email protected]

Lever-Operated Grease Gun SER 1056-S4
Alemite LLC 5 Revision (11-10)
6. Operate the pump and view the movement of the
Follower Rod.
7. Discontinue pump operation once the groove* on the
Follower Rod is visible.
8. Push and turn the Follower Rod into the Cylinder.
9. Prime the gun. Refer to the section entitled Priming
the Loaded Gun for details.
Suction Loading
1. Unscrew the Head Assembly from the Cylinder.
2. Insert the head of the Cylinder below the surface of the
grease.
3. Slowly pull the Follower Rod outward from the
Cylinder Cap until the groove* is visible.
4. Engage the groove in the Follower Rod with the slot in
the Cylinder’s Cap. See Figure 3.
5. Screw the Head Assembly onto the Cylinder.
• Tighten the Head Assembly securely.
6. Push and rotate the Follower Rod into the Cylinder.
7. Prime the gun. Refer to the section entitled Priming
the Loaded Gun for details.
Priming the Loaded Gun
Overview
Priming is the act of removing air and introducing
grease into the gun’s pumping mechanism.
Whether a gun primes is dependent on the:
• viscosity of the grease
• temperature of the grease
• condition of the gun
Operate the Gun
IMPORTANT: Make sure the gun is in the
volume position. See Figure 7.
In most cases the gun will prime simply by operating
the Lever several times.
Should grease fail to appear, the Head Assembly must
be bled.
* Locate the second groove on model 1056-LE4.
Figure 6 Loader Fitting and Loader Coupler
Section View
Figure 5 Follower Rod Engaged with Back-Up Plate
1-800-548-1191 - http://www.partdeal.com - [email protected]

SER 1056-S4 Lever-Operated Grease Gun
Revision (11-10) 6 Alemite LLC
/