
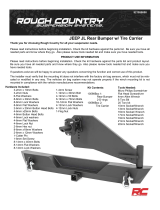
JEEP YJ/TJ REAR BUMPER W/ TIRE CARRIER
Thank you for choosing Rough Country
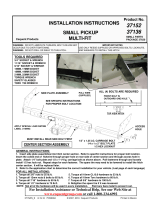
Please read instructions before beginning installation. Check the kit hardware against the parts list and product layout.
Be sure you have all needed parts and know where they go. Also please review tools needed list and make sure you
have needed tools.
If questions exist we will be happy to answer any questions concerning the design, function, and correct use of this prod-
uct.
INSTALLATION INSTRUCTIONS
1. Place vehicle on a flat surface and set emergency brake.
2. Remove the bumper covers using a T30 wrench from both sides. See Photo 1 & 2.
Kit Contents:
1– Rear Bumper
1-Tire Carrier
2– D-Rings
1– Hardware including:
3-1/2” x 20 Wheel Studs
6-12mm Lock Washers
8-10mm Flat Washers
34 –12mm Flat Washers
1-8mm Hex Screw
4-10mm Lock Nut
14-12mm Lock Nuts
1-24mm Hex Nut
3-10mm x 40mm Bolts
1-10mm x 65mm Bolts
19-12mm x 35mm Bolts
2 - 12mm x 80mm Bolts
1-Cotter Pin
2-1/4” Thick Square Washers
1-Upper Bearing
1-Lower Bearing
Tools Needed:
19mm Wrench
18mm Wrench
T30
1/2” Drill
Drill Motor
921059200A
PHOTO 1 PHOTO 2

3. Remove the bumper caps from the Jeep and remove the bolts securing the stock bumper to the frame using an
18mm wrench. See Photo 3 & 4. Remove the bumper from the vehicle.
4. Place the supplied mounting brackets on the frame and secure with the supplied 12mm x 35mm bolts, washers and
lock nuts. Do not tighten at this time. See Photo 5.
5. Align the bracket with the frame and drill the center two holes using a 1/2” drill bit. See Photo 6. Install the 12mm x
35mm bolts, washers and lock nuts. Tighten using a 19mm wrench.
6. Position the bumper into place and install the supplied 12mm x 35mm bolts, washers and lock nuts. See Photo 7.
7. Position the supplied square washer between the frame and bumper mount as shown in Photo 8 and install the
supplied 12mm x 35mm bolts, washers and lock nuts. Tighten all bolts using a 19mm wrench.
PHOTO 3 PHOTO 4
PHOTO 5 PHOTO 6
PHOTO 7 PHOTO 8

8. Install the bearing races in the carrier as shown in Photo 11 with a bearing tool or equivalent.
9. Grease the tire carrier lower bearing and install in the tire carrier. See Photo 12.
10. Install the supplied washer beside the bearing as shown. See Photo 13.
11. Gently tap on the edge of the in seal to install the mount. See Photo 14.
12. Lightly grease the stub shaft on the bumper and place the tire carrier on the stub shaft on the bumper. Grease and
install the upper bearing. See Photo 15.
13. Install supplied washer as shown. See Photo 16.
Photo 11 Photo 12
Photo 13 Photo 14
Photo 15 Photo 16

14. Install the supplied castle nut, cotter pin and set screw and install cap. Tighten castle nut with a 36mm socket. See
Photo 17 & 18.
15. Install the handle assembly in the carrier and secure with the supplied 10mm x 65 bolt, washers and lock nut. Tight-
en with a 17mm wrench. See Photo 19.
16. Match the bolt pattern bracket up with the wheel and install the supplied wheel studs. See Photo 20.
17. Install the base mount on the carrier with the supplied 12mm x 35mm bolts, washers and lock nut. Tighten using a
18mm socket. Install wheel mount bracket with the supplied 12mm x 80mm bolts, washers and lock nuts. Do not
tighten at this time. See Photo 21.
18. Install the tire/wheel on the carrier and adjust the wheel mount bracket to bring in the tire/wheel firmly against the
carrier. See Photo 21 & 22. Tighten 12mm x 80mm bolts using a 18mm wrench and socket.
Photo 21
Photo 17 Photo 18
Photo 19 Photo 20
Photo 21 Photo 22
POST INSTALLATION INSTRUCTIONS
1. Check and retighten wheels at 50 miles and again at 500 miles. Periodically check all hardware for
tightness.
By purchasing any item sold by Rough Country, LLC, the buyer expressly warrants that he/she is in compliance with all
applicable , State, and Local laws and regulations regarding the purchase, ownership, and use of the item. It shall be
the buyers responsibility to comply with all Federal, State and Local laws governing the sales of any items listed, illustrat-
ed or sold. The buyer expressly agrees to indemnify and hold harmless Rough Country, LLC for all claims resulting di-
rectly or indirectly from the purchase, ownership, or use of the items.
-
 1
1
-
 2
2
-
 3
3
-
 4
4


Ask a question and I''ll find the answer in the document
Finding information in a document is now easier with AI
Related papers
-
 Rough Country 10594A Installation guide
-
 Rough Country 10593A Installation guide
-
 Rough Country Lower Windshield Light Mounts Installation guide
-
 Rough Country 10598 Installation guide
-
 Rough Country 4in Long Arm Suspension Lift Kit Installation guide
-
 Rough Country 70046 Installation guide
-
 Rough Country 6in Suspension Lift Kit Installation guide
-
 Rough Country 70504BLDRLA Installation guide
-
 Rough Country 10647 Installation guide
-
 Rough Country 68422 Installation guide


Other documents
-
 Fishbone Offroad FB22050 Installation guide
-
 DV8 OFFROAD Rear Bumper Installation guide
-
 Quadratec QRC Rear Bumper Installation guide
-
 Cequent 37136 Installation guide
-
Reese Towpower 37042 Installation guide
-
-
HL Polaris Ranger 1000 XP User guide
-
Skyjacker 4in Dual Rate Long Travel Lift Kit Installation guide
-
Blue Ox BX1758 Operating instructions
-
HL Cam Am Defender 1000 User guide


