Page is loading ...

PowerFlex 750-Series ATEX Option Module
Catalog Number 20-750-ATEX
User Manual
Original Instructions

Important User Information
Read this document and the documents listed in the additional resources section about installation, configuration, and
operation of this equipment before you install, configure, operate, or maintain this product. Users are required to
familiarize themselves with installation and wiring instructions in addition to requirements of all applicable codes, laws,
and standards.
Activities including installation, adjustments, putting into service, use, assembly, disassembly, and maintenance are
required to be carried out by suitably trained personnel in accordance with applicable code of practice.
If this equipment is used in a manner not specified by the manufacturer, the protection provided by the equipment may
be impaired.
In no event will Rockwell Automation, Inc. be responsible or liable for indirect or consequential damages resulting from
the use or application of this equipment.
The examples and diagrams in this manual are included solely for illustrative purposes. Because of the many variables and
requirements associated with any particular installation, Rockwell Automation, Inc. cannot assume responsibility or
liability for actual use based on the examples and diagrams.
No patent liability is assumed by Rockwell Automation, Inc. with respect to use of information, circuits, equipment, or
software described in this manual.
Reproduction of the contents of this manual, in whole or in part, without written permission of Rockwell Automation,
Inc., is prohibited.
Throughout this manual, when necessary, we use notes to make you aware of safety considerations.
Labels may also be on or inside the equipment to provide specific precautions.
WARNING: Identifies information about practices or circumstances that can cause an explosion in a hazardous
environment, which may lead to personal injury or death, property damage, or economic loss.
ATTENTION: Identifies information about practices or circumstances that can lead to personal injury or death, property
damage, or economic loss. Attentions help you identify a hazard, avoid a hazard, and recognize the consequence.
IMPORTANT Identifies information that is critical for successful application and understanding of the product.
SHOCK HAZARD: Labels may be on or inside the equipment, for example, a drive or motor, to alert people that dangerous
voltage may be present.
BURN HAZARD: Labels may be on or inside the equipment, for example, a drive or motor, to alert people that surfaces may
reach dangerous temperatures.
ARC FLASH HAZARD: Labels may be on or inside the equipment, for example, a motor control center, to alert people to
potential Arc Flash. Arc Flash will cause severe injury or death. Wear proper Personal Protective Equipment (PPE). Follow ALL
Regulatory requirements for safe work practices and for Personal Protective Equipment (PPE).

Rockwell Automation Publication 750-UM003D-EN-P - March 2017 3
Table of Contents
Preface
Summary of Changes . . . . . . . . . . . . . . . . . . . . . . . . . . . . . . . . . . . . . . . . . . . 5
About the PowerFlex 750-Series ATEX Option Module . . . . . . . . . . 7
Catalog Numbers for ATEX and 11-Series I/O Option Modules. . . 7
Catalog Numbers for Spare Terminal Plugs. . . . . . . . . . . . . . . . . . . . . . . 7
Additional Resources . . . . . . . . . . . . . . . . . . . . . . . . . . . . . . . . . . . . . . . . . . . 8
Chapter 1
Safety Concepts ATEX Directive 2014/34/EU . . . . . . . . . . . . . . . . . . . . . . . . . . . . . . . . . . 9
Motor Requirements . . . . . . . . . . . . . . . . . . . . . . . . . . . . . . . . . . . . . . . . . . 10
ATEX System . . . . . . . . . . . . . . . . . . . . . . . . . . . . . . . . . . . . . . . . . . . . . . . . 11
ATEX Function . . . . . . . . . . . . . . . . . . . . . . . . . . . . . . . . . . . . . . . . . . . . . . 11
Thermostat Trip . . . . . . . . . . . . . . . . . . . . . . . . . . . . . . . . . . . . . . . . . . 12
Positive Temperature Coefficient (PTC) Trip . . . . . . . . . . . . . . . 12
Safe State . . . . . . . . . . . . . . . . . . . . . . . . . . . . . . . . . . . . . . . . . . . . . . . . . . . . . 12
Hardware Fault Tolerance . . . . . . . . . . . . . . . . . . . . . . . . . . . . . . . . . . . . . 13
Safety Reaction Time . . . . . . . . . . . . . . . . . . . . . . . . . . . . . . . . . . . . . . . . . . 13
Contact Information If Safety Option Failure Occurs . . . . . . . . . . . . 13
Chapter 2
Installation and Wiring Perform a Risk Assessment of the Operational Environment . . . . . . 15
Perform a Safety Analysis of the Motor. . . . . . . . . . . . . . . . . . . . . . . . . . 16
Access the Drive Control Pod . . . . . . . . . . . . . . . . . . . . . . . . . . . . . . . . . . 16
Remove the Drive Cover for Frame 1. . . . . . . . . . . . . . . . . . . . . . . . 16
Remove the Drive Cover for Frames 2…5 . . . . . . . . . . . . . . . . . . . . 17
Remove the Drive Cover for Frames 6 and 7 . . . . . . . . . . . . . . . . . 18
Remove the Drive Cover for Frames 8…12. . . . . . . . . . . . . . . . . . . 19
Configure the Hardware . . . . . . . . . . . . . . . . . . . . . . . . . . . . . . . . . . . . . . . 21
S1 Switch Location . . . . . . . . . . . . . . . . . . . . . . . . . . . . . . . . . . . . . . . . 21
Safety Enable Jumper Locations. . . . . . . . . . . . . . . . . . . . . . . . . . . . . 22
ATEX Option Module and 11-Series I/O Option Module
without a Safety Option Module. . . . . . . . . . . . . . . . . . . . . . . . . . . . 23
ATEX Option Module and 11-Series I/O Option Module
with a Safety Option Module . . . . . . . . . . . . . . . . . . . . . . . . . . . . . . . 24
Assemble the ATEX and 11-Series I/O Option Modules . . . . . 25
Connect the Thermal Sensor Wires. . . . . . . . . . . . . . . . . . . . . . . . . . . . . 26
Cabling Requirements . . . . . . . . . . . . . . . . . . . . . . . . . . . . . . . . . . . . . 26
Installation Requirements . . . . . . . . . . . . . . . . . . . . . . . . . . . . . . . . . . 27
Install the ATEX Option Module Assembly. . . . . . . . . . . . . . . . . . . . . 27
Safe Torque Off Option Wiring . . . . . . . . . . . . . . . . . . . . . . . . . . . . . . . . 30
Safe Speed Monitor Option Wiring. . . . . . . . . . . . . . . . . . . . . . . . . . . . . 31
Reset the Drive after an SSM Fault Detection. . . . . . . . . . . . . . . . . . . . 32
Interface Without a Safety Option. . . . . . . . . . . . . . . . . . . . . . . . . . . . . . 32

4 Rockwell Automation Publication 750-UM003D-EN-P - March 2017
Table of Contents
Chapter 3
Verify Operation Description of Functionality . . . . . . . . . . . . . . . . . . . . . . . . . . . . . . . . . . . 33
Motors with Thermostatic Switches . . . . . . . . . . . . . . . . . . . . . . . . . . . . 34
Functional Proof Testing for Systems with
Thermostat Contacts . . . . . . . . . . . . . . . . . . . . . . . . . . . . . . . . . . . . . . 34
Motors with Positive Temperature Coefficient (PTC) Devices. . . . 35
Functional Proof Testing for Systems with PTC Devices. . . . . . 35
Functional Proof Testing without a Test Fixture. . . . . . . . . . . . . . . . . 36
Chapter 4
ATEX Monitoring Parameter 41 [ATEX Sts]. . . . . . . . . . . . . . . . . . . . . . . . . . . . . . . . . . . . . . 39
ATEX Fault Descriptions. . . . . . . . . . . . . . . . . . . . . . . . . . . . . . . . . . . . . . 40
ATEX Configuration Errors . . . . . . . . . . . . . . . . . . . . . . . . . . . . . . . . . . . 40
Restart the Drive after an Over-temperature Fault . . . . . . . . . . . . . . . 41
Appendix A
Specifications and Certifications General Specifications . . . . . . . . . . . . . . . . . . . . . . . . . . . . . . . . . . . . . . . . . 43
11-Series I/O Option Module Terminal Block Specifications . . . . . 43
Safety Data . . . . . . . . . . . . . . . . . . . . . . . . . . . . . . . . . . . . . . . . . . . . . . . . . . . 44
Environmental Specifications . . . . . . . . . . . . . . . . . . . . . . . . . . . . . . . . . . 44
Certifications . . . . . . . . . . . . . . . . . . . . . . . . . . . . . . . . . . . . . . . . . . . . . . . . . 45
Index
. . . . . . . . . . . . . . . . . . . . . . . . . . . . . . . . . . . . . . . . . . . . . . . . . . . . . . . . . 47

Rockwell Automation Publication 750-UM003D-EN-P - March 2017 5
Preface
Summary of Changes
This manual contains new and updated information as indicated in the
following table.
Topic Page
Added a mini table of contents to the beginning of each section. –
Replaced European Union Directive 94/9/EU with the new directive number throughout the user
manual 2014/34/EU
–
Added reference to these new products:
• PowerFlex 755TL low harmonic drives
• PowerFlex 755TR regenerative drives
• PowerFlex 755TM drive systems
(Throughout this manual, the PowerFlex 755TL low harmonic drives, PowerFlex 755TR regenerative
drives, and PowerFlex 755TM drive systems are also referred to as PowerFlex 755T drive products.)
7
Added manuals for the new modular drives to the Additional Resources table. 8
Relocated ATEX Directive and Motor Requirements content from the Preface to Chapter 1. 9, 10
Added new ATEX System content to Chapter 1. 11
Updated the EN and IEC standards for hardware fault tolerance. 13
Added the PowerFlex 755T drive products to the safety reaction time table. 13
Added the PowerFlex 755T drive products to instructions to remove the drive cover. 19
Added a drawing of the location of the safety enable jumper on the main control board of the
PowerFlex 755T drive products.
22
Added a drawing of the safety enable jumper installed on the main control board of the PowerFlex
755T drive products.
23
Added a drawing of the safety enable jumper removed from the main control board of the PowerFlex
755T drive products.
24
Added a statement to clarify to remove only the jumper that slides off of the pins, and do not attempt
to remove the pins from the option module.
24
Added DC voltage test points for PowerFlex 755T drive products. 27, 36
Added statement for PowerFlex 755T drive products to check the firmware release notes for known
anomalies and verify that there are no safety-related anomalies.
33
Replaced the environmental specifications table with links to the technical data publications for the
different drives.
44
Changed the heading for Risk Assessment Data to Safety Data and moved the content to Appendix A. 44
Added information for environmental pollution degree. 44
Updated the index. 47

6 Rockwell Automation Publication 750-UM003D-EN-P - March 2017
Preface
The PowerFlex® ATEX option module and the 11-Series I/O option module
for PowerFlex 750-Series AC drives and PowerFlex 755T drive products are
safety system components of the equipment and protective systems. The
option modules are intended for equipment that is used in potentially
explosive atmospheres (ATEX). Perform a risk assessment and safety analysis
of the operating atmosphere and the ATEX system components before you
begin this ATEX installation:
• PowerFlex 750-Series drive
• PowerFlex 755TL low harmonic drives
(1)
• PowerFlex 755TR regenerative drives
(1)
• PowerFlex 755TM drive systems
(1)
• Motor
•ATEX option module
• 11-Series I/O option module
Throughout this manual, PowerFlex 755T drive products is used to refer to
PowerFlex 755TL drives, PowerFlex 755TR drives, and PowerFlex 755TM
drive systems.
See Installation and Wiring on page 15
.
(1) Throughout this manual, the PowerFlex 755TL low harmonic drives, PowerFlex 755TR regenerative drives, and PowerFlex 755TM
drive systems are also referred to as PowerFlex 755T drive products.
IMPORTANT Read and understand this user manual before you begin to design and
install your ATEX system.

Rockwell Automation Publication 750-UM003D-EN-P - March 2017 7
Preface
About the PowerFlex
750-Series ATEX Option
Module
The ATEX option module with the 11-Series I/O option module enables a
PowerFlex 750-Series drive and PowerFlex 755T drive products to be used in
ATEX installations. The ATEX option module helps to reduce the risk of
explosion due to an over-temperature condition in an ATEX approved motor.
In an ATEX installation, the motor is installed in a potentially explosive
atmosphere, while the drive is installed outside of the potentially explosive
atmosphere. See Figure 1 on page 11
.
Catalog Numbers for ATEX
and 11-Series I/O Option
Modules
This table lists the catalog numbers for the ATEX option module and the
compatible 11-Series I/O option modules.
Catalog Numbers for Spare
Terminal Plugs
This table contains the catalog numbers for the 11-Series I/O option module
spare terminal plug kits.
WARNING: Risk of Explosion.
Do not install the PowerFlex 750-Series drive or PowerFlex 755T drive products
in a potentially explosive atmosphere.
A drive that is installed in a potentially explosive atmosphere can cause an
explosion.
ATEX Option Module Cat. No. 11-Series I/O Option Module
Cat. No.
Description
20-750-ATEX
20-750-1132D-2R 115V AC digital input
Two relay outputs, digital
20-750-1133C-1R2T 24V DC digital input
Two transistor outputs, one relay output,
digital
20-750-1132C-2R 24V DC digital input
Two relay outputs, digital
Cat. No. Spare Terminal Plug Kit
SK-R1-SCRWTB-EIO Screw-down terminal plugs spare kit (set of three)
SK-R1-SPRGTB-EIO Spring-clamp terminal plugs spare kit (set of three)

8 Rockwell Automation Publication 750-UM003D-EN-P - March 2017
Preface
Additional Resources
These documents contain additional information concerning related products
from Rockwell Automation.
You can view or download publications at
http://www.rockwellautomation.com/global/literature-library/overview.page
.
To order paper copies of technical documentation, contact your local
Allen-Bradley distributor or Rockwell Automation sales representative.
Resource Description
PowerFlex 750-Series Products with TotalFORCE™ Control Installation Instructions, publication 750-IN100 Provides the basic steps to install PowerFlex 755TL low harmonic
drives, PowerFlex 755TR regenerative drives, and PowerFlex
755TM drive systems.
PowerFlex 755TM IP00 Open Type Kits Installation Instructions, publication 750-IN101 Provides instructions to install IP00 Open Type kits in user-
supplied enclosures.
PowerFlex 750-Series AC Drives Installation Instructions, publication 750-IN001
Provides the basic steps to install PowerFlex 750-Series AC drives.
PowerFlex Drives with TotalFORCE Control Programming Manual, publication 750-PM100
PowerFlex 750-Series AC Drives Programming Manual, publication 750-PM001
Provides detailed information on:
• I/O, control, and feedback options
• Parameters and programming
• Faults, alarms, and troubleshooting
PowerFlex 750-Series AC Drives Technical Data, publication 750-TD001 Provides detailed information on:
• Drive and bus supply specifications
• Option specifications
• Fuse and circuit breaker ratings
PowerFlex 750-Series Products with TotalFORCE Control Technical Data, publication 750-TD100
PowerFlex 755TM IP00 Open Type Kits Technical Data, publication 750-TD101 Provides detailed information on:
•Kit selection
• Kit ratings and specifications
• Option specifications
PowerFlex 750-Series Safe Torque Off User Manual, publication 750-UM002 Provides information for the Safe Torque Off option that can be
used as a component in a safety control system.
Safe Speed Monitor Option Module for PowerFlex 750-Series AC Drives Safety Reference Manual, publication
750-RM001
Provides information for the Safe Speed Monitor option that can
be used as a component in a safety control system.
Industrial Automation Wiring and Grounding Guidelines, publication 1770-4.1
Provides general guidelines for installing a Rockwell Automation
industrial system.
Product Certifications website, http://www.rockwellautomation.com/global/certification/overview.page Provides declarations of conformity, certificates, and other
certification details.

Rockwell Automation Publication 750-UM003D-EN-P - March 2017 9
Chapter 1
Safety Concepts
The PowerFlex® ATEX option module that is installed in a PowerFlex
750-Series drive or PowerFlex 755T drive products and equipped with an
11-Series I/O option module provides an ATEX-compliant safety function.
This ATEX-compliant function provides a safe turn-off for equipment that is
installed in a potentially explosive atmosphere according to 2014/34/EU.
ATEX Directive 2014/34/EU
The PowerFlex 750-Series drives and PowerFlex 755T drive products, together
with the ATEX and 11-Series I/O option modules, are compliant safety
devices under the ATEX directive 2014/34/EU, and satisfy requirements for
use in Group II, Category 2, (GD) applications with ATEX approved motors
as described here:
• Group II – The motor is installed in a potentially explosive atmosphere
that is not in a mine.
• Category 2 – The motor is likely to be exposed to an explosive
atmosphere. A high level of protection is required.
• GD – The explosive atmosphere consists of a mixture of (G) gas vapors
and (D) dust that can cause an explosion.
Certification of the drive for the ATEX group and category on its nameplate is
based on installation, operation, and maintenance according to these items:
•This user manual
• The requirements in the drive user manual and installation instructions
• The instruction manual for the motor
Topic Page
ATEX Directive 2014/34/EU 9
Motor Requirements 10
ATEX System 11
ATEX Function 11
Safe State 12
Hardware Fault Tolerance 13
Safety Reaction Time 13
Contact Information If Safety Option Failure Occurs 13

10 Rockwell Automation Publication 750-UM003D-EN-P - March 2017
Chapter 1 Safety Concepts
Motor Requirements
• The motor must be manufactured under the guidelines of the ATEX
directive 2014/34/EU. The motor must be installed, operated, and
maintained according to the instructions of the motor manufacturer.
• Only motors with nameplates that are marked for use on an inverter
power source, and labeled for specific hazardous areas, can be used in
hazardous areas on inverter (variable frequency) power.
• When the motor is rated ATEX Group II, Category 2 for use in gas
environments (category 2G), the motor must be of flameproof
construction, EEx d (according to EN 50018) or Ex d (according to
EN 60079-1 or IEC 60079-1). Group II motors are marked with a
temperature or a temperature code.
• When the motor is rated ATEX Group II, Category 2 for use in dust
environments (category 2D), the motor must be protected by an
enclosure (according to EN 50281-1-1, or according to
IEC 61241-1: Ex tD). Group II motors are marked with a temperature.
• The motor over-temperature signal is supplied to the drive by one of two
methods:
– A normally closed contact (open during over temperature condition)
compatible with the digital (logic) input circuitry of the drive. If
multiple sensors are required in the motor, the connection at the
drive must be the result of all required contacts that are wired in
series.
– A positive temperature coefficient (PTC) type of thermal sensor. See
Appendix A
for specifications.
•See all product markings for additional cautions.
• Typical motor markings are contained on a motor certification
nameplate similar to the sample here.
ATTENTION: Follow all procedures in the standard installation and user
manuals for the ATEX-certified drive with an ATEX-certified motor. You must
also follow all additional instructions in this PowerFlex 750-Series ATEX
Option Module User Manual. Equipment damage and/or personal injury can
result if all additional instructions in this user manual are not followed.
FLAMEPROOF Exd ENCLOSURE
EExd I/IIB Tamb C to C
II 2 G/D
I M2 Sira ATEX
MFG. BY ROCKWELL AUTOMATION
0035

Rockwell Automation Publication 750-UM003D-EN-P - March 2017 11
Safety Concepts Chapter 1
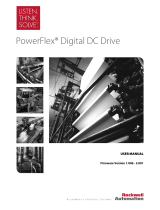
ATEX System
The overall system includes an ATEX certified motor that is installed in a
potentially explosive atmosphere. The motor is equipped with a thermal sensor
that is connected to the ATEX option input. Do not install the drive in a
potentially explosive atmosphere. See Figure 1
.
Figure 1 - Basic ATEX Application
The ATEX option module monitors the thermal sensor in the motor. When
the thermal sensor reaches its trip point, the drive initiates a Safe Torque Off
function and removes torque-producing power from the motor. The ATEX
safety function has a safety integration level (SIL) capability limit of 1
according to IEC 61508.
ATEX Function
The PowerFlex 750-Series ATEX option module can be configured to support
ATEX certified motors that are equipped with either a thermostat or a PTC-
type thermal sensor.
WARNING: Risk of Explosion.
Do not install the PowerFlex 750-Series drive or PowerFlex 755T drive products
in a potentially explosive atmosphere.
A drive that is installed in a potentially explosive atmosphere can cause an
explosion.
PowerFlex 750-Series Drive or PowerFlex 755T drive products (750-Series drive shown)
Power to the Motor
Thermal Sensor Input to the Drive
Potentially Explosive Atmosphere
ATEX Certified Motor
ATTENTION: Risk of electric shock. If a motor insulation fault occurs, high
voltage can be present at the ATEX terminal block and wiring. Be sure that all
drive covers are installed when power is applied to the drive.

12 Rockwell Automation Publication 750-UM003D-EN-P - March 2017
Chapter 1 Safety Concepts
Thermostat Trip
When the circuit is configured to trip with a thermostat, the ATEX option
module supports a normally closed, dry-contact thermostat. The safe-off
function initiates when the ATEX option module detects that the contact is
open. This trip can be the result of a broken wire, or an over-temperature
condition in the motor.
Positive Temperature Coefficient (PTC) Trip
When the circuit is configured to trip with a PTC-type thermal sensor, the
ATEX option module supports sensors with characteristics according to
DIN 44081/DIN 440. The ‘Mark A’ measuring circuit on the ATEX option
module is designed in accordance to IEC 60947-8 or EN 60947-8. This circuit
trips when the motor temperature has reached its trip point, or an open-wire/
short-circuit condition is detected in the sensor circuit.
Loss of voltage to the measuring circuit also initiates the safe-off function. The
ATEX option module internally sources this voltage.
Figure 2 - ATEX Circuitry
Safe State
The safe state includes all operation that occurs outside of the other
monitoring and stopping behavior that is defined as part of the ATEX option
module. The ATEX safety function, as provided by the ATEX option module,
places the drive in a safe state by removing the power from the gate firing
circuits of the output power devices (IGBTs).
ATEX+
ATEX–
High Voltage
Possible
Isolation Safe Low Voltage
EnC
EnNOThermal
Sensor Type
Switch
Safety
Configuration
Switch
Latch
Relay Driver
Safe Shutdown
Signal
Reset Signal
Or
Field wiring to thermal sensor.
See Connect the Thermal
Sensor Wires on page 26.
Safety configuration switch to configure the
safety path for use with a safety option. See
Configure the Hardware on page 21.
Terminals EnC and EnNO must be wired correctly
when a safety option is present in the drive. See the
important statements on page 30 and page 31.
ATEX trip signals pass through an
isolation barrier to protect the drive
in a motor insulation fault. See ATEX
Monitoring on page 39.
Thermal sensor-type switch selects
between PTC and thermostatic-
type thermal sensors. See S1 Switch
Location on page 21.
An ATEX trip latches the drive into a
safe state until a reset sequence takes
place. See Restart the Drive after an
Over-temperature Fault on page41.
For installations that do not have the Safe
Torque Off or Safe Speed Monitor safety options
present, the ATEX safety function uses the
safety signal on the backplane. See Interface
Without a Safety Option on page 32.

Rockwell Automation Publication 750-UM003D-EN-P - March 2017 13
Safety Concepts Chapter 1
Hardware Fault Tolerance
Hardware fault tolerance is the minimum number of faults that can cause a loss
of the safety function as defined by EN 61800-5-2 and IEC 61508 part 2. The
overall ATEX function has a hardware fault tolerance of zero.
Safety Reaction Time
The safety reaction time is the amount of time from a safety-related event as
input to the system until the system is in the safe state.
The safety reaction time from an input signal trigger to the initiation of the
ATE X safet y f unction.
Table 1 - Safety Reaction Time
Contact Information If Safety
Option Failure Occurs
If you experience a failure with any safety-certified device, contact your local
Allen-Bradley distributor to do the following:
• Return the device to Rockwell Automation so the failure is
appropriately logged for the catalog number that is affected and a record
is made of the failure.
• Request a failure analysis (if necessary) to determine the probable cause
of the failure.
IMPORTANT If one fault occurs in the safety path, the safety function can become
compromised.
Drive Safety Reaction Time
PowerFlex 753 drives
30 ms (max)
PowerFlex 755 drives
PowerFlex 755TL low harmonic drives
PowerFlex 755TR regenerative drives
PowerFlex 755TM drive systems

14 Rockwell Automation Publication 750-UM003D-EN-P - March 2017
Chapter 1 Safety Concepts
Notes:

Rockwell Automation Publication 750-UM003D-EN-P - March 2017 15
Chapter 2
Installation and Wiring
You must follow the installation steps that are described in this installation and
wiring section. The installation and wiring steps must be performed by
qualified drive installation personnel. The PowerFlex® 750-Series ATEX
option module with an 11-Series I/O module is part of an ATEX safety
control system.
Perform a Risk Assessment of
the Operational Environment
Before you begin the installation, perform a risk assessment to compare the
ATEX option specifications with the potentially explosive atmosphere where
you want to install the system. See Safety Concepts on page 9
.
Topic Page
Perform a Risk Assessment of the Operational Environment 15
Perform a Safety Analysis of the Motor 16
Access the Drive Control Pod 16
Configure the Hardware 21
Connect the Thermal Sensor Wires 26
Install the ATEX Option Module Assembly 27
Safe Torque Off Option Wiring 30
Safe Speed Monitor Option Wiring 31
Reset the Drive after an SSM Fault Detection 32
Interface Without a Safety Option 32
ATTENTION: Only qualified personnel familiar with adjustable frequency AC
drives and associated machinery can plan or implement the installation,
start-up, and subsequent maintenance of the system. Failure to comply can
result in personal injury and/or equipment damage.
ATTENTION: The following information is a guide for proper installation.
Rockwell Automation does not assume responsibility for the compliance or
the noncompliance to any code, national, local, or otherwise, for the proper
installation of this equipment. Personal injury and/or equipment damage
can occur if codes are ignored during installation.

16 Rockwell Automation Publication 750-UM003D-EN-P - March 2017
Chapter 2 Installation and Wiring
Perform a Safety Analysis of
the Motor
The ATEX safety system includes the thermal sensor in the motor and the
wiring to the ATEX daughter card. Verif y Operation on pag e 33
gives methods
for functional tests of the system from the input to the ATEX daughter card,
but these tests do not verify the thermal sensor response or the wiring from the
motor. Follow the recommendations of the motor manufacturer for safe use of
the motor in ATEX installations and possible functional test procedures.
Access the Drive Control Pod
Different frame sizes have different ways to access the control pod. To access
the control pod, follow the steps for your drive and frame size.
• Remove the Drive Cover for Frame 1 on page 16
• Remove the Drive Cover for Frames 2…5 on page 17
• Remove the Drive Cover for Frames 6 and 7 on page 18
• Remove the Drive Cover for Frames 8…12 on page 19
Remove the Drive Cover for Frame 1
To remove the drive cover for PowerFlex 753 and 755 frame 1 drives, follow
these steps.
1. Squeeze the locking tabs and pull out the bottom of the cover.
2. Pull the cover down and away from the chassis.
3. Lift the chassis cover.
a. Loosen the retention screw.
b. Use a screwdriver to release the chassis-cover locking tabs.
c. Lift the chassis until the latch engages.

Rockwell Automation Publication 750-UM003D-EN-P - March 2017 17
Installation and Wiring Chapter 2
Remove the Drive Cover for Frames 2…5
To remove the drive cover for PowerFlex 753 and 755 frame 2…5 drives, follow
these steps.
1. Squeeze the locking tabs and pull out the bottom of the cover.
2. Pull the cover down and away from the chassis.
3. Lift the human interface module (HIM) cradle.
a. Loosen the retention screw.
b. Lift the cradle until the latch engages.

18 Rockwell Automation Publication 750-UM003D-EN-P - March 2017
Chapter 2 Installation and Wiring
Remove the Drive Cover for Frames 6 and 7
To remove the drive cover for PowerFlex 753 and 755 frames 6 and 7 drives,
follow these steps.
1. Loosen the door screws.
2. Gently pry the door open and remove the door.
3. Lift the human interface module (HIM) cradle.
a. Loosen the retention screw.

Rockwell Automation Publication 750-UM003D-EN-P - March 2017 19
Installation and Wiring Chapter 2
b. Lift the cradle until the latch engages.
Remove the Drive Cover for Frames 8…12
To remove the drive cover for PowerFlex 755 AC drives and PowerFlex 755T
drive products, frame 8…12, follow these steps.
1. Remove the top screws.
2. Loosen the bottom screws.
3. Remove the right front cover.

20 Rockwell Automation Publication 750-UM003D-EN-P - March 2017
Chapter 2 Installation and Wiring
4. Loosen the retention screw.
5. Lift the cradle until the latch engages.
/