Page is loading ...

SYSTEM USER GUIDE
XR SERIES CANADIAN CONTROL PANEL


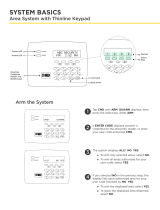
HOW TO HANDLE AN ALARM
Enter your user code or present your credential to the keypad if it has
a built-in proximity reader. You will see:
IS THIS A FALSE ALARM? YES NO or CANCEL VERIFY
Real Alarm
Press NO or VERIFY to notify to the emergency monitoring station.
Your system will remain armed.
False Alarm
Press YES or CANCEL to cancel the alarm.
Your system will disarm.

TABLE OF CONTENTS
Get to Know Your System .........................................1
Use Your Keypad ....................................................... 3
LCD Keypad ................................................................................ 3
Graphic Touchscreen Keypad .............................................. 4
Type in Your Keypad ................................................. 7
Standard DMP Keypad ...........................................................7
Know Your System Type ........................................... 8
Area (A) .......................................................................................8
All/Perimeter (All Perim) ......................................................8
Home/Sleep/Away (with Guest) ....................................................9
Arm Your System ..................................................... 10
Area (A) .....................................................................................10
All/Perimeter (All Perim) ....................................................10
Home/Sleep/Away (H S A) .................................................10
More Arming Options ............................................................ 11
Disarm Your System .................................................13
How to Handle an Alarm ..................................................... 13
Disarm Your System .............................................................. 13
User Menu ................................................................. 14
Alarm Silence ........................................................................... 14
Sensor Reset ............................................................................ 15
Lockdown .................................................................................. 15
Door Lock/Unlock .................................................................. 16
Door Access ............................................................................. 16
Armed Areas ............................................................................ 16
Outputs On/O ........................................................................17
Favorites .....................................................................................17
Z-Wave Setup .......................................................................... 19
Wi-Fi Setup ............................................................................... 21
Zone Status ...............................................................................22
Bypass Zones ...........................................................................22
Zone Monitor ........................................................................... 23
System Status ......................................................................... 23
System Test .............................................................................. 24
User Profiles ............................................................................ 25
User Codes ............................................................................... 29
Ambush Code ......................................................................... 30
Schedules .................................................................................. 31
Time ............................................................................................ 34
Display Events ........................................................................ 34
Service Request ..................................................................... 35
Fire Drill ..................................................................................... 35
Appendix ..................................................................36
User Authority Descriptions.............................................. 36
Common Keypad Displays ................................................. 38
Glossary ................................................................... 40
Notes .........................................................................42

System User Guide | XR150CAN/XR550CAN 1
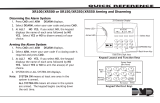
GET TO KNOW YOUR SYSTEM
Control Panel
The control panel acts as your system’s brain. It communicates
with the keypad and all the other system devices throughout
the building.
Keypad
The keypad allows you to control your system from one place.
You can use it to arm and disarm your system, add user codes,
verify alarms, and many other functions.
Prox Key
A prox key is an impact resistant credential that fits on a
standard key ring. It allows for codeless arming, disarming, and
door access when it is presented to a reader.
Sensor
Sensors are small devices that monitor motion, temperature,
flooding, breaking glass, and know when windows and doors
have been opened.
Key Fob Remote
Depending on how your key fob remote is set up, it provides an
easy way to arm and disarm your system or send a panic alarm.
Your system may not include all of the equipment and functions found in this guide.
FRI 2:52 PM
1 2 3 4
5 6 7 8
9 0 CMD
A
C
B
D
F
E
G
I
H
J
L
K
V
X
W
S
U
T
P
R
Q
M
O
N
Y
Z
E
N
T
E
R
B
A
C
K
TODAY
WEDNESDAY
82
98 77
CURRENT
HI LO
85 68
HI LO
98 77
Options
Keypad
User Codes
Schedules
DISARMED

2 XR150CAN/XR550CAN | System User Guide
Siren
The siren emits sound when your system goes into alarm.
Smoke and Carbon Monoxide (CO) Detector
These detectors notify you when smoke or carbon monoxide
is present. Some detectors have an integrated synchronized
sounder. If they are installed in groups, they will all sound
simultaneously.
Z-WaveTM
Z-Wave devices allow you to control the lights, small
appliances, garage doors, thermostats, and locks from the
keypad, Virtual KeypadTM App, and VirtualKeypad.com.
SecureComTM Video
SecureCom Video allows you to add wired or wireless
cameras inside or outside the building. You can easily record
clips or view live video feed at any time using the Virtual
Keypad App or VirtualKeypad.com.
Virtual Keypad App and VirtualKeypad.com
The Virtual Keypad App and VirtualKeypad.com allow you
to control and monitor your system on the go. The app is
available for Apple® and Android™ devices.

System User Guide | XR150CAN/XR550CAN 3
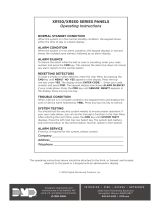
USE YOUR KEYPAD
Proximity Card Reader
The keypad may have a built-in proximity card reader that allows you to arm or disarm your system when
you present a credential.
Power and Armed LEDs
The AC Power and Armed LEDs indicate your system’s power and armed status.
Select Keys
Use the select keys to type and navigate in the keypad. See Type in Your Keypad for more information.
7/0 Panic Feature (Hardwired systems only)
Press and hold the 7 and 0 keys at the same time to send a fire, emergency, or panic report to the
emergency monitoring station.
Power/Armed
LEDs FRI 2:52 PM
1 2 3 4
5 6 7 8
9 0 CMD
A
C
B
D
F
E
G
I
H
J
L
K
V
X
W
S
U
T
P
R
Q
M
O
N
Y
Z
E
N
T
E
R
B
A
C
K
Proximity
Card Reader
Select Keys
LCD Keypad

4 XR150CAN/XR550CAN | System User Guide
TO DAY
WEDNESDAY
82
98 77
CURRENT
HI LO
85 68
HI LO
98 77
Options
Keypad
User Codes
Schedules
DISARMED
Power/Armed LEDs Proximity Card
Reader
Navigation
Arrows
Interactive
Shield
Local
Weather
Carousel
Menu
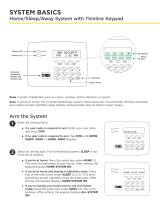
Graphic Touchscreen Keypad
Options
On the LCD keypad, press and hold the CMD and back arrow keys at the same time to access the Options
Menu. On the Graphic Touchscreen Keypad, press Options in the carousel menu. From here, you can
adjust the keypad brightness, tone, and volume.
Interactive Shield
On the Graphic Touchscreen Keypad, press the shield to display your arming options. Disarm your system
by pressing the shield and entering your user code.
Carousel Menu
On the Graphic Touchscreen Keypad, use the navigation arrows or press and drag to scroll through the
carousel menu options.

System User Guide | XR150CAN/XR550CAN 5
Carousel Menu Options for Graphic Touchscreen Keypads
Panic Press Police, Emergency, or Fire to send a panic report to the
emergency monitoring station.
Chime
Press Chime to turn the chime feature on and o. If chime is on, the
keypad will sound an alert and display a notification when external
doors and windows (with sensors installed) are opened.
Reset Press Reset to reset fire and panic sensors after they have triggered
an alarm.
Favorites Favorites displays a list of your Z-Wave favorites. Press a Favorite to
activate it.
Easy Exit
When your system is armed, press Easy Exit to allow you to leave
through an exit door without triggering the alarm or needing to
disarm and re-arm your system.
Options
Press Options to display the Setting Options screen. From here, you
can adjust the keypad screen brightness, tone, and volume. You can
also choose what you want to display in the carousel menu.
Keypad
Press Keypad to display a standard DMP keypad. Use this option
to access the User Menu. See Type In Your Keypad for more
information.

6 XR150CAN/XR550CAN | System User Guide
Carousel Menu Options for Graphic Touchscreen Keypads
User Codes Press User Codes to add, edit, or delete user codes in your system.
Schedules
Press Schedules to add, edit, or delete schedules. You can also use it
to assign schedules to outputs and favorites, as well as auto-arming
and auto-disarming.
Events Events allows you to view up to 12,000 past events that occurred on
your system over the last 45 days.
Thermostats
Press Thermostats to display the Z-Wave thermostats screen. From
here, you can adjust the temperature or select ON, OFF, HEAT,
COOL, or FAN.
Doors
Press Doors to lock or unlock Z-Wave locks. You can also open and
close Z-Wave-equipped
garage doors.
Lights Press Lights to turn ON, turn OFF, or DIM Z-Wave lights.

System User Guide | XR150CAN/XR550CAN 7
TYPE IN YOUR KEYPAD
Both keypads oer the number pad, but only the Graphic Touchscreen Keypad oers the standard
keyboard. Use the table and the keypad select areas that are shown in the graphics below to enter
characters using the number pad. Follow the directions to enter characters using the standard keyboard.
Standard Keyboard
▸Press ABC to access uppercase letters.
▸Press abc to access lowercase letters.
Standard Keyboard and Select Areas
1 2 3 4
5 6 7 8
9 0 CMD
ABC DEF GHI JKL
MNO PQR STU VWX
YZ
Area
1
Area
2
Area
3
Area
4
▸Press !@# to access symbols.
▸Press 123 to access the number pad.

8 XR150CAN/XR550CAN | System User Guide
NUMBER
KEY
SELECT AREA
12 3 4
1A B C (
2D E F )
3G H I !
4J K L ?
5M N O /
6P
Q
R &
7S T U @
8V W X ,
9Y Z space _
0- . * #
1 2 3 4
5 6 7 8
9 0 CMD
A
C
B
D
F
E
G
I
H
J
L
K
V
X
W
S
U
T
P
R
Q
M
O
N
Y
Z
E
N
T
E
R
B
A
C
K
Number Pad and
Select Keys
Key
1
Key
2
Key
3
Key
4
1. Choose a character from the table.
2. Identify the Number the character correlates with and press that character on the number pad.
3. Identify the Select Key or Area for that character and press that select key or area on the keypad.
To access the lowercase letter, press that select key or area again.
4. When the desired character displays on the keypad, return to Step 1 to enter another character or
press CMD if finished.
Number Pad

System User Guide | XR150CAN/XR550CAN 9
KNOW YOUR SYSTEM TYPE
Your system operates in one of the following ways: Area, All/Perimeter, Home/Sleep/Away, or Home/
Sleep/Away with Guest. Regardless of which system type you have, much of the operation is similar. The
best way to identify your system type, is to arm it.
On an LCD Keypad, press CMD until ARM DISARM display, then press the select key under ARM. The
arming options display. Identify your system type, then press the back arrow to exit the arming screen.
On a Graphic Touchscreen Keypad, touch the interactive shield and the arming options display. Identify
your system type, then press the shield at the top of the keypad to exit the arming screen.
Your system can have up to 32 separate areas for an XR550CAN control panel and up to 8 separate areas
for an XR150CAN control panel. Each area can do the following:
▸It can have a custom name.
▸It can arm or disarm independently of other areas.
▸It can limit access to users.
Area (A)
All/Perimeter (All Perim)
The building is divided into 2 main areas:
All
▸Arms both the perimeter and the interior of the building.
▸Use when you’re leaving the building and no one remains inside.
Perimeter
▸Arms just the perimeter of the building.
▸Use when you’re staying inside the building.

10 XR150CAN/XR550CAN | System User Guide
The building is divided into 2 or 3 areas: perimeter, interior, and bedrooms. For guest systems, you can
have up to 2 guest areas.
Home
▸Arms the perimeter of the building.
▸Use when you’re staying in the building.
Sleep
▸Arms the perimeter and a portion of the interior.
▸Use to leave the bedroom areas of the building unarmed.
Away
▸Arms the perimeter, interior, and bedrooms.
▸Is used when you’re leaving the building and no one remains inside.
Home/Sleep/Away (with Guest)

System User Guide | XR150CAN/XR550CAN 11
1. Press and release the shield on a Graphic Touchscreen Keypad to open the arming options screen
or press CMD on an LCD Keypad until ARM DISARM displays.
2. Select ARM. The keypad displays ALL? NO YES.
3. To arm all areas, select YES. To arm selected areas, select NO. The keypad displays each area you
have access to. Select YES to arm the areas and NO to leave the area disarmed.
ARM YOUR SYSTEM
1. Enter your user code and the keypad displays PERIM ALL.
2. Select ALL to arm all areas. The keypad displays ALL SYSTEM ON. Select PERIM to arm only the
perimeter. The keypad displays PERIMETER ON.
1. Enter your user code and the keypad displays H S A.
2. Select HOME if you’re staying inside the building, leaving the interior disarmed and arming the
exterior. Select SLEEP to leave the bedroom areas disarmed, arming the interior and exterior
areas. Select AWAY if no one will remain inside the building. Select GUEST to arm the guest areas.
Area (A)
All/Perimeter (All Perim)
Home/Sleep/Away (H S A)

12 XR150CAN/XR550CAN | System User Guide
Instantly Arm Your System
1. Press and release the shield on a Graphic Touchscreen Keypad to open the arming options
screen or press CMD on an LCD keypad until ARM DISARM displays.
2. Select INSTANT. This overrides the entry and exit delay, instantly arming your system.
Use the Keypad Shortcut Keys
The LCD Keypad and the Graphic Touchscreen Keypad provides one-button shortcut keys. Press the key
for two seconds until a tone sounds.
KEY OPERATION
1
Arm Away for Home/Sleep/Away systems
Arm Away for Home/Sleep/Away with Guest systems
Arm All for All/Perimeter systems
2Fire and Panic Sensor Reset on all systems
3Arm Home for Home/Sleep/Away systems
Arm Home for Home/Sleep/Away with Guest systems
5Monitor (Chime) on all systems
6Arm Perimeter for All/Perimeter systems
7Arm Sleep for Home/Sleep/Away systems
Arm Sleep for Home/Sleep/Away with Guest systems
8Easy Exit for Home/Sleep/Away systems
More Arming Options

System User Guide | XR150CAN/XR550CAN 13
Bypass Zones
If a problem exists on any zone, the zone name and problem display, followed by OK BYPASS STOP.
▸Press OK to force arm the zone. The zone will re-arm when it’s restored.
▸Press BYPASS to ignore the zone before arming. Panic, emergency, fire, flood detector, and
temperature sensor zones cannot be bypassed.
▸Press STOP to stop your system from arming. This allows you to correct the zone, return to the
keypad, and restart the arming process.
Extend Schedules
When a schedule is active, you can extend the schedule to a later time. When arming your system, the
keypad displays LATE or CLOSING TIME!.
1. Press any select key or area. The keypad displays ENTER CODE:-.
2. Enter your user code and press CMD or present your credential to a card reader.
3. The keypad displays 2HR 4HR 6HR 8HR. Select the number of hours to extend the schedule.

14 XR150CAN/XR550CAN | System User Guide
DISARM YOUR SYSTEM
Enter your user code or present your credential to the keypad if it has a built-in proximity reader.
You will see:
IS THIS A FALSE ALARM? YES NO or CANCEL VERIFY
Real Alarm
Press NO or VERIFY to notify the emergency monitoring station. Your system will remain armed.
False Alarm
Press YES or CANCEL to cancel the alarm. Your system will disarm.
1. Press the shield on the Graphic Touchscreen Keypad and enter your user code to disarm your
system or press CMD on the LCD Keypad until ARM DISARM displays.
2. Select DISARM. The keypad displays ALL? NO YES.
3. Select YES to disarm all areas. Select NO to disarm individual areas and select YES to disarm the
area or NO to leave the area armed.
How to Handle an Alarm
Disarm Your System

System User Guide | XR150CAN/XR550CAN 15
USER MENU
Alarm silence turns o your bells and sirens when your system is in alarm. It does not stop a report from
being sent to the emergency monitoring station.
Silence an Alarm:
1. Access the User Menu.
2. At ALARM SILENCE?, press any select key or area to silence the bells or sirens.
You have access to many functions in the User Menu that can be accessed from the keypad. Enter your
user code and the functions you have access to, display. The User Menu allows you to create user profiles,
add, change, and delete user codes, create favorites with your Z-Wave devices, and more.
Below are the User Menu functions and their processes as you will see them on the keypad. Before using a
function, you will need to access the User Menu. See Access the User Menu below.
Access the User Menu
1. Press CMD until MENU? NO YES displays.
2. Select YES.
3. Enter your user code and press CMD.
Alarm Silence

16 XR150CAN/XR550CAN | System User Guide
Sensor Reset resets panic and fire sensors after they have been tripped. They must be reset before they
can detect any additional alarm conditions.
Reset All Sensors
1. Access the User Menu.
2. Press CMD until SENSOR RESET? displays.
3. Press a top row select key or area. The keypad displays SENSORS OFF followed by SENSORS ON.
Reset Your Fire Sensor
Press 2 for two seconds then enter your user code.
Activate a lockdown to immediately lock all public doors connected to your system. Deactivate a
lockdown by allowing an authorized user to perform a Sensor Reset at the keypad.
Activate a Lockdown
1. Access the User Menu.
2. Press CMD until LOCKDOWN? displays.
3. Press any select key or area to lock all public doors.
Deactivate a Lockdown
1. Access the User Menu if Sensor Reset and Lockdown Override are enabled in your profile.
2. Press CMD until SENSOR RESET? displays.
3. Press a top row select key or area. The keypad displays SENSORS OFF followed by SENSORS ON,
returning all public doors back to their previous state.
Sensor Reset
Lockdown
/