Page is loading ...

1
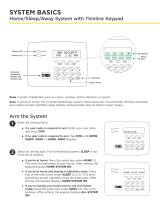
The system displays ALL? NO YES.
▸To arm only selected areas, select NO.
▸To arm all areas authorized for your
user code, select YES.
If ENTER CODE displays, present a
credential to the proximity reader, or enter
your user code and press CMD.
3
2
Tap CMD until ARM DISARM displays, then
press the select key under ARM.
1 2 3 4
5 6 7 8
9 0
A
C
B
D
F
E
G
I
H
J
L
K
V
X
W
S
U
T
P
R
Q
M
O
N
Y
Z
B
A
C
K
CMD
POWER
ARMED
4If you selected NO in the previous step, the
display lists each authorized area for your
user code followed by NO YES.
▸To arm the displayed area, select YES.
▸To leave the displayed area disarmed,
select NO.
1 2 3 4
5 6 7 8
9 0
A
C
B
D
F
E
G
I
H
J
L
K
V
X
W
S
U
T
P
R
Q
M
O
N
Y
Z
B
A
C
K
CMD
POWER
ARMED
Arm the System
SYSTEM BASICS
Area System with Thinline Keypad
1 2 3 4
5 6 7 8
9 0
A
C
B
D
F
E
G
I
H
J
L
K
V
X
W
S
U
T
P
R
Q
M
O
N
Y
Z
B
A
C
K
CMD
ABC SECURITY
FRI 2: 52 PM
POWER
ARMED
Power LED
Armed LED
Command
Back Arrow
Proximity
Credential
Reader and
Backlit Logo
Options
Select
Keys

LT-2270 | 20354 | System Basics: Area System with Thinline Keypad
© 2020 Digital Monitoring Products, Inc.
Faulted Zones
If a problem with a zone occurs while you try to arm, the zone’s name and a brief description of the
issue are displayed followed by OKAY BYPASS STOP.
▸To force arm the zones before arming, select O KAY. The system will arm and the zone that is
faulted will become part of the protected area once it returns to a normal state.
▸To bypass the zones before arming, select BYPASS. The system will arm and the zone that is
faulted will remain bypassed until the next time the system is armed. Panic, emergency, fire, flood
detector, and temperature sensor zones cannot be bypassed.
▸To stop the system from arming, select STOP. Correct the zone problems, then try to arm again.
Disarm the System
During Normal Operation
1Press CMD until ARM DISARM displays,
then press the key under DISARM.
1 2 3 4
5 6 7 8
9 0
A
C
B
D
F
E
G
I
H
J
L
K
V
X
W
S
U
T
P
R
Q
M
O
N
Y
Z
B
A
C
K
CMD
POWER
ARMED
3
2
1 2 3 4
5 6 7 8
9 0
A
C
B
D
F
E
G
I
H
J
L
K
V
X
W
S
U
T
P
R
Q
M
O
N
Y
Z
B
A
C
K
CMD
POWER
ARMED
The system displays ALL? NO YES.
▸To disarm only selected areas, select
NO.
▸To disarm all areas authorized for your
user code, select YES.
At ENTER CODE, present a credential to the
proximity reader, or enter your user code
and tap CMD.
▸Real Alarm: Press the key under NO.
This confirms the alarm and notifies
the monitoring center that a real alarm
is happening. Your security system
stays armed.
▸False Alarm: Press the key under YES.
This cancels the alarm and sends an
abort message to the monitoring
center. Your security system disarms.
During an Alarm
1 2 3 4
5 6 7 8
9 0
A
C
B
D
F
E
G
I
H
J
L
K
V
X
W
S
U
T
P
R
Q
M
O
N
Y
Z
B
A
C
K
CMD
POWER
ARMED
1Enter your user code, then press CMD.
The system displays IS THIS A FALSE
ALARM? NO YES.
2
4If NO is selected in step2, the display lists
each authorized area for your user code
followed by NO YES.
▸To disarm the displayed area, select
YES.
▸To leave the displayed area armed,
select NO.
/