Page is loading ...


b HAVE QUESTIONS? GETSECURA.COM
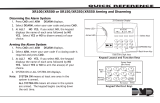
SILENCING AN ALARM
When the alarm bell or siren is sounding, enter your user code or
present your SecuraProx fob to your keypad.
IS THIS A FALSE ALARM? YES NO displays.
REAL ALARM
If a burglar alarm is valid, press NO to send a verication message to
the Central Station. Your security system will remain armed
FALSE ALARM
If a valid alarm has not occurred, press YES to cancel the alarm and
send an abort message to the Central Station. Your security system will
be disarmed.
Note: For Area Systems, the false alarm question only
displays if the entered User Code has the authority to disarm the area.

HAVE QUESTIONS? GETSECURA.COM c
Get to Know Your System ............................................................... 1
SecuraHub ....................................................................................1
SecuraTouch .................................................................................1
SecuraSounder .............................................................................1
SecuraSensor ................................................................................1
SecuraRemote ..............................................................................1
SecuraProx Key ............................................................................2
SecuraSmoke ................................................................................2
SecuraLight ..................................................................................2
Z-Wave .........................................................................................2
SecureCom Video ........................................................................2
SecuraMobile App .......................................................................2
How to Use Your Keypad................................................................. 3
System Status Icons ......................................................................3
Weather ........................................................................................4
Secura Logo .................................................................................4
Power/Armed LED .......................................................................4
Proximity card Reader ..................................................................5
Interactive Lock ............................................................................5
Arming Your System ........................................................................ 6
Arming..........................................................................................6
Instant Arming ..............................................................................6
Bypass Zones ................................................................................7
Disarming Your System .................................................................... 8
When You’re At Home .................................................................8
When You’re Coming Home ........................................................8
How to Handle an Alarm.................................................................. 9
User Code Options ........................................................................ 10
Adding a User Code ..................................................................10
Deleting a User Code.................................................................11
Editing a User Code ...................................................................11
Sending a User Code .................................................................11
TABLE OF CONTENTS

d HAVE QUESTIONS? GETSECURA.COM
Z-Wave Options ............................................................................. 12
Adding a Z-Wave Device ...........................................................12
Viewing Your Z-Wave Devices ....................................................12
Removing a Z-Wave Device .......................................................12
Transferring Z-Wave Device Information ...................................13
Optimizing Z-Wave Device Communication ..............................13
Using Favorites .............................................................................. 14
Creating a Favorite.....................................................................14
Editing a Favorite .......................................................................15
Activating a Favorite ..................................................................15
Working with Schedules ................................................................. 16
Adding a Permanent Schedule ..................................................16
Extending a Schedule ................................................................16
Adding a Schedule to a Favorite ...............................................17
Using the Carousel Menu ............................................................... 18
Panic ...........................................................................................18
Chime .........................................................................................18
Reset ..........................................................................................18
Favorites .....................................................................................18
Easy Exit .....................................................................................18
Options ......................................................................................19
Keypad .......................................................................................19
User Codes .................................................................................19
Schedules ...................................................................................19
Events .........................................................................................19
Thermostats ...............................................................................19
Doors ..........................................................................................19
Lights ..........................................................................................19
User Menu Options ........................................................................ 20
Sensor Reset...............................................................................20
Favorites .....................................................................................20
Z-Wave Setup .............................................................................20
Wi-Fi Setup .................................................................................21
Bypass Zones ..............................................................................21
Zone Monitor .............................................................................21

HAVE QUESTIONS? GETSECURA.COM e
System Test ................................................................................21
User Code ..................................................................................21
Schedules ...................................................................................21
Time ...........................................................................................21
Display Events. ...........................................................................22
Request Service ..........................................................................22

HAVE QUESTIONS? GETSECURA.COM 1
GET TO KNOW YOUR SYSTEM
This guide will introduce you to your home security system and
teach you how to navigate through its basic, everyday operation.
DISARMED
Panic
Chime
Reset
Favorites
CURRENT
HI LO
98
98 77
SecuraHub™
Your hub acts as your system’s brains. It communicates
with your keypad, as well as all the other system
devices throughout your home.
SecuraTouch™
The SecuraTouch is a touchscreen controller that
allows you to intuitively use your entire system. You
can use your keypad to arm and disarm the system,
add user codes, and verify alarms.
SecuraSounder™
The SecuraSounder emits sound notications when
your system goes into alarm.
SecuraSensor™SecuraSensors are small wireless
devices that detect motion inside your home or know
when your doors or windows have been opened.
SecuraRemote™The SecuraRemote is just like
the remote to your car, but for your home. It provides
an easy way to arm and disarm your system.
SecuraProx™ Key
The SecuraProx is an impact-resistant credential that
ts on any standard key ring and allows for codeless
arming and disarming when used with the reader
built into your keypad.
ARM
DIS

2 HAVE QUESTIONS? GETSECURA.COM
SecuraSmoke™
Your SecuraSmoke detector is a wireless sensor with
an integrated synchronized sounder.When installed in
groups, when one sounds, they all sound.
SecuraLight™
The SecuraLight comes on when an alarm is triggered
or activated by other system events, or by the app. It
provides emergency indoor-path lighting even when
the AC power is lost.
Z-Wave™
Z-Wave technology allows you to remotely control a
variety of devices. There are Z-Wave options for lights,
small appliances, garage door, thermostat, and locks.
SecureCom™ VideoWith SecureCom Video,
you can add wireless cameras inside or
outside your home and record clips or view
live video at any time.
SecuraMobile™ App
The SecuraMobile app allows you to control and
monitor your system on the go. The app is available for
Apple© and Android phones.
It is important to note that your system may not include all of the
equipment found in this guide.

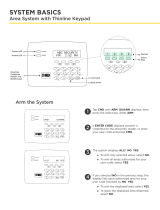
HAVE QUESTIONS? GETSECURA.COM 3
UNDERSTANDING THE
HOME SCREEN
This guide will help you learn to use your SecuraTouch keypad,
your main interface when interacting with your system. During all
normal operation, your keypad’s home screen will display. Below are
descriptions of each of the areas on your home screen.
SYSTEM STATUS ICONS
A system status icon is located at the top of your home screen. The
following icons indicated the status of your system:
System Ready to Arm
No check mark indicates that the system is not ready to arm.
A door or window may be open.
Attention List
When pressed, the attention list icon displays the
type of event or trouble message your hub has recorded,
along with the name and number of any aected zone.
DISARMED
Panic
Chime
Reset
Favorites
CURRENT
HI LO
98
98 77
LOCAL
WEATHER
CAROUSEL
MENU
INTERACTIVE
LOCK
NAVIGATION
ARROWS
LED/PROXIMITY
READER
STATUS
ICON

4 HAVE QUESTIONS? GETSECURA.COM
WEATHER
Your system has been programmed to provide local weather
information. Current weather conditions, as well as forecasted HI and
LOW temperatures, are available on the home screen.
SECURA LOGO
Press the Secura logo at the top of the keypad to bring up your security
provider’s contact information.
POWER/ARMED LED
The LED at the top-center of the keypad
indicates the keypad power
status and armed status of the panel. Depending on the operation, the
LED displays Red or Blue as listed in the table.
Color and Activity Armed Status Keypad Power Status
Blue Steady Disarmed AC Power OK, Battery OK
Blue Blinking Disarmed AC Power OK, Battery Fault
No Light Disarmed AC Power Fault, Battery OK
Red Steady Armed AC Power OK, Battery OK
Red/Blue Alternate Armed AC Power OK, Battery Fault
Red Blinking Armed AC Power Fault, Battery OK
Chime On
A tone will sound each time a door or window is opened.
You can activate this feature in the Zone Monitor section of
the user menu. See Zone Monitor.
AC Power Trouble
Your system’s AC power supply is low or missing.
Battery Trouble
Your system’s battery is low or missing.

HAVE QUESTIONS? GETSECURA.COM 5
PROXIMITY CARD READER
Your keypad provides a built-in proximity card reader located behind
the Power/Armed LED for the ultimate in codeless arming/disarming.
INTERACTIVE LOCK
The interactive Lock allows arming and disarming from the home
screen. Your system may be programmed as either an All/Perimeter
system or as a Home/Sleep/Away system.
All
All arms both the perimeter and the interior of your
home. Use this when you are leaving the house and no
one will remain inside.
Perimeter
Perimeter arms just the perimeter of your home. Use
this when you are staying home, but would like your
exterior doors and windows to remain armed.
Sleep
Sleep arms the perimeter and a portion of the interior.
Bedrooms and nighttime parts of your home are left
unarmed, allowing you to access parts of your home during
the night. Other areas of the house that are not used at
night are armed.
Away
Away arms the perimeter, interior, and bedrooms. Use
this when you are leaving the house and no one will
remain inside.
Home
Home arms the perimeter of your home. Use this when
you are staying home, but would like your exterior doors
and windows to remain armed.
All/Perimeter
Home/Sleep/Away

6 HAVE QUESTIONS? GETSECURA.COM
UNDERSTANDING THE
KEYPAD SCREEN
This guide will help you learn to use your SecuraTouch keypad,
your main interface when interacting with your system. During all
normal operation, your keypad’s home screen will display. Below are
descriptions of each of the areas on your home screen.
SYSTEM STATUS ICONS
A system status icon is located at the top of your home screen. The
following icons indicated the status of your system:
DISARMED
Panic
Chime
Reset
Favorites
CURRENT
HI LO
98
98 77
LOCAL
WEATHER
CAROUSEL
MENU
INTERACTIVE
LOCK
NAVIGATION
ARROWS
POWER/
ARMED LED
STATUS
ICON
PROXIMITY
CARD READER

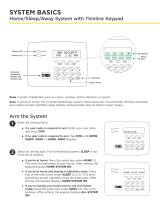
HAVE QUESTIONS? GETSECURA.COM 7
From your keypad’s home screen, you can easily arm your system.
Choose between arming or instant arming, depending on your needs.
ARMING
1. On the home screen, press the center of the lock icon and
release. This displays the ARMING options screen.
2. Choose your arming type. The Exit Timer screen displays and
begins counting down your programmed exit time.
Note: To cancel arming your system during Exit Timer count
down, press ENTER CODE TO CANCEL and the keypad
screen displays. You may now enter your User Code to
discontinue arming. If any zones are faulted or bypassed, the
system displays those zones.
See Bypass Zones.
3. The screen displays SYSTEM ON if at least one area in the
system is armed, and ALL SYSTEM ON if all areas in the
system are armed.
4. The screen then displays the exit time in seconds and
counts down the remaining time: EXIT: # # (# # = seconds
remaining). When the entire system is armed, the keypad
sounds the exit delay alert and when the delay expires, the
zones are armed.
INSTANT ARMING
1. On the home screen, press and release the lock icon to open
the ARMING options screen.
ARMING YOUR SYSTEM
TUE 5:35 PM
82
CURRENT
HI LO
98 77
Panic
Chime
Reset
Favorites
ARMED

8 HAVE QUESTIONS? GETSECURA.COM
2. Press INSTANT.
3. Instant arming bypasses the exit timer and instantly arms the
system.
BYPASS ZONES
If a problem exists on any zones, the zone name and problem are
shown followed by: OK BYPASS STOP.
1. Press OK to force arm the zone(s) before arming.
2. Press BYPASS to bypass the zone(s) before arming.
3. Press STOP to stop the system from arming. Correct the zone
problem(s) and return to step 1.
Note: 24-hour zones cannot be bypassed.

HAVE QUESTIONS? GETSECURA.COM 9
You have two options for disarming your system. One is for when
you’re already home and are disarming your system from inside the
house. The other is for when you’re coming home and are disarming
your system after entering the house.
WHEN YOU’RE AT HOME
1. On the home screen, press and release the lock icon.
2. The screen displays ENTER CODE:. Enter your user code or
present a SecuraProx fob to disarm the system.
3. You should see ALL SYSTEM OFF displayed in the upper
right corner after the system disarms. The open lock indicates
a disarmed status.
WHEN YOU’RE COMING HOME
1. During the prewarn tone, the screen displays ENTER CODE:
and the zone entered through. Enter your user code or present
a SecuraProx fob to disarm the system. Only those areas
authorized for your user code will disarm.
2. Your system silences the tone as soon as the rst user code digit
is pressed. If a valid user code is not entered within 5 seconds
or an invalid user code is entered, the prewarn tone begins
sounding again.
3. You should see ALL SYSTEM OFF displayed in the upper
right corner after the system disarms. The open lock indicates
a disarmed status.
DISARMING YOUR SYSTEM
TUE 5:35 PM
82
CURRENT
HI LO
98 77
Panic
Chime
Reset
Favorites
DISARMED
STATUS
ICON

10 HAVE QUESTIONS? GETSECURA.COM
When the alarm bell or siren is sounding, enter your user code or
present your SecuraProx fob to your keypad. IS THIS A FALSE
ALARM? YES NO displays.
REAL ALARM
If the alarm is valid, press NO to send an alarm verify message to the
Central Station. Your security system will remain armed.
FALSE ALARM
If a valid alarm has not occurred, press YES to cancel the alarm and
send an abort message to the Central Station. Your security system
will be disarmed.
HOW TO HANDLE AN ALARM
TUE 5:35 PM
Panic
Chime
Reset
Favorites
ALARM

HAVE QUESTIONS? GETSECURA.COM 11
User codes are four-digit codes needed to use several functions of the
keypad, including the user menu and disarming the system. Every user
on the system should be assigned a user code.
A User Code is made up of the following elements:
▸USER NUMBER: Each user on your system is
assigned a number (1–99). This number identies them
to the system and can be transmitted to the central
station when they arm or disarm the system.
▸USER CODE: Users also have a four-digit user code they
enter into the keypad or app when disarming their system.
▸USER NAME: Enter the name of the user.
▸AUTHORITY LEVEL: Determines what User Menu options
the user has access to. A user code can be set to master
or standard.
ADDING A USER CODE
1. From the home screen, access User Codes from the carousel
menu. Enter your user code and press CMD, then Press ADD.
2. Enter the new user number from 1–99, a four-digit user code,
and the new user name. Press CMD to cycle through the
system prompts.
USER CODE OPTIONS
1 2 3 4
5 6 7 8
9 0
CMD
ABC
!@#
ABC DEF GHI JKL
MNO PQR STU VWX
YZ
TUE 5:35 PM
USER CODES?
ADD DEL CHG SEND

12 HAVE QUESTIONS? GETSECURA.COM
3. Determine if the code is a master user code. If the user you are
entering is a temporary user, then make the user a temporary
user and assign a number of days for the code to be active
(1–250 days).
4. Last, determine if the user is ARM ONLY. Select YES to
restrict the user to arming only. Select NO to allow the user to
arm the system and access standard level user menu options.
DELETING A USER CODE
1. From the home screen, access User Codes from the carousel
menu. Enter your user code and press CMD, then Press DEL.
2. Enter the user code number to delete and press CMD. The
system displays that he user code was deleted.
EDITING A USER CODE
1. From the home screen, access User Codes from the carousel
menu. Enter your user code and press CMD, then Press CHG.
2. Enter the user code number that you want to edit and press
CMD. Press CMD to cycle through the dierent parts of the
user code. Press a select area to edit the user code.
SENDING A USER CODE
1. From the home screen, access User Codes from the carousel
menu. Enter your user code and press CMD, then Press SEND.
2. The system sends user codes for user numbers 2–20 (master
and standard) to compatible Z-Wave locks.
3. After the locks receive the user codes, enter a valid user code
at the lock to lock the door or to unlock and disarm the system.
What the user codes can do at Z-Wave locks is based on the
user’s authority level.

HAVE QUESTIONS? GETSECURA.COM 13
Z-WAVE OPTIONS
1 2 3 4
5 6 7 8
9 0 CMD
ABC
!@#
ABC DEF GHI JKL
MNO PQR STU VWX
YZ
TUE 5:35 PM
ZWAVE SETUP?
Z-Wave technology provides home automation. Using Z-Wave, you
can control lights, locks, small appliances, and thermostats from your
keypad, computer, or smartphone (with the SecuraMobile™ app). You
can add up to 140 Z-Wave devices to your system.
ADDING A Z-WAVE DEVICE
1. Access the user menu and press CMD until ZWAVE SETUP?
appears, and then press any select area.
2. Press ADD.
3. Press the Z-Wave button on the device you are adding and wait
for your keypad to recognize it.
VIEWING YOUR Z-WAVE DEVICES
1. Access the user menu and press CMD until ZWAVE SETUP?
appears, and then press any select area.
2. Press LIST.
3. All of your Z-Wave devices that are connected to your panel
display on the screen. Press CMD to cycle through your
devices, if needed.
REMOVING A Z-WAVE DEVICE
1. Access the user menu and press CMD until ZWAVE SETUP?
appears, and then press any select area.
2. Press REMOVE.
3. Press the Z-Wave button on the device you are removing. Wait
for your keypad to display that the device has been removed.

14 HAVE QUESTIONS? GETSECURA.COM
TRANSFERRING Z-WAVE DEVICE INFORMATION
Allows you to replace your Z-Wave information with the information
from another system.
1. Access the user menu and press CMD until ZWAVE SETUP?
appears, and then press any select area. Press CMD to cycle
through the Z-Wave options and press XFER.
2. The system warns you that transferring Z-Wave device
information deletes your existing devices from the panel, and
then asks if you are sure you want to continue the transfer. If
you want to proceed, press YES.
3. The system deletes your existing Z-Wave devices from your
panel and searches for another system to import Z-Wave
information from.
OPTIMIZING Z-WAVE DEVICE COMMUNICATION
Allows you to update the communication between all your Z-Wave
devices and your system.
1. Access the user menu and press CMD until ZWAVE SETUP?
appears, and then press any select area. Press CMD to cycle
through the Z-Wave options and press OPT.
2. The system displays the names of your connected Z-Wave
devices and updates the communication.
3. When the update is complete the system displays OPTIMIZE
SUCCESS.

HAVE QUESTIONS? GETSECURA.COM 15
USING FAVORITES
1 2 3 4
5 6 7 8
9 0 CMD
ABC
!@#
ABC DEF GHI JKL
MNO PQR STU VWX
YZ
TUE 5:35 PM
FAVORITES?
Favorites allow you to quickly activate multiple Z-Wave devices at once.
For example, you could set turning o your thermostat, turning o your
lights, and locking your door together as a favorite to activate when
leaving your house. You can add up to 25 Z-Wave devices to a favorite.
To work with favorites, access the FAVORITES option from your
keypad. You can do this three dierent ways:
• From the home screen, press Favorites from the carousel
menu, and then press the pencil icon in the bottom-right
corner of the screen.
• Access the user menu, press CMD until FAVORITES
appears, and then press any select area. This option is only
used to activate or deactivate existing favorites. You cannot
add or edit favorites using this option.
• Access the user menu, press CMD until ZWAVE SETUP?
appears, and then press any select area. Then, press CMD to
cycle through the Z-Wave options and press FAV.
CREATING A FAVORITE
1. Access the FAVORITES option on your keypad from the
carousel menu or ZWAVE SETUP?.
2. Enter a new number for the favorite and press CMD. The
screen displays that the favorite is unused.
3. Press UNUSED, enter a name for the favorite, and then press
CMD. The screen displays your new favorite.
/