Page is loading ...

IMPORTANT SAFEGUARDS
READ AND FOLLOW ALL SAFETY INSTRUCTIONS.
When using electrical equipment, basic safety precautions should always be followed including the following:
• DISCONNECT AC POWER SUPPLY BEFORE SERVICING.
• Installation and servicing of this equipment should be performed by qualified service personnel only.
• Ensure that the electrical wiring conforms to the National Electrical Code NEC® and local regulations, if
applicable.
• Do not mount near gas or electrical heaters.
• Equipment should be mounted in locations and at heights where it will not be readily subjected to tampering
by unauthorized personnel.
• The use of accessory equipment not recommended by the manufacturer may cause an unsafe condition.
• Any modification or use of non-original components will void the warranty and product liability.
• Do not use this equipment for other than intended use.
SAVE THESE INSTRUCTIONS!
Technical Support ■ (623) 580-8943 ■ [email protected]
VPA Series
Installation Instructions
20070163 REV 2 - 06/21 1 800-533-3948 www.barronltg.com

Installation
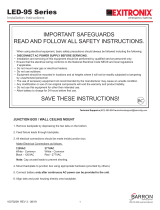
1. Follow the step for the desired mounting method:
a. Ceiling Mount using Snap-on Brackets - Secure snap-on brackets to ceiling (refer to mounting dimension list) using
appropriate hardware (supplied by others) for the mounting surface (Fig. 1).
b. Ceiling Mount, Suspended - Secure to ceiling (refer to mounting dimension list) using appropriate hardware (supplied
by others) for the mounting surface. Attach ceiling mounting hardware to the snap-on fixture brackets (Fig. 2)
Mounting Dimension List:
2ft long fixture (2 mounting brackets) - 12-1/4" center to center
4ft long fixture (2 mounting brackets) - 33-1/2" center to center
8ft long fixture (3 mounting brackets) - 32" center to center (2 times)
2. Align light fixture with the brackets and snap into place.
3. Release the latches and remove the lens. (Fig. 3)
4. Make electrical connections; see Electrical Connections section.
5. Replace the lens and secure with the latches.
IMPORTANT: Weatherproof your outdoor installation. Be sure to seal all holes in the enclosure, such as the mounting,
conduit, plugs, sensors, and photocontrols with silicone sealant.
Fig. 1
Fig. 2
Fig. 3
VPA Series
Installation Instructions
20070163 REV 2 - 06/21 2 800-533-3948 www.barronltg.com

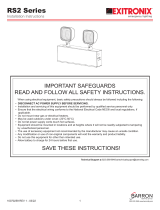
Electrical Connections (Fig. 4-6)
All electrical connections should be made inside the light fixture. Make electrical connection as follows:
120-277VAC
Black - 120-277VAC
White - Common
Green/Yellow Green - Ground
Note: Cap unused leads to prevent shorting.
This fixture auto-adjusts to voltages between 120-277VAC.
Troubleshooting
If the fixture does not turn ON:
1. Check incoming voltage to the LED driver. The voltage must be a minimum of 120VAC and no greater than 277VAC.
2. Are all LEDs on the light engine OFF? If so, the LED driver may be defective. Using a voltmeter, check to see if voltage
is present at the output of the power supply. If low or no voltage is found, replace the power supply.
3. If any individual LEDs are OFF, the LED light engine may be defective. Please have the serial number of the light
engine available when you contact technical support.
4. If the unit is equipped with a photocell, check the photocell to make sure it is functioning properly.
Fig. 4 - VPA Wiring Diagram
Switch Line
White
Yellow Stripe
Neutral
Ground
Fig. 5 - VPA with Motion Sensor
Wiring Diagram
Fig. 6 - VPA with Motion Sensor
& Battery Backup Wiring Diagram
White
Yellow Stripe
Neutral
Ground
Switch Line Unswitched Line
White
Yellow Stripe
Neutral
Ground
Switch Line
VPA Series
Installation Instructions
20070163 REV 2 - 06/21 3 800-533-3948 www.barronltg.com

Battery Backup Information and Operation
1. Make sure battery is connected prior to closing fixture.
2. Battery requires up to 24 hours to fully charge after connecting to unswitched line power.
3. Battery backup has a momentary test button with a red/green LED indicator light.
• Steady red indicator light ON: Indicates there is unswitched power to the battery backup and it is in charging mode.
• Flashing red indicator light: Indicates battery may be disconnected or battery may be defective. Check battery
connection and battery voltage and condition.
• Indicator light OFF: Battery backup is in discharging mode and there is no power to the unswitched line. Fixture LEDs
illuminated by battery power.
• Steady green indicator light ON: Indicates the battery is fully charged.
4. Pressing and holding the momentary test button simulates the loss of power to the unswitched line. The solid red or
green indicator light should go OFF and the fixture LEDs should illuminate under battery power. Releasing the test
button resumes normal operation.
Motion Sensor and Remote Information and Operation
1. Motion sensor operates by using microwaves to detect motion and a photocell to measure ambient light levels.
2. Default operation of the motion sensor is:
• Detection range / Sensitivity (100%)
• Standby / Hold time before dimming (10 seconds)
• Light control / Daylight harvesting (30 Lux)
• Dim / Twilight level (30%)
• Standby/twilight time before unit turns off (+∞/does not turn off, 60 minutes)
3. Optional remote control provides additional features and overrides default motion sensor operation. Remote control
sends motion sensor commands via infrared (IR) signal. The motion sensor will beep on receipt of commands from the
remote. The motion sensor has an internal memory that remembers the last programming from the remote, even after
power loss. Remote control part #TL-RC-SCCNS. Remote control not required if default settings are acceptable.
4. Full motion sensor and optional remote instructions are included in the box or available on the Barron Lighting Group
website.
5. Sensor can be disabled by disconnecting the low voltage gray and purple wires from the sensor; cap unused wires.
VPA Series
Installation Instructions
20070163 REV 2 - 06/21 4 800-533-3948 www.barronltg.com
/