Page is loading ...
Product names listed herein are trademarks of AS America, Inc.
© AS America, Inc. 2019
M985014 (3/19)
Contemporary
®
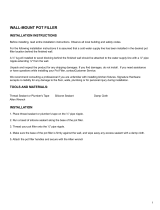
Wall-Mount Pot Filler
Adjustable Wrench Teon Tape Phillips Screwdriver Electric Drill3/8” Hex Wrench
6-1/8"
(155 mm)
3-3/16"
(81 mm)
1-7/8"
(48 mm)
INLET
1/2" NPT
(21 mm)
2" (51 mm)
11"
(280 mm)
3-15/16"
(100 mm)
2-3/4"
(70 mm)
3-1/4"
(82 mm)
Thank you for selecting American Standard...
the benchmark of fine quality for over 140 years.
To ensure that your installation proceeds smoothly-please
read these instructions carefully before you begin.
INSTALLATION
INSTRUCTIONS
4803900
Certied to comply with ANSI A112.18.1M
RECOMMENDED TOOLS AND MATERIALS
Most of the procedures require the use of common tools and materials, which are available from hardware and plumbing
supply stores. It is essential that the tools and materials be on hand before work is begun.
ROUGHING-IN DIMENSIONS:
• For reference
- 1 -
- 2 -
1
2
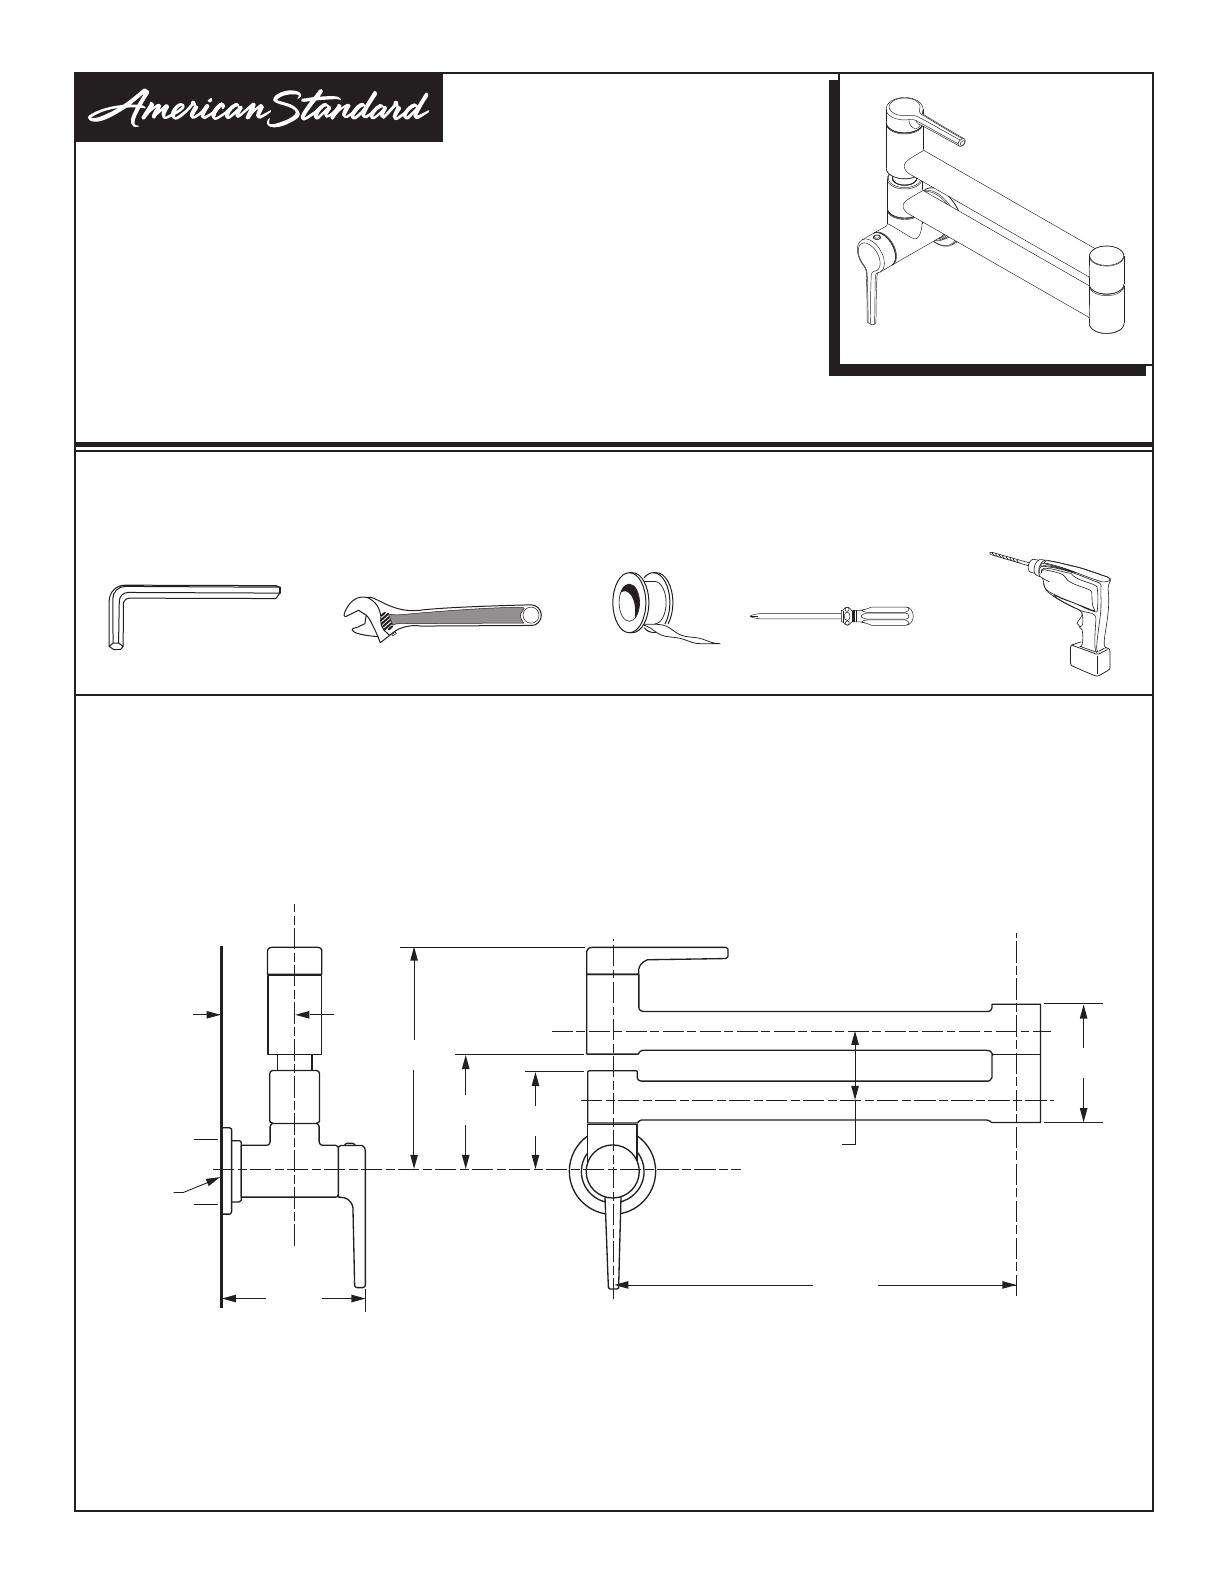
ROUGHING-IN
INSTALL COLD WATER SUPPLY
• Install a 2x6 Cross Brace within the wall between the Wall Studs.
• Determine the supply height from the nished oor and drill a 7/8 inch dia. hole at that location.
• Install the 1/2" NPT cold water supply. Secure supply pipe to the Cross Brace.
Important: The supply pipe must extend 1/2" from the face of the finished wall
• Finish installing the wall board and the nished wall.
M985014 (3/19)
CAUTION
Turn off hot and cold water
supplies before beginning.
2X6 CROSS BRACE
7/8"DIA. HOLE
WALL BOARD
FINISHED WALL
FINISHED WALL
OPTIONAL TO
FINISHED FLOOR
2X6 CROSS BRACE
DRILL 7/8"
DIA. HOLE
WALL STUDS
16"
FINISHED WALL
1/2"
1/2"
NPT
SUPPLY
WALL BOARD
FINISHED WALL
SUPPLY NIPPLE
PIPE BRACE
- 3 -
1
2
3
4
Figure B. Figure C.
Figure A.
SPLINE
LEVEL
3/8" HEX
WRENCH
Figure D.
5
2
3
8
6
7
3
4
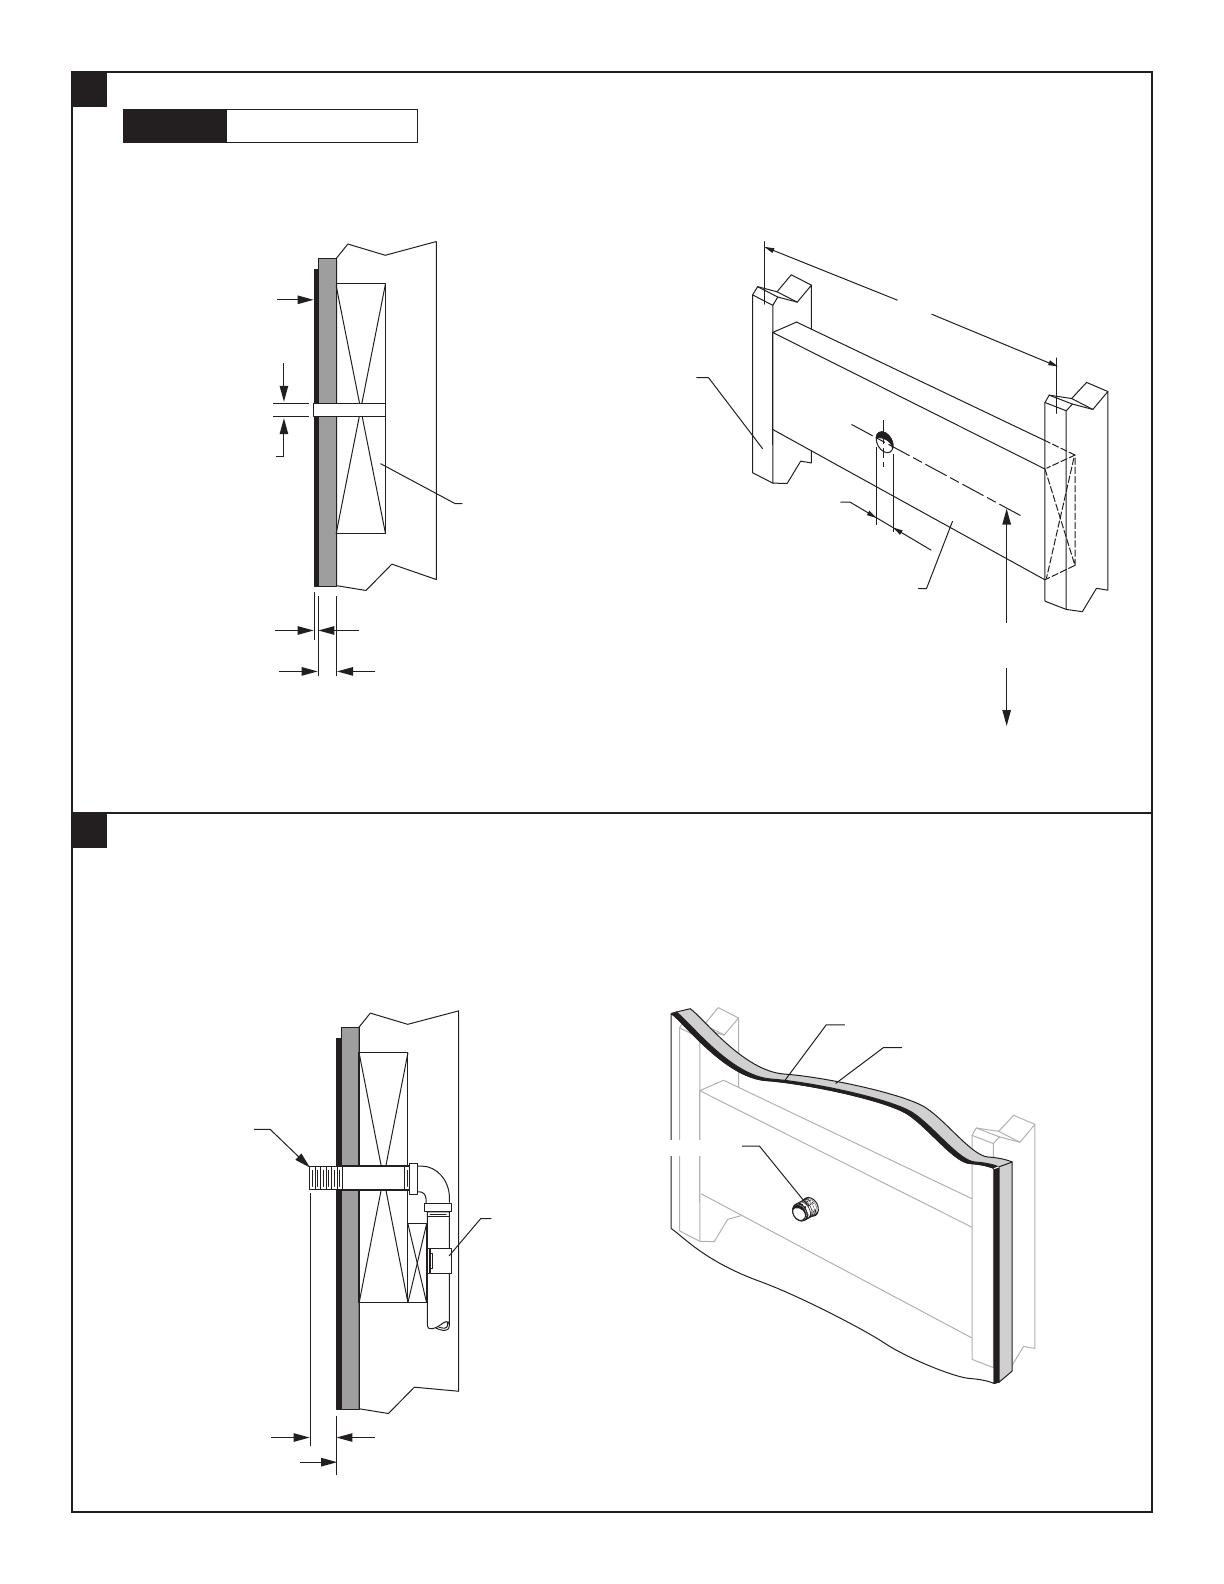
INSTALL FAUCET MOUNTING ADAPTER
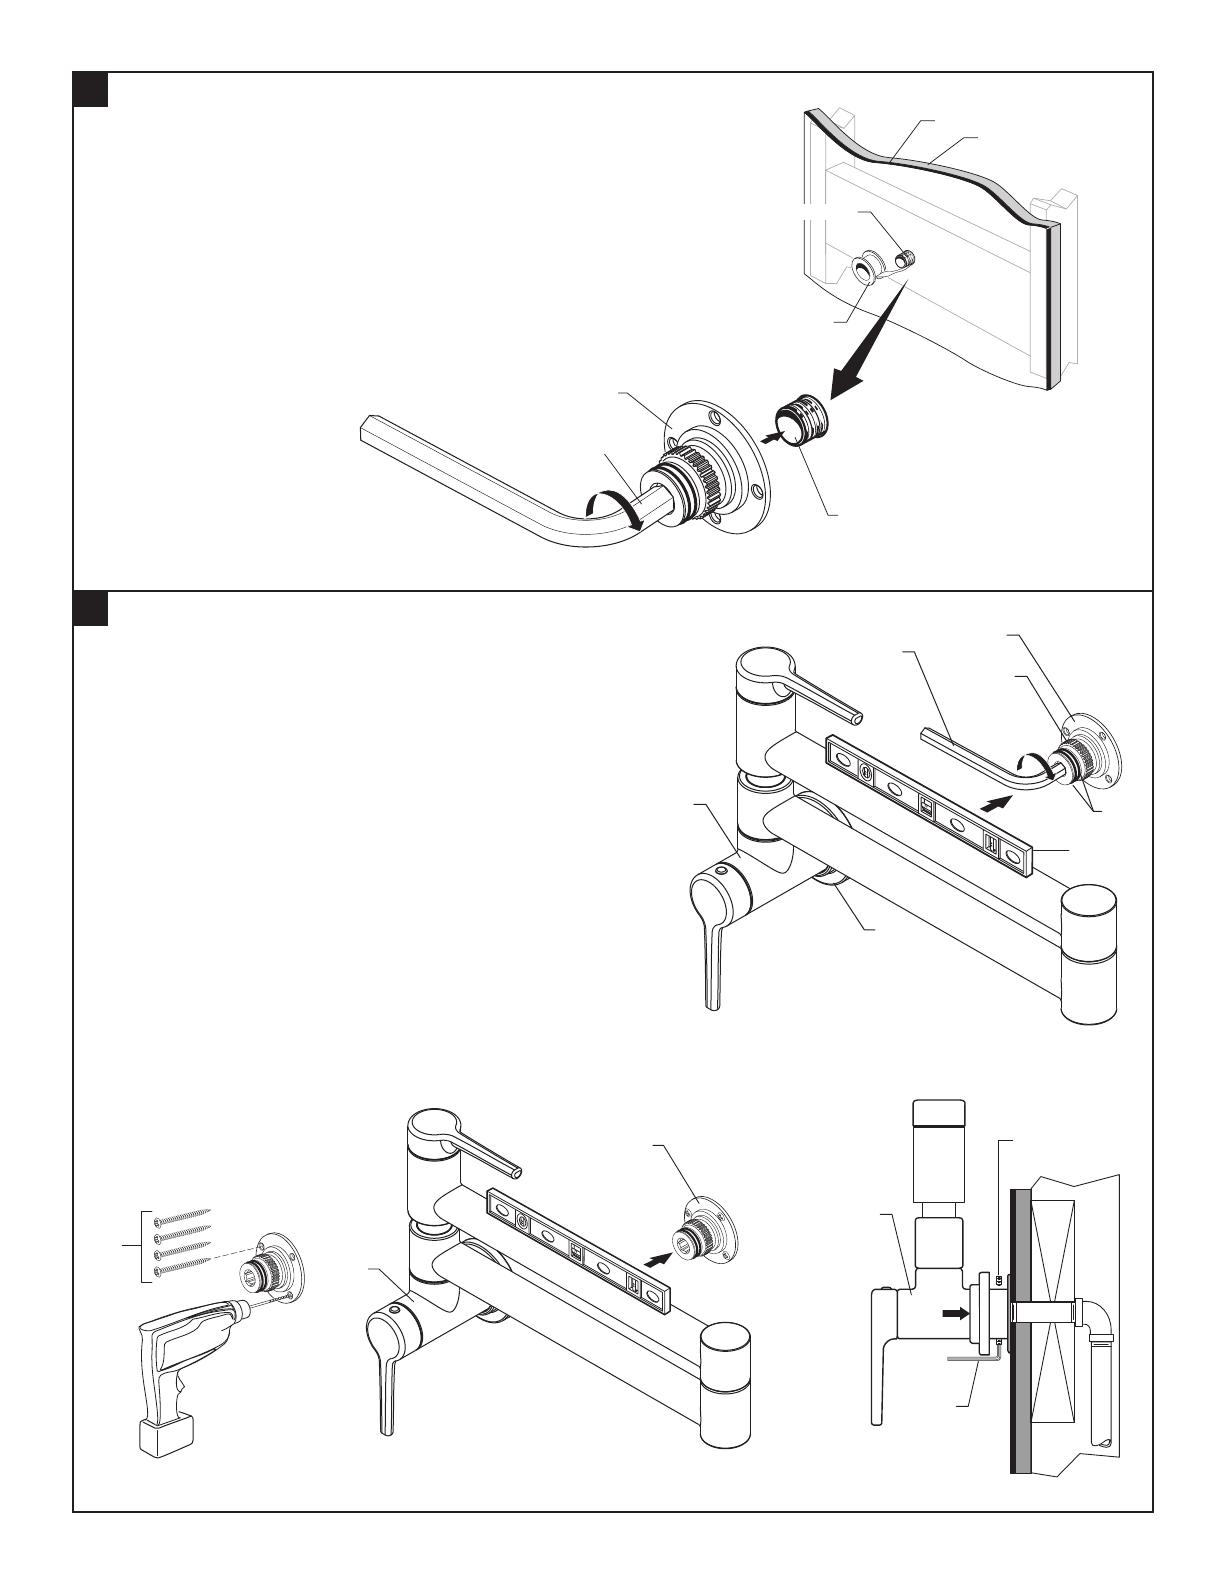
INSTALL POT FILLER
• Apply Sealing Tape to the threads of the Supply Nipple.
Figure A.
• Thread the MOUNTING ADAPTER (1) onto the Supply
Nipple until tight against the the nished wall. Use a 3/8
Hex Wrench. Figure B.
• Install the ESCUTCHEON (1) onto the pot ller body. Align the
POT FILLER (2) and install it onto the spline of the MOUNTING
ADAPTER (3). Be carefull not to damage the O-RING SEALS (4)
on the MOUNTING ADAPTER (3). Figure A.
• Use a level as shown to help align the pot ller. Note: If the pot
filler cannot be leveled, remove the pot filler from the mounting
adapter. With the 3/8 hex wrench rotate the mounting adapter
until a level position is acheived. Figure A.
• When the MOUNTING ADAPTER (3) is properly positioned, drill
four pilot holes. Secure the MOUNTING ADAPTER (3) with the four
MOUNTING SCREW (5) provided. Figure B.
• Reinstall the POT FILLER (2) onto the MOUNTING ADAPTER (3),
check for level. Figure C.
• If the POT FILLER (2) is level, tighten the two SET SCREWS (6)
with the small HEX WRENCH (7) provided. Push the ESCUTCHEON (1)
ush against the nshed wall. Figure D.
• Turn on the water supply. Check for leaks and proper operation.
M985014 (3/19)
WALL BOARD
SEALING TAPE
FINISHED WALL
Figure A.
SUPPLY NIPPLE
3/8" HEX WRENCH
Figure B.
SUPPLY NIPPLE
1
/