
INSTALLATION
Tools:
Adjustable Wrench Power Drill Teon Tape Rags
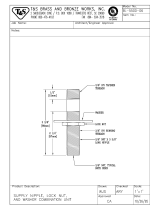
Model Number: 2AM600, 2MT600
Warnings and Notes:
Check with local plumbing code requirements before installation.
This product should be installed by a local listed plumber.
Do not use plumbers putty on threads.
Installation Steps:
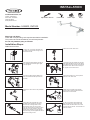
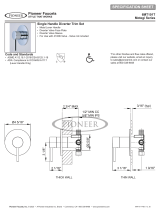
Wallmount Pot Filler
32mm
[1 1/4"]
1/2" IPS
Finish Wall
13mm
[ 1/2"]
(1) Conrm the 1/2” IPS/NPT threaded inlet
pipe nipple must be kept with a length of 1/2”
from the nished wall.
PIONEER INDUSTRIES, INC.
3325 S. Gareld Ave
Commerce, CA 90040
(800) 338-9468
www.pioneerind.com
(7) Carefully screw the pot-ller into inlet pipe
nipple using adjustable wrench to fully tighten
the pot ller. Ensure the notches on the faucet
align with the 3/32” Allen screw.Level the pot
ller. Tighten the 3/32” Allen screw.
(2) After wall is nished install the pot ller to
the 1/2” IPS/NPT threaded inlet pipe nipple.
Do not fully tighten.
(3) Level the pot-ller. Mark the drilling hole
location on the nished wall. Space remove
the pot ller.
2.4mm
[3/32"]
(4) Drill the four 3/32” holes on the premarked
location
(6) Remove the 3/32” Allen screw
(5) Apply Teon tape to thread end of inlet
pipe nipple before installing the mounting
bracket. Put the mounting washer on the
wall and drill the 3/32” hole on the same
location as wall. Ensure the mounting washer
is behind the mounting bracket to form the
watertight seal. Install the mounting bracket
with the mounting screws supplied with faucet.
Tighten the mounting screws.
(8) Place the escutcheon in correct position.
Tighten the 1/16” Allen screw
(9) Make sure the pot ller spout swivels
smoothly. Place a bucket underneath of the
pot-ller. Remove the aerator.
(10) Turn on inlet water supply. Make sure
all the connections are secure. Open both
handles. Flush and allow water to run at full
ow for at least one minute. Turn off water and
replace the aerator.

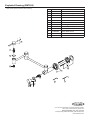
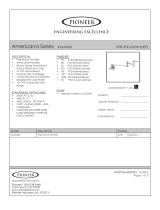
Exploded Drawing (2AM600)
* Note: Please specify nish/color when ordering.
A
B
C
D
E
F
D
G
H
I
J
1
2
3
4
5
ITEM # DESCRIPTION
A X-1200010* Lever Handle
B X-4200093* Handle Sleeve
C X-4200067* Handle Escutcheon
D X-3200004H Ceramic Cartridge
E X-4900041* 2.0 GPM Aerator
F X-1200009* Lever Handle
G X-4200064* Escutcheon
H X-5200010 Mounting Kit
I X-4900040 1/16” Allen Wrench
J X-4900024 3/32” Allen Wrench
1 X-4900042P* Handle Button-Plain
2 X-4900043 Handle Screw
3 X-4200065 Handle Screw
4 X-4900039 1/16” Allen Screw
5 X-4900002 3/32” Allen Screw
For more care information or trouble shooting inqui-
ries about your Pioneer product, please call:
Pioneer Industries, Inc. (800) 338-9468
Monday-Friday 8AM to 8PM EST (5AM to 5PM PST)
www.pioneerind.com

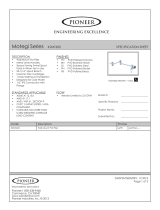
Exploded Drawing (2MT600)
* Note: Please specify nish/color when ordering.
A
B
C
D
E
B
C
F
G
H
I
1
2
1
2
3
1
ITEM # DESCRIPTION
A X-1200018* Lever Handle
B X-3200004H Ceramic Cartridge
C X-4200153 Gasket
D X-4900041* 2.0 GPM Aerator
E X-1200021* Lever Handle
F X-4200158* Escutcheon
G X-5200010 Mounting Kit
H X-4900040 1/16” Allen Wrench
I X-4900024 3/32” Allen Wrench
1 X-4900002 3/32” Allen Screw
2 X-4400073* Hole Cover
3 X-4900039 1/16” Allen Screw
For more care information or trouble shooting inquiries
about your Pioneer product, please call:
Pioneer Industries, Inc. (800) 338-9468
Monday-Friday 8AM to 8PM EST (5AM to 5PM PST)
www.pioneerind.com
-
 1
1
-
 2
2
-
 3
3


Pioneer Faucets 2AM600-BN Installation guide
- Type
- Installation guide
Ask a question and I''ll find the answer in the document
Finding information in a document is now easier with AI
Related papers
-
Pioneer Faucets 2AM700-BN Installation guide
-
-
-
-
-
-
-
-
-
Other documents
-
 T & S Brass & Bronze Works BL-5500-06 Datasheet
-
 Ovios TH8045 Installation guide
-
Signature Hardware 422756 Installation guide
-
 Pioneer Industries 2AM600 User guide
-
 Pioneer Industries 2MT600-BN User guide
-
 Pioneer Industries 6MT101T-BN Dimensions Guide
-
Luxier KTS17-TC-V User guide
-
-
 Pioneer Industries 2AM600 Dimensions Guide
-
 Pioneer Industries 2MT600-BN Dimensions Guide


