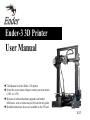
Ender 3 3D Printer: Unleash Your Creativity with Limitless Printing Options
With its user-friendly interface, auto bed leveling feature, and compatibility with various filament types, the Ender 3 3D Printer empowers you to bring your imaginative designs to life effortlessly. Its sturdy construction ensures stable and precise printing, while the heated bed allows for better adhesion and successful printing of complex models. Explore a world of possibilities, from functional prototypes to intricate art pieces, with the Ender 3, your gateway to the realm of 3D printing.


-
 1
1
-
 2
2
-
 3
3
-
 4
4
-
 5
5
-
 6
6
-
 7
7
-
 8
8
-
 9
9
-
 10
10
-
 11
11
-
 12
12
-
 13
13
-
 14
14
-
 15
15
-
 16
16


Ender 3 3D Printer User manual
- Type
- User manual
- This manual is also suitable for
Ender 3 3D Printer: Unleash Your Creativity with Limitless Printing Options
With its user-friendly interface, auto bed leveling feature, and compatibility with various filament types, the Ender 3 3D Printer empowers you to bring your imaginative designs to life effortlessly. Its sturdy construction ensures stable and precise printing, while the heated bed allows for better adhesion and successful printing of complex models. Explore a world of possibilities, from functional prototypes to intricate art pieces, with the Ender 3, your gateway to the realm of 3D printing.
Ask a question and I''ll find the answer in the document
Finding information in a document is now easier with AI
Related papers


Other documents
-
Creality CR-10 S5 User manual
-
-
-
-
SainSmart Creality Ender-3 V2 3D Printer User manual
-
Creality CR-M4 Owner's manual
-
Cocoon Cocoon Create Model Maker HE170703 User manual
-
-
-
Creality Ender-3 S1 Direct Drive 3D Printer Installation guide