Ender 3 S1 Plus 3D Printer User manual

Type
User manual

This manual is also suitable for

Ender 3 S1 Plus 3D Printer: Experience precise and versatile 3D printing with a user-friendly interface, auto-leveling capabilities, and compatibility with various filament types. Create intricate objects with high-quality results, thanks to its sturdy build and advanced features. Unleash your creativity and bring your 3D designs to life with the Ender 3 S1 Plus.

Ender 3 S1 Plus 3D Printer: Experience precise and versatile 3D printing with a user-friendly interface, auto-leveling capabilities, and compatibility with various filament types. Create intricate objects with high-quality results, thanks to its sturdy build and advanced features. Unleash your creativity and bring your 3D designs to life with the Ender 3 S1 Plus.

V1.1
3D Printer User Manual
For a better experience in using our product, you can also learn how to use the Printer in the following ways: View
the accompanied instructions and videos in the Storage card.
Ender-3 S1 Plus
1 Notes
Do not use the printer any way other than described herein in order to avoid personal injury or property damage.
Users should comply with the laws and regulations of the corresponding countries and regions where the equipment is located (used), abide by
professional ethics, pay attention to safety obligations, and strictly prohibit the use of our products or equipment for any illegal purposes. Creality
will not be responsible for any violators' legal liability under any circustance.
This machine is equipped with a security protection mechanism. Do not manually move the nozzle and printing platform mechanism manually while
booting up, otherwise the device will automatically power off for safety.
Clean the printer frequently. Always turn the power off when cleaning, and wipe with a dry cloth to remove dust, adhered printing plastics or any other
material off the frame, guide rails, or wheels. Use glass cleaner or isopropyl alcohol to clean the print surface before every print for consistent results.
When cleaning debris from the printer hotend, always use the provided tools. Do not touch the nozzle directly when heated. This can cause personal
injury.
Do not touch the nozzle or printing surface during operation as they may be hot. Keep hands away from machine while in use to avoid burns or
personal injury.
Before using experimental or exotic filaments, we suggest using standard filaments such as ABS or PLA to calibrate and test the machine.
Do not expose the printer to violent vibration or any unstable environment, as this may cause poor print quality.
Do not place the printer near any heat source or flammable or explosive objects. We suggest placing it in a well-ventilated, low-dust environment.
1
2
3
4
5
6
7
8
9
3 Tool list
Spade X1
9Diagonal Pliers X1
10 Filament X1
11 Wrench and screwdriver
X1
12
Power Cord X1
13 Nozzle Cleaner X1
14 Storage Card &
Card Reader X1
15 Nozzle X1
16
2 Parts List
Base Frame X1 Nozzle Kit X1 Spool X1
Display X1
Gantry Frame X1
1
5 6 Screen bracket X1
7Material rack and
filament sensor X1
8
2Wire clamp X1
3 4
4 Interface Descriptions
4.1 Description of Mainboard interfaces and Connections
4.2
Description of nozzle interfaces 4.3
Description of Z-axis
Adapter
Tips: the above accessories are
for reference only, in kind prevail!
Hexagon socket head
spring washer combination
screw M5x45 X5
17 Hexagon socket flat
round head screw
M4x18 X4
18 Hexagon socket
head cap screw
M3x6 X5
19
Z-axis motor
interface
Memory card slot
10P Flexible Flat
Cable (FFC)
30P Flexible Flat
Cable (FFC)
Mainboard fan
Type-C interface
Filament Sensor
Interface Z limit interface Touch screen
interface Knob display
interface
Heated Bed
DC 24V
Heated Bed
Thermistor
Fuse
24P Flexible Flat Cable (FFC)
Auto Leveling Interface
Heatsink Fan Interface
Front Print Fan Interface
Hotend Thermistor
Interface
Extrusion motor
interface
Heating pipe
Z-Axis Motor
Interface
Filament Sensor
Interface
+ 24V
- 24V
PWM
Z-axis limit switch
kit x1
20
21 8-10 open-end
spanners ×1
5 Product installation
5.1 Nozzle assembly and wire clamp installation
5.2 Gantry frame installation
A. Firstly, move X axis to the bottom, and then place the gantry in the base slot and pre-lock the mounting holes
by 2 M5x45 hexagon socket head cap screws with spring washers from the side against the mounting holes.
B. Rotate the base assembly by 180° to ensure that both sides of the profile are flush at the top and bottom,
and use two M5x45 hexagon socket head cap screws with spring washers on the other side to pre-lock
the mounting holes before tightening up.
C. Rotate the base assembly by 180° and tighten the pre-locked screws in A to secure it.
A. Place the nozzle assembly on the mounting back panel of the extruder, pre-lock with four M3x6 hexagon
socket head cap screw, and then tighten to fix it.
B. Clip the wire clamp to the back panel of the X-axis motor.
When tightening the screws, use the short side of the wrench.
3
3
5
19
2
Side view
1
5
17 17
5.5 Equipment wiring
X, Z axis motor interface X axis limit switch
5.4 Material rack installation
A. Find the material pipe accessories, and fix the threaded end on the right end of the material rack.
B. Fit the front slot of the installed material rack to the front slot of the profile, and then press down to
clamp the bottom of the profile.
5.3 Display installation
A. Place the display bracket on the side of the right profile, and tighten it with three M4X18 hexagon flat
round head screws.
B. Align the pins on the back of the display with the large holes of the display bracket and insert them, and
then slide down to tighten it.
718
6
8
4
1. Connect the nozzle to the 24pin port as shown in the figure. 2. Connect the X and Z axis stepper motors
according to the yellow label on 6pin (4 wires) port. 3. Connect the X-axis limit switch as indicated by the
yellow label on the 3pin (2 wires) port. 4. Connect 3pin (3 wires) 2.0 port to the keysets, and 3pin (3 wires)
2.54 port to the filament detector.
Note
Please ensure the correct position for the power supply switch and mains before supply connection, in order to
avoid damage to the device.
If the mains between 200V and 240V, please select the 230V for the power supply switch (default is 230V).
If the mains between 100V and 120V, please select the 115V for the power supply switch.
6 Auto Leveling
1. Go to "settings" and tap "leveling" to enter the CR Touch leveling interface.
Tap "start" and wait for the automatic leveling to complete.
(Please use the CR Touch for automatic leveling first. If the CR Touch lights up in red and it cannot
be leveled, please use the auxiliary leveling again.)
Filament detector wiring
115V
230V
Z2
Z1
0%
7 Assisted Leveling
1. Go to Settings → Leveling → Assisted Leveling. Tap numbers ①/②/③/④/⑤ respectively.
2.Return to the previous menu. Enter the assisted leveling interface. Adjust the Z-axis compensation value
so that the height from the nozzle to the printing platform is about the thickness of a piece of A4 paper.
Return to the previous menu, and the Z-axis compensation value will be configured.
(The CR Touch leveling will fail when the platform inclination is greater
than 2 mm. In this case, please use assisted leveling instead.)
The gap is about the thickness of
a piece of A4 paper, and there is
a slight resistance when pulling
the paper.
-2.30
0%
-2.30
A. In order to successfully load the filament, please trim the end of the filament at an angle of 45 degrees.
B. Press the filament until it passes through the filament detection hole. Then press and hold the extruder
handle to insert the filament into the extruder hole until it reaches the nozzle.
C. Warm up the nozzle. If the filament flows out of the nozzle when the temperature reaches the target value,
the filament is properly loaded.
8 Loading the Filament
Replacing the filament:
1. When the printer is not printing:
A. Heat the nozzle to 185℃ or higher, wait for the filament
in the nozzle to soften. Then press and hold the extrusion
handle to quickly extract the filament to prevent it from
clogging in the heat break.
B. Place the new filament onto the rack and repeat the
steps in Section 8: Loading the Filament.
2. When the printer is printing:
A. Pause the printing. After the printer stops, press and
hold the extrusion handle and quickly extract the filament
to prevent it from clogging in the heat break.
B. Place the new filament onto the rack and press it through
the filament detector. Press and hold the extrusion handle to
insert the filament into the nozzle. Then push the filament to
squeeze out the residual filament in the nozzle and clean up
the nozzle before resuming printing.
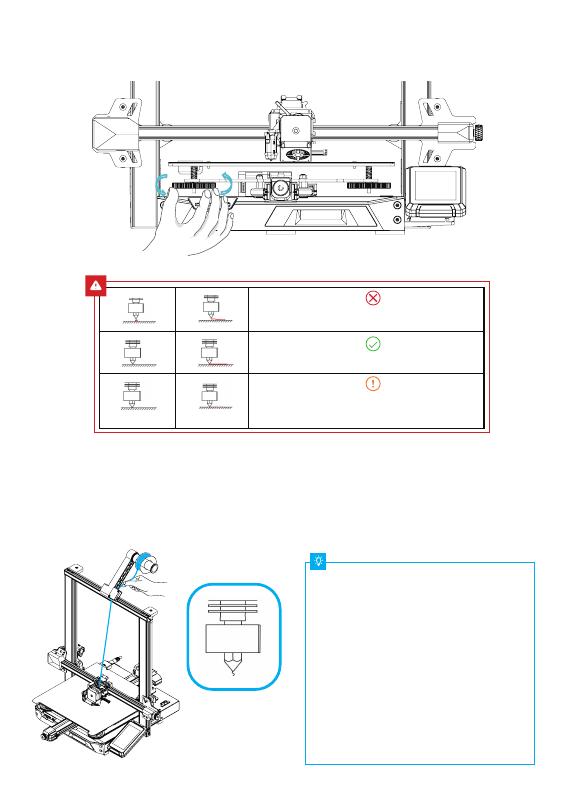
2. Turn the knob at the bottom of the hotbed and move the nozzle to the four corners of the printing platform so
that the gap between the nozzle and the printing platform is almost the thickness of a piece of A4 paper (0.08
to 0.1 mm). Ensure that all the four corners are leveled.
The nozzle is too close to the platform, and the
filament is not extruded enough, which may
damage the platform.
The nozzle is too far away from the platform, and
the filaments cannot stick to the platform.
The filament is evenly extruded and sticks to
the platform just right.
9 First time Printing Instruction
1. Log in to the official website to download
(www.creality.com) or find the Creality
software in the memory card and install it.
Creality Slicer
2. Select Preferences in sequence → Configure Creality
→ Next → Select corresponding language → Next →
Finish to complete the setting.
3. Select Printer (Ender-3 S1 Plus) 4. Enter the corresponding parameters → Close
5. Open Creality
Slicer
6. Load File
7. Select File
Creality Slicer
Load
It is important to note file name within the memory card must
be in Latin letters or numbers. Chinese characters or any other
special symbol cannot be displayed by the printer.
Reminder: Please refer to user manual within the provided
memory card for software operation instructions.
9. Insert the memory card → Select "Print"
→ Select the file to print→ Select "Start
Printing"
8.
Generate G code → Save to memory card
Plus
S1 Plus
Plus
Plus
Plus
300
300
300
Creality Ender-3 S1 Plus
The actual product may be different from the picture due to different models. Please refer to the actual
product. Shenzhen Creality 3D Technology Co., Ltd. reserves the right of final interpretation.
10 Equipment Introduction
1X-axis Limit Switch
2Nozzle Assembly
3Auto Leveling Assembly
4Printing Platform
5Memory Card Slot
6Type-C Connection
7Tool Box
8 Spool Holder
9 Filament Sensor
10 X-axis Belt Tension Adjustment Knob
11 Display
12 Z-axis Motor Z2
13 Y-Axis Limit Switch
14 Voltage Toggle Switch
15 Y-axis Motor
16 X-axis Motor
19
18 Coupler
17 Y-axis Belt Tension Adjustment
Knob
20
Z-axis Motor Z1
21
Power Switch
Power Socket
22
23
Pinboard
Leveling nuts
SHENZHEN CREALITY 3D TECHNOLOGY CO., LTD.
18F, JinXiuHongDuBuilding, Meilong Blvd., LonghuaDist., Shenzhen,China 518131
Official Website: www.creality.com
Tel: +86 755-8523 4565
19
20
21
23
22
8
9
10
11
1
2
4
3
5
6
7
  • Page 1 1
  • Page 2 2
  • Page 3 3
  • Page 4 4
  • Page 5 5
  • Page 6 6
  • Page 7 7
  • Page 8 8
  • Page 9 9
  • Page 10 10

Ender 3 S1 Plus 3D Printer User manual

Type
User manual
This manual is also suitable for

Ender 3 S1 Plus 3D Printer: Experience precise and versatile 3D printing with a user-friendly interface, auto-leveling capabilities, and compatibility with various filament types. Create intricate objects with high-quality results, thanks to its sturdy build and advanced features. Unleash your creativity and bring your 3D designs to life with the Ender 3 S1 Plus.

Ask a question and I''ll find the answer in the document

Finding information in a document is now easier with AI