Page is loading ...

Diamond Grade
™
School Bus Markings
Application Instructions
Information Folder 4.10 April 2014
Description
3M
™
Diamond Grade
™
Conspicuity Markings Series 983 and 3M
™
Diamond Grade
™
Flexible
Prismatic Conspicuity Markings Series 973 utilize a pressure sensitive adhesive for application
to many clean, dry, weather-resistant surfaces.
The adhesive is protected by an easy-release liner. 3M school bus markings are intended to be
applied to the emergency exits, sides and rear of school buses to enhance visibility and recognition
by motorists.
Markings can be applied to flat surfaces (with and without rivets) and non-compound curved surfaces
with a radius greater than five (5) inches.
Application is not recommended to rusted or corroded metal, loose or chalking paint, irregular shaped
framework, bolts, rivets, support plates, corrugations, within one eighth (1/8) inch of door hinges,
exterior posts, weld joints, the end of the vehicle surface, or within three (3)inches of mandated lights,
reflectors, or turn signals.
Storage
3M school bus markings can be stored for a period of one year in a cool, dry area at temperatures
between 65–75ºF (18–24ºC) and must be applied within the one-year time frame. Rolls should be
stored horizontally or in their shipping carton.
Partially used rolls should be returned to the shipping carton or suspended from a rod or pipe through
the core.

2
Application
Preparation
Instructions
Tools
1. Plastic Applicator, PA-1 (blue or gold); available from 3M.
2. Low friction sleeve, SA-1 (used on the plastic applicator to minimize surface scratching);
available from 3M.
3. Utility knife and scissors, available locally at hardware or industrial supply stores.
4. Osborne Arch Punch No. 149 or Osborne Belt Punch No. 245 of proper size; available
at hardware or industrial supply stores.
5. 3M
™
Scotch-Brite
™
Heavy Duty Cleaning Pad (green or brown); available locally at paint
or industrial supply stores.
6. Lint free paper towels.
7. Recommended cleaning solvent.
Application Temperature
For optimum adhesion and durability, 3M school bus markings should be applied when air and
application surface temperatures are within the following limits:
Minimum Maximum
50ºF (10ºC) 100ºF (38ºC)
The markings may also be applied when air and application surface temperatures are beyond these
limits with the following precautions:
*Above 100ºF (38ºC) care must be taken to avoid pre-adhesion.
* Below 50ºF (10ºC) the substrate surface may be mechanically heated to a temperature within the
application range by using a portable heater or heat lamps. When air temperature is below the
minimum application temperature, the markings should be stored in a hotbox to keep them above
50ºF (10ºC) until application.
Surface Preparation
All surfaces must be cleaned prior to application.
1. Wash surface with detergent and water to remove dirt and road film.
2. Solvent wipe using a lint-free paper towel saturated with a non-oily, quick-drying solvent,
such as isopropyl alcohol, acetone, or 3M
™
Prep Solvent 70.
3. Immediately dry the surface with a clean, dry lint-free paper towel before the solvent dries,
paying close attention to rivets, seams and door hinge areas.
Note: An application surface that has been washed, dried and solvent wiped can still have poor
adhesion in the area around rivets and seams due to liquid retention caused by capillary action.
This problem can be overcome by use of a heat gun to dry out retained solvent or by allowing a
cleaned vehicle to stand overnight prior to application of markings.

3
Application Procedure
These procedures should be followed to apply the markings to the cleaned bus surface within the
proper application temperature range.
1. Apply markings no closer than one-eighth (1/8) inch to door hinges, door hardware, ends of the
bus and weld joints to avoid wrinkling or lifting. Markings must be cut one-eighth (1/8) inch
away from exterior posts and large bolts or rivets.
2. Remove a small section of the liner (6-12 inches) from back of marking, position and align the
marking on the vehicle and tack down lightly to hold in position.
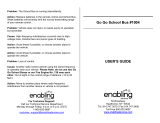
3. Without stretching the marking, hold two to three (2-3) feet (arm’s length) of marking in position
against the surface with one hand. Slowly remove the liner from the back with your other hand
by pulling down on the liner. Do not lose alignment. Do not stretch the marking. Gently tack the
marking in place with your hand (Figure 1).
Figure 1
4. Using a PA-1 applicator, press the marking to the surface using firm, vertical, overlapping
strokes. Be sure all edges are adhered by resqueegeeing the edges.
5. Apply markings over rivets using firm pressure leaving a bridge over the rivet head. Cut
markings around rivets using an Osborne tool of the proper size to fit over the rivet. Place the
tool over the top of the rivet and tap lightly using a small hammer while slightly turning the
cutting tool. Squeegee the marking around the rivet with firm pressure. The cut film on the rivet
head can be removed or left on, but it will eventually come off during washing. Avoid applying
markings over closely spaced rivets where possible. Apply the marking above the bottom row of
closely spaced rivets on side panels.
Figure 2
6. Markings should not be overlapped to make seams or joints. Markings should be
butted together.
7. Cut marking at all panel seams and door openings using a sharp utility knife and squeegee the
marking to the surface. Cut markings no closer than one-eighth (1/8) inch to exterior post weld
joints, door hinges, door hardware, lower panel of expansion joints on school bus to avoid lifting
and wrinkling.
8. Do not apply the marking beyond panel edges where moisture and dirt can contaminate
the adhesive.
9. Apply the remaining markings to the bus following these steps.

4
Cleaning
Routine washing is recommended for maximum performance. The following cleaning methods
are recommended:
• Wash with sponge, cloth or soft brush using water and detergent.
• Standard high-pressure hand spray:
Maximum pressure — 1200 PSI/80 bar.
Maximum water/wash solution temperature — 140ºF/60ºC.
Minimum of 12 inches/30cm distance between cleaning spray tips and markings. Cleaning wand or
spray tips to be at no greater angle than 45 degrees from perpendicular to the markings surface. Use
Spray Tip – #1505 (15 degree spray angle, 05 capacity size).
• When using metal brighteners, follow manufacturer’s recommendations for dilution. Thoroughly
rinse from marking after soaking rail car or other vehicle.
Removal Instructions Required Tools:
1. Single edged razor blades
2. Handled tool to hold razor blades
3. Safety glasses
4. Solvent resistant protective gloves
5. Absorbent paper towels
Recommended Solvents:
1. Isopropyl alcohol (rubbing alcohol)
2. Suggested adhesive removal products:
a. 3M Citrus Cleaner
b. You may try other products to de-tackify the adhesive. Be cautious as you do not want the
finish to be harmed.
Note: always follow manufacturer’s instructions and safety recommendations
Instructions:
1. Use handled tool containing a new single edged razor blade to lift an edge of the marking.
2. While keeping the edge of the razor close to the surface of the substrate, begin to work the razor
from side-to-side in small strokes in the direction of removal.
3. Pull the loose marking with minimal tension at approximately 45 degrees away from the substrate
while working the razor back and forth.
4. If markings break away from the substrate, keep repeating steps 1-3 above. Note: Ease of marking
removal will depend on initial adhesion and time on substrate.
5. It is very important to change razor blades frequently. A sharp blade will give best results.
Removing Adhesive:
1. Spray one of the suggested adhesive removal products onto the adhesive residue.
2. Let the remover soak on the adhesive for three to five minutes.
3. Use a sharp razor blade in handled tool to scrape off adhesive.
4. Wipe residue off onto paper towel.
5. It may be necessary to repeat steps 1-4 several times to remove all adhesive.
6. Always use a sharp razor blade for best results.
7. All adhesive residue must be removed before re-application of markings.
8. Substrate needs to be cleaned with alcohol using one towel to clean and one to wipe away residue
before reapplication of markings.

5
Important Notice
All statements, technical information and recommendations contained herein are based on tests we believe as of the date of this printing to be
reliable, but the accuracy or completeness thereof is not guaranteed, and the following is made in lieu of all warranties, or conditions express
or implied. Seller’s and manufacturer’s only obligation shall be to replace such quantity of the product proved to be defective. Neither seller nor
manufacturer shall be liable for any injury, loss or damage, direct, special or consequential, arising out of the use of or the inability to use the product.
Before using, user shall determine the suitability of the product for his/her intended use, and user assumes all risk and liability whatsoever in
connection therewith. Statements or recommendations not contained herein shall have no force or effect unless in an agreement signed by officers of
seller and manufacturer.
3M, Diamond Grade and Scotch-Bright are trademarks of 3M. Used under license in Canada.
Traffic Safety and Security Division
3M Center, Building 225-04-N-14
St. Paul, MN 55144-1000
1-800-553-1380
www.3M.com/roadwaysafety
3M Canada Company
P.O. Box 5757
London, Ontario N6A 4T1
1-800-3MHELPS
3M México, S.A. de C.V.
Av. Santa Fe No. 55
Col. Santa Fe, Del. Alvaro Obregón
México, D.F. 01210
Please Recycle
© 3M 2014. All rights reserved.
Electronic Only
3M assumes no responsibility for any injury, loss or damage arising out of the use of a product that is not of our manufacture. Where reference
is made in literature to a commercially available product, made by another manufacturer, it shall be the user’s responsibility to ascertain the
precautionary measures for its use outlined by the manufacturer.
Health and Safety
Information
Read all health hazard, precautionary, and first aid statements found in the Material Safety Data
Sheet (MSDS) and/or product label of chemicals prior to handling or use. Also refer to MSDS for
information about the volatile organic compounds (VOC) content of chemical products or cleaning
solvents. Consult local regulatory authorities for possible restrictions on product VOC content and/
or VOC emissions. For 3M products you may contact 3M Helps at 1-888-364-3577.
FOR INFORMATION OR ASSISTANCE
CALL: 1-800-553-1380
IN CANADA CALL:
1-800-265-1840
Internet:
www.3M.com/roadwaysafety
/