Page is loading ...

3
Scotch-Weld
™
Hot Melt Applicator PG II LT Owner’s
Manual
Aplicador por fusión al calor de Scotch-Weld
™
PG II
LT de 3M
™
Manual del usuario
Manuel de l’utilisateur – Applicateur d’adhésif
thermo-fusible PG II LT 3M
™
Scotch-Weld
™
Use only with 3M™ Scotch-Weld™ Hot Melt LM Adhesives
Úselo sólamente con adhesivos de fusión al calor Scotch-Weld™ LM de 3M™
À utiliser uniquement avec les adhésifs thermo-fusibles LM 3M™ Scotch-Weld ™

Important Safety Instructions..........................................................................1
General Information........................................................................................2
Set Up and Installation....................................................................................3
Operation.........................................................................................................5
Preventive Maintenance ..................................................................................7
Troubleshooting ..............................................................................................9
Repair Part Kits .............................................................................11
Repair Procedures .........................................................................................13
General Assembly (Schematic).....................................................................20
Electrical Control/Wiring Arrangement........................................................21
Flow Control .................................................................................................22
Accessories....................................................................................................23
Repair Service...............................................................................................24
Important Notice ...........................................................................................24
Warranty and Limitation of Remedies..........................................................24
Limitation of Liability...................................................................................24
3M Sales Branches.........................................................................Back Cover
General Information

Important Safety Instructions
©
3M 2006
1
!
SAVE THESE INSTRUCTIONS
Read instructions thoroughly before operating or performing any maintenance on 3M™ Scotch-Weld™ Hot
Melt Applicator PG II LT.
Danger
Do not modify the plug provided with the 3M
Scotch-Weld Hot Melt Applicator PG II LT.
Improper grounding connection of the plug may
cause electrical shock. Check with a qualified
electrician or service person to determine whether
the plug is properly grounded.
Caution
Use only an approved extension cord with 3M
Scotch-Weld Hot Melt Applicator PG II LT. Use of
improper extension cord may cause electrical shock.
Use an extension cord that complies with NEC
requirements and state and local electrical
requirements.
Caution
Disconnect air and electrical power and make sure
applicator is at room temperature before servicing
3M Scotch-Weld Hot Melt Applicator PG II LT.
Failure to disconnect air and electrical power before
servicing may cause electrical shock or damage to
the applicator.
Caution
Contact with molten adhesive or hot applicator tip
or metal components may cause burns. Wear heat-
resistant gloves and safety glasses when operating
or repairing the 3M Scotch-Weld Hot Melt
Applicator PG II LT.
Important
Do not connect 3M Scotch-Weld Hot Melt
Applicator PG II LT to air supply with air pressure
greater than 80 psi. Damage to the applicator may
result.
Important
Use 3M™ Scotch-Weld™ Hot Melt LM Adhesives
only. Use of other adhesives may damage the
applicator or result in hazardous conditions.
!
!
!
!
!

© 3M 2006
2
General Information
READ INSTRUCTIONS THOROUGHLY BEFORE OPERATING OR PERFORMING ANY
MAINTENANCE ON 3M™ SCOTCH-WELD™ HOT MELT APPLICATOR PG II LT.
The 3M™ Scotch-Weld™ Hot Melt Applicator PG II
LT is designed to be a simple, reliable tool for
dispensing 3M™ Scotch-Weld™ Hot Melt LM
Adhesive Sticks.
Important
Use 3M Scotch-Weld Hot Melt LM Adhesives only.
Use of other adhesives may damage the applicator or
result in hazardous conditions.
It is self-contained and hand held, designed for multi-
station or intermittent manual adhesive application.
The 3M Scotch-Weld Hot Melt Applicator PG II LT
uses electric heat to melt the adhesive, and air
pressure to deliver the adhesive. Adhesive
temperature is automatically maintained by a fixed
thermostat on the heat block. The system is further
protected by a thermal cutout (TCO), which acts as a
thermal fuse.
Please take time to properly fill out and return
your 3M Scotch-Weld Hot Melt Applicator PG II
LT Warranty Card.
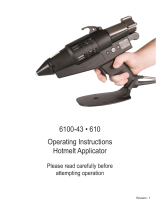
When trigger (1) is pulled, the variable regulator (2)
allows air pressure into rear of the Speedloader stick
feed (3). Air pushes the piston (4), which advances
adhesive stick through applicator. As adhesive
advances, it passes through hard plastic insulating
sleeve (5) which acts as thermal barrier to keep
molten adhesive and heat in forward portion of the
applicator. The rest of the applicator stays cool.
As adhesive advances into the heat block, it is melted
and liquefied. With pressure from the solid adhesive
sticks and the piston, the liquid adhesive is forced out
of the applicator through the nozzle tip (6). When the
trigger is released, air pressure is released from the
rear of the loading chamber. Pressure on the molten
adhesive in the front of the applicator is then also
relieved. Spring tension in the nozzle valve retracts
the valve, neatly cutting off the adhesive flow.
The delivery rate of molten adhesive for the 3M
Scotch-Weld Hot Melt Applicator PG II LT is
approximately six pounds per hour with 3M™
Scotch-Weld™ Hot Melt Adhesive 3762-LM utilizing
the standard tip 9921. Adhesive flow rates will vary
with the different 3M adhesives in the line and the
nozzle tip you choose.
!

Setup and Installation
©
3M 2006
3
1. Remove the 3M™
Scotch-Weld™ Hot Melt
Applicator PG II LT from its
shipper and inspect for obvious
damage.
2. Connect Air and Electrical
Service
Select a work station where 120 VAC grounded
receptacle and compressed air service are
available.
Grounding Instructions
The 3M Scotch-Weld Hot Melt Applicator PG II LT
must be grounded. If it should malfunction or break
down, grounding provides a path of least resistance
for electric current to help reduce the risk of
electrical shock. This applicator is equipped with a
cord having an equipment-grounding conductor and
grouding plug. This plug must be used with
appropriate outles that are properly installed and
grounded in accordance with all local codes and
ordinances.
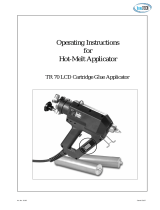
The 3M Scotch-Weld Hot Melt Applicator PG II LT
is designed for use on a nominal 120-volt circuit and
has a grounding plug as shown in illustration above.
Make sure the applicator is connected to an outlet
having the same configuration as the plug. No
adaptor should be used.
Danger
Do not modify the plug provided with the 3M
Scotch-Weld Hot Melt Applicator PG II LT.
Improper grounding connection of the plug may
cause electrical shock. Check with a qualified
electrician or service person to determine whether
the plug is properly grounded.
Electrical outlet should be as close to air supply
as possible.
Filtered air regulated to 80 psi
maximum is vital to optimum operation.
Important
Do not connect 3M Scotch-Weld Hot Melt
Applicator PG II LT to air supply with air
pressure greater than 80 psi. Damage to the
applicator may result.
Refer to step 3 on page 4 for air filter and
regulator installation procedure.
Connect air hose using two 1/2’’ open-end
wrenches. Remove the steel swivel portion of the
connector and insert the steel swivel into 1/8’’
female pipe thread air source. Insert and tighten
the brass fitting into the swivel and snug up all
fittings.
!
!

© 3M 2006
4
Setup and Installation
3. Install Air Filter and
Regulator
An air filter and moisture trap must be installed at the
applicator connection point of the air system. Install
an air filter WATTS #602-2S Model M4 or equivalent
at the air outlet or as close as possible to it. The hose
connection at the end of the 3M™ Scotch-Weld™
Hot Melt Applicator PG II LT air hose is 1/8’’
standard male pipe fitting.
4. Install Bench Stand
Prior to start up in operation, set the bench stand on
work surface so that tip of the applicator points away
from work area when applicator is not in use. When
bench stand is in most desirable position, fasten
permanently using the screws provided. (If
portability of the bench stand is desired, simply
attach the stand to a piece of scrap wood
approximately 7’’ x 16’’ using either screws or by
adhering the stand to the wood.)

Operation
©
3M 2006
5
Warm Up
Set the off/on switch to the “on” position and set
the 3M™ Scotch-Weld™ Hot Melt Applicator PG
II LT in the bench stand for approximately 15
minutes. During this warm-up period you may
note a slight dripping from the nozzle tip. This
dripping is due to expansion of the adhesive
during warm-up.
Caution
Contact with molten adhesive or hot applicator tip or
metal components may cause burns. Wear heat-
resistant gloves and safety glasses when operating or
repairing the 3M Scotch-Weld Hot Melt Applicator
PG II LT.
Loading
Important
Use 3M™ Scotch-Weld™ Hot Melt LM Adhesives
only. Use of other adhesives may damage the
applicator or result in hazardous conditions.
After warm-up, load applicator with the 3M
Scotch-Weld Hot Melt LM Adhesive you’ll be using
on the job.
To do this, fully retract the Speedloader piston by
pulling one of the retract knobs located on either side
of the loading chamber. Insert up to three 3M Scotch-
Weld Hot Melt LM Adhesive Sticks into the chamber
through the rear loading port. The applicator is now
ready for operation.
Note
Do not depress trigger on the applicator unless
there is adhesive in the loading chamber. Damage
to the applicator may result.
As adhesive is extruded, the piston will move
forward. This will be visually evident by the forward
movement of the retract knobs. As the piston
approaches the front of the chamber, a whistling
sound will be heard. At this point the piston may be
retracted and another adhesive stick will fall into
place. The applicator is again ready for operation.
Adhesive may be loaded into the chamber via the
rear port at any time during operation thus saving
time and increasing productivity.
If it is desired to remove adhesive once it is in the
loading chamber, simply roll the applicator to one
side and then point up. This will allow the adhesive
to roll up and out of the chamber.
In order to keep the Speedloader stick feed operating
at maximum efficiency, the chamber should be
sprayed inside while the piston is in the full forward
position with 3M™ Silicone Lubricant or equivalent
once a week.
Application
Get a feel for your new 3M Scotch-Weld Hot Melt
Applicator PG II LT. Start by applying small
amounts of adhesive in puddles on a piece of scrap or
paper. Try feathering the trigger. The 3M Scotch-
Weld Hot Melt Applicator PG II is unique in this
respect. Pull the trigger back slowly and note a small
discharge of adhesive; pull the trigger back more and
note increasing adhesive flow. When the trigger is
fully depressed; you will get maximum flow. If more
or less flow is desired, refer to page 22 of this
manual.
Note
Do not operate the applicator without a nozzle
tip. Damage to the applicator may result.
!
!

© 3M 2006
6
Operation
Changing Tips
Caution
Contact with molten adhesive or hot applicator tip or
metal components may cause burns. Wear heat-
resistant gloves and safety glasses when operating or
repairing the 3M™ Scotch-Weld™ Hot Melt
Applicator PG II LT.
The 3M Scotch-Weld Hot Melt Applicator PG II LT
includes a 9921 (.093’’) tip as standard equipment.
Other tips, available from your 3M Scotch-Weld Hot
Melt Adhesive distributor, are shown on page 22 of
this manual.
Note
Disconnect air supply before changing tips.
Tips can be changed only when the applicator is
hot. You will need a 5/8’’ and a 1/2’’ open-end
wrench. Hold the nozzle valve hex firmly with the
5/8’’ wench, while removing the nozzle tip with the
1/2’’ wrench. The accessory tip is mounted using the
reverse procedure. Snug the tip lightly.
Note
Do not tighten the tip. Overtightening could
damage the valve assembly.
!

Preventive Maintenance
©
3M 2006
7
Before Operation
1. Make sure filtered compressed air is available,
regulated to a maximum of 80 psi or to a
minimum of 40 psi.
DO NOT OPERATE 3M™
SCOTCH-WELD™ HOT MELT
APPLICATOR PG II LT BELOW 40 PSI.
If
low flow is experienced at 40 psi see page 9,
Troubleshooting.
2. Make sure that the 3M Scotch-Weld Hot Melt
Applicator PG II LT is plugged into 120 VAC and
that the switch is in the “on” position.
3. Inspect nozzle tip daily. Make sure tip is clean
and clear of foreign matter. Using a coarse cloth,
wipe off any accumulated adhesive or other
foreign matter on the tip.
Caution
Contact with molten adhesive or hot applicator tip
or metal components may cause burns. Wear
heat-resistant gloves and safety glasses when
operating or repairing the 3M Scotch-Weld Hot
Melt Applicator PG II LT.
4. Be sure there is adhesive in the loading chamber.
5. Under normal conditions, allow at least 15
minutes for the applicator to warm up.
Note
If proper shutdown procedure has not been
followed (see Preventive Maintenance, "After
Operation," page 8), up to one hour heat up prior
to use may be required.
6. Under normal operations the in-line air filter
should be removed and cleaned every six months
(some air systems may require more periodic
changing). Simply remove the filter from the air
supply line and blow compressed air through the
filter in reverse of normal air flow to remove
particular matter.
7. Periodically inspect the applicator to ensure that
assembly is proper (i.e. watch for loose screws,
worn pins, etc). See page 9 through 19 for
Troubleshooting and Repair Procedures.
!
S
c
o
t
c
h
-
W
e
l
d
™
H
o
t
M
e
l
t
A
p
p
l
i
c
a
t
o
r
P

© 3M 2006
8
Preventive Maintenance
During Operation
Always use the bench stand provided when 3M™
Scotch-Weld™ Hot Melt Applicator PG II LT is not
in use. Do not lay the applicator on its side. This
impedes cooling process and may cause plugging
problems.
Open adhesive cartridge stick only when necessary.
Keep sticks clean and free from airborne
contaminants.
After Operation
Before shutting down the 3M Scotch-Weld Hot Melt
Applicator PG II LT, put the electrical switch in the
“off” position. Continue using the applicator until
approximately one adhesive stick has been
discharged.
Note
If proper shutdown procedure has not been
followed, up to one hour heat up prior to use may
be required.
Lubricate inside loading chamber with 3M™ Silicone
Lubricant or equivalent once a week.
S
c
o
t
c
h
-
W
e
l
d
™
H
o
t
M
e
l
t
A
p
p
l
i
c
a
t
o
r
P

Problem Probable Cause Correction
(In or
der of priority)
Low or no adhesive flow
©
3M 2006
9
Troubleshooting
1. Hung adhesive stick
T
urn on the 3M™ Scotch-Weld™ Hot
Melt Applicator PG II LT and allow it to
heat for at least 60 minutes.
Caution
Contact with molten adhesive or hot
applicator tip or metal components
may cause bur
ns. Wear heat-
resistant gloves and safety glasses
when operating or repairing the
3M Scotch-Weld Hot Melt
Applicator PG II LT.
With incoming air at 80 psi extrude
adhesive. If unsuccessful remove nozzle
assembly and extrude one stick of
adhesive. Readjust incoming air to
desired pressure.
Check to see if there is sufficient air
pressure. Test by setting pressure at 80
psi. Check in-line filter to ensure that it is
not plugged with contaminants.
Disconnect in-line filter from air hose.
Using a compressed air line, blow
compressed air through the filter in the
reverse flow position. If this does not
increase air flow through the filter, swivel
filter should be replaced.
Check to see that electrical service is
live, and that lighted switch is in “on”
position.
Remove nozzle valve and clean. Run
one adhesive stick out. Replace cleaned
valve assembly. This step should only be
done while tip is hot
Caution
Contact with molten adhesive or hot
applicator tip or metal components
may cause bur
ns. W
ear heat-
resistant gloves and safety glasses
when operating or repairing the
3M Scotch-W
eld Hot Melt
Applicator PG II LT.
Squeeze trigger and try to pull r
etract
knobs. If they can be pulled back easily,
install new regulator kit.
!
!
2. Low air pressure
3. No electricity
4. Dirty nozzle valve assembly
5. Regulator malfunction

© 3M 2006
10
Troubleshooting
Problem Probable Cause Correction
(In order of priority)
Low or no adhesive flow (cont.)
6. Burned out heater(s)
With Volt/Ohm Meter, run electrical
continuity check on each heater (see
page 17 for r
epair procedure). If open
circuit exists, install new heater kit.
Caution
Disconnect air and electrical power
and make sure applicator is at room
temperature before servicing 3M™
Scotch-Weld™ Hot Melt Applicator
PG II LT. Failure to disconnect air
and electrical power before servicing
may cause electrical shock or
damage to the applicator.
If the piston is retracted before reaching
the point where the whistle is heard, a
jam-up of the adhesive may occur. To
free this, simply retract the piston fully
and roll the applicator to one side so
that the adhesive in the magazine will
free itself. Now push the knobs forward
until the adhesive stick still in the
chamber is contacted by the piston. Roll
the applicator back to its normal
operating position and continue
extruding adhesive until the whistle is
heard or until the piston has traveled its
full length as indicated by the orange
retract knobs.
Replace with new Thermostat/TCO kit.
Refer to page 18, paragraph J.
With finger of
f of trigger
, attempt to
retract piston. If piston is very difficult to
pull back, air r
egulator may not be
shutting of
f entir
ely
. Replace r
egulator
.
Extrude one adhesive stick.
Replace with new nozzle valve
assembly. Refer to page 14,
paragraph C.
!
7. Jammed adhesive sticks
1. Blown thermal cutoff
1. Regulator malfunction
2. Expanded adhesive stick
3. Worn nozzle valve
No heat
Dripping Nozzle

# of
Items/
Kit # Repair Part Kit Kit
9200
Trigger Kit
a. Trigger Pin 1
b. Trigger Assembly 1
9932 Heat Shield Kit
a. Heat Shield 1
9204 Regulator Kit
a. Regulator Assembly 1
9220 Regulator Hose
Sub-Assembly Kit
a. Hose Assembly 1
9207 Power Cord Kit
a. Power Cord Assembly 1
b. Cable Ties 5
9931 Thermostat/TCO Kit
a. Thermal Cutout Assembly 1
b. Machine Screw Large 1
c. Machine Screw Small 2
d. Thermostat Sub-Assembly 1
# of
Items/
Kit # Repair Part Kit Kit
9221
Handle Kit
a. Right Handle Sub-Assembly 1
b. Left- Handle Sub-Assembly 1
c. Machine Screw
4
d. Machine Screw 3
9219 Switch Kit
a. Switch Sub-Assembly 1
9220 Hose Kit, Main
a. Hose Sub-Assembly 1
b. Cable Ties 5
9220 Hose Kit
a. Hose 1
b. Elbow 1
c. Swivel Filter 1
d. Cable Ties 5
9222 Heater Kit
a. 125 W Heater 4
b. Machine Screw 8
c. Cable Tie 1
9223 Valve Kit
a. Nozzle Tip 1
b. Valve Assembly 1
# of
Items/
Kit # Repair Part Kit Kit
9224
Miscellaneous Parts Kit
a. Heat Shield Screw, Top 1
b. Heat Shield Screw, Side 2
c. Heat Shield Screw
4
d. Shim 2
e. Electrical Connector Screw 9
f. Connector Strip 2
g. Handle Screw 4
h. Regulator Screw 3
i. Ground Wire Screw 2
j. Hinge Pin 3
k. Bail Screw 2
l. Lock Washer for Bail 2
m. Bail 2
9226 Dump Valve
a. Valve 1
9260 Speedloader Hose Assembly
a. Hose Assembly 1
9936 Scotch-Weld SL Magazine
Extension Kit
a. Magazine Extension 1
9935 Speedloader Assembly
a. Speedloader
1
b. Hose 1
c. Pin
1
d. Bail 1
©
3M 2006
11
Troubleshooting
For ease and convenience in repair, 3M™ Scotch-
Weld™ Hot Melt Applicator PG II LT repair part kits
are available from your authorized 3M Scotch-Weld
Adhesive distributor. When ordering part kits,
provide the name and number of the repair part kit.
Part kits can also be ordered directly from the nearest
3M Sales Branch listed on the back cover.
Repair Parts Kit

© 3M 2006
12
Troubleshooting
Your 3M™ Scotch-Weld™ Hot Melt Applicator PG
II LT has been engineered for durability and
reliability. However, as with any electrical-
mechanical device, parts will wear with use and
require replacement for optimum performance. We
have listed below certain part kits that you may want
to have available in case the immediate need for
replacement arises. All part kits listed are available
from your authorized 3M Scotch-Weld Hot Melt
Adhesive distributor or from the nearest 3M Sales
Branch location listed on the back cover of this
manual.
Please note the serial number of your 3M
Scotch-Weld Hot Melt Applicator PG II LT before
ordering part kits.
No. of Scotch-Weld Hot Melt
Kit
Applicators in Use
Number Name
2-5 6-10 11-15 16-20
9200 T
rigger Kit 62-9200-6921-8 0 0 1 1
9932 Heat Shield Kit 62-9783-9932-7 0 1 1 2
9204 Regulator Kit 62-9204-6922-8 1 1 2 2
9207 Power Cord Kit 62-9207-6947-8
0001
9931 Thermostat/TCO Kit 62-9783-9931-9 1 2 2 3
9219 Switch Kit 62-9219-2798-4 0 0 1 1
9220 Hose Kit 62-9220-2797-4 0 0 0 1
9221 Handle Kit 62-9221-2651-1 0001
9222 Heater Kit 62-9222-6930-3 0 0 1 1
9223 Valve Kit 62-9223-6930-1 1 2 3 4
9226 Dump V
alve Kit 62-9226-6990-8
0 01 1
9260 S/L Hose Assem. Kit 62-9260-2945-5 0 0 1 1

©
3M 2006
13
Repair Procedures
A. Handle Kit
Remove heat shield (see procedure H, page 16). With
the nozzle of the applicator pointing away from you,
remove the seven Phillips head cap screws in the
handle. These screws are located in the left hand side
of the handle grip, two in the pistol grip itself, two just
forward of the wire terminal and three to the rear of the
wire terminal. Without removing the wires from the
wire terminals, lift the handle up and to the front of the
applicator. This operation will allow for subsequent
repair steps.
To replace applicator handles, first follow “Handle
Disassembly Instructions.” Next remove the electrical
wiring from the terminal strip on the left handle,
replacing them to the same terminals on the
replacement. The right half of the handle is removed by
removing the four Phillips head cap screws. Next
remove the electrical wiring from the terminal strip and
re-assemble these to the replacement right half handle.
Lift the switch out of its slot in the handle and replace
it in the new handle. Replace the trigger and trigger pin
at this time. Using reverse procedure, reassemble the
right handle half, then the left. Be sure all the electrical
wires are in place and are not being pinched.
Handle Disassembly Instructions
Caution
Disconnect air and electrical power and make sure
applicator is at room temperature before servicing
3M™ Scotch-Weld™ Hot Melt Applicator PG II LT.
Failure to disconnect air and electrical power before
servicing may cause electrical shock or damage to the
applicator.
!
Procedure Part Kit
A. Handle Kit
B. Regulator Kit
C. Valve Kit
D. Hose Kit
E. Power Cord Kit
F. Switch Kit
G. Trigger Kit
H. Heat Shield Kit
I. Heater Kit
J. Thermostat/TCO Kit
K. Heat Block Kit

© 3M 2006
14
Repair Procedures
First follow “Handle Disassembly Instructions,”
Procedure A on page 13. Then remove the two large
Phillips head screws to the rear of the wire terminals on
the right hand side of the handle. This allows the
regulator assembly to swing free, connected only by
the hose going from the brass rear of the regulator to
the loading chamber assembly, and then main hose
assembly. Remove the main hose by unscrewing the
elbow fitting from the regulator. Use a 5/16’’ wrench
to remove the loading chamber hose from the regulator.
Reassemble with a new regulator using reverse
procedure. Be sure hose fittings are quite snug. Check
for air leaks by activating the regulator. Once this is
done, reassemble the handle and heat shield.
B. Regulator Kit
Caution
Disconnect air and electrical power and make sure
applicator is at room temperature before servicing
3M™ Scotch-Weld™ Hot Melt Applicator PG II LT.
Failure to disconnect air and electrical power before
servicing may cause electrical shock or damage to the
applicator.
!
Caution
Contact with molten adhesive or hot applicator tip or
metal components may cause burns. Wear heat-
resistant gloves and safety glasses when operating or
repairing the 3M Scotch-Weld Hot Melt Applicator
PG II LT.
!
C. Valve Kit
3M Scotch-Weld Hot Melt Applicator PG II LT
must be warm prior to repairing nozzle valve.
Nozzle valve assembly consists of the nozzle tip and
the nozzle valve. Remove the old valve assembly using
a 5/8’’ open-end wrench. Replace with new assembly.
Gently snug up the valve assembly. With a 1/2’’
wrench, also snug up the new tip.
D. Hose Kit
Follow “Handle Disassembly Instructions,” Procedure
A on page 13. Remove the main hose by unscrewing
the elbow fitting from the air regulator. Cut the cable
ties holding the power cord and hose assembly
together. Remove the hose and reconnect the new hose
using reverse procedure. Add new cable ties to the hose
and power cord.
Caution
Disconnect air and electrical power and make sure
applicator is at room temperature before servicing 3M
Scotch-Weld Hot Melt Applicator PG II LT. Failure to
disconnect air and electrical power before servicing
may cause electrical shock or damage to the
applicator.
!

©
3M 2006
15
Repair Procedures
Follow “Handle Disassembly Instructions,” Procedure
A on page 13. The power cord wire from the switch is
removed from the bayonet connector. The black and
white wires are removed from their respective
terminals. Remember which wire came off which
terminal for reassembly. Consult the electrical wiring
arrangement on page 21. Reassemble, following
reverse procedure.
F. Switch Kit
E. Power Cord Kit
Caution
Disconnect air and electrical power and make sure
applicator is at room temperature before servicing
3M™ Scotch-Weld™ Hot Melt Applicator PG II LT.
Failure to disconnect air and electrical power before
servicing may cause electrical shock or damage to the
applicator.
!
Caution
Disconnect air and electrical power and make sure
applicator is at room temperature before servicing 3M
Scotch-Weld Hot Melt Applicator PG II LT. Failure to
disconnect air and electrical power before servicing
may cause electrical shock or damage to the
applicator.
!
Follow “Handle Disassembly Instructions,” Procedure
A on page 13. Lift the switch from the slot in the right
half of the handle. The power lead can be unplugged
from the power cord receptacle. The other wires
terminating in ring lugs should be removed from their
respective terminals, noting that the black lead is
connected to the Thermal Cut Out Assembly and the
white lead to the heaters. Install the new switch using
reverse procedure.
G. Trigger Kit
Follow “Handle Disassembly Procedures,” Procedure A
on page 13. Lift the trigger assembly off the trigger pin
and replace. Reassemble, following reverse procedure.
Caution
Disconnect air and electrical power and make sure
applicator is at room temperature before servicing 3M
Scotch-Weld Hot Melt Applicator PG II LT. Failure to
disconnect air and electrical power before servicing
may cause electrical shock or damage to the
applicator.
!

© 3M 2006
16
Repair Procedures
Heat Shield Disassembly
H. Heat Shield Kit
Caution
Disconnect air and electrical power and make sure
applicator is at room temperature before servicing
3M™ Scotch-Weld™ Hot Melt Applicator PG II LT.
Failure to disconnect air and electrical power before
servicing may cause electrical shock or damage to the
applicator.
Remove the heat shield assembly by removing the two
Phillips head screws from either side of the heat shield
and the one Phillips head screw on the heat shield
immediately above the loading chamber. Reassemble,
following reverse procedure.
!
I. Heater Kit
Follow “Heat Shield Disassembly, “per procedure H.
All heater wires must be disconnected from their
respective terminal strips. With a suitable drift punch,
drive the old heaters out through the top of the heat
block.
All four heaters should be replaced making sure to
reconnect the wires in the proper places. Refer to the
“Wiring Arrangement” and “Electrical Control”
diagrams, page 21. Be sure that heaters are bottomed
out in the heat block. They should not stick out above
the block more than 1/4’’. It may be necessary to
gently tap the heaters into place, but be careful not to
crack the ceramic.
To ensure that heaters remain in place, gather all the
wires together approximately 1/2’’ below the heat block
and tightly attach the cable tie provided with the kit.
Caution
Disconnect air and electrical power and make sure
applicator is at room temperature before servicing 3M
Scotch-Weld Hot Melt Applicator PG II LT. Failure to
disconnect air and electrical power before servicing
may cause electrical shock or damage to the
applicator.
!

©
3M 2006
17
Repair Procedures
Heater Check-Out
Caution
Disconnect air and electrical power and make sure
applicator is at room temperature before servicing
3M™ Scotch-Weld™ Hot Melt Applicator PG II LT.
Failure to disconnect air and electrical power before
servicing may cause electrical shock or damage to the
applicator.
!
Use Volt/Ohm Meter to check electrical continuity of
each heater. If continuity exists, heater is okay. First
remove heat shield. Heaters need not be removed from
the block. Check in the following sequence: left front,
right front, right rear, left rear. To start the check,
remove only one wire from its connection on the
terminal strip.
Place one probe from the meter on the connector of the
wire that has been removed, and with the other probe,
touch the matching connector on opposite side of the
applicator. If needle on Volt/Ohm Meter swings, heater
is okay.
Reconnect wire that was removed first, and continue
sequence. If one or more heaters are burned out, refer
to Repair Procedure, pages 13 through 19.

© 3M 2006
18
Repair Procedures
J. Thermostat/TCO Kit
Caution
Disconnect air and electrical power and make sure
applicator is at room temperature before servicing
3M™ Scotch-Weld™ Hot Melt Applicator PG II LT.
Failure to disconnect air and electrical power before
servicing may cause electrical shock or damage to the
applicator.
!
Remove the heat shield assembly by removing the two
Phillips head screws from either side of the heat shield
and the one Phillips head screw on the heat shield
immediately above the loading chamber.
The thermostat and TCO are assembled as a unit and
are replaced as such no matter which component has
failed.
The Quick-Slide clips should be removed from the
thermostat. Remove the two screws holding the
thermostat, and pry the thermostat from the block.
Insert new thermostat.
Make sure the rear rim of the
thermostat is slipped into the slot in the heat block
before affixing screws.
The thermal cutout assembly is then removed by
disconnecting the Phillips head screw, holding the
thermal cutout to the head block on the stand off strip.
Remove the other end of the thermal cutout from the
terminal strip with a small Phillips screwdriver.
Procedure is reversed to replace the thermal cutout.
/