Quick Installation Guide
—— Triple Power Lithium-ion Battery
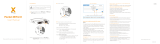
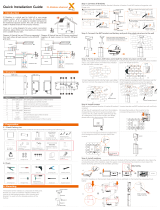
Battery Installation
Note: 1. For T-BAT H 5.8 + 1~3 battery moduls, please finish the battery installation before connecting cables!
2. Please make sure that the inverter is completely switched off before you start connecting cables!
- Mark the position of the holes.
Bracket(377*140*69mm)
(for wall mounting)
- Drill five holes with a Φ10 drill bit.
- Depth: at least 50mm.
380<height<650mm
- Hammer the expension tubes into the holes.
NOTE: 1. The distance between the bottom of the battery pack and floor shall not exceed 300mm.
2. It is recommended to keep a distance of at least 300mm between battery packs.
- Match the battery with the bracket. - Screw the expansion bolts.
30<height<300 mm
Overview of Installation
NOTE!
-One T-BAT system is allowed to install one T-BAT H 5.8 with another three battery packs at most. Connecting
more than four batteries in total to the T-BAT system will blow the fuse, and the batteries will be damaged.
Please keep in mind and follow this instruction.
-If the batteries have not been used for more than 9 months, these batteries must be charged to at least SOC 50
% each time.
-If one of the batteries is replaced, the SOC of the battery after replacement shall be consistent with those of
batteries that have not been replaced, with the maximum difference of between -5% and 5%.
-If users want to increase their battery system capacity, please ensure that the SOC of the existing system
capacity is about 40%. The manufacture date of the new battery shall not exceed 6 months; in case of exceeding
6 months, please charge the new battery to around 40%.
Make sure that the installation location meets the following conditions:
·The building is designed to withstand earthquakes
·The location is far away from the sea, to avoid sea water and humid air
·The floor is flat and level
·There are no flammable or explosive materials nearby
·THE AMBIENCE IS SHADY AND COOL, KEEP AWAY FROM HEAT AND AVOID DIRECT SUNLIGHT.
·The ambient enironment is shady and away from heat as well as direct sunlight.
·The temperature and humidity stay at a constant level.
·There is minimal dust and dirt in the area.
·There is no corrosive gases present, including ammonia and acid vapor.
·ambient optimal ambient temperature is between 15°C and 35°C. The temperature is within the range from 0°C to 55°Cand the
NOTE!
NOTE!
Installation Prerequisites
II
The Triple Power battery is rated at IP55 and thus can be installed outdoors as well as indoors. However, if installed
outdoors, do not expose the battery to directly sunlight and moisture.
If the ambient temperature is beyond the operating range, the battery pack will stop operating to protect itself. The
optimal temperature range for the battery pack to operate is form 15℃ to 35℃. Frequent exposure to harsh
temperatures may deteriorate the performance and lifetime of the battery module.
NOTE!
For the rst installation, the interval among manufacture dates of battery modules shall not exceed 3 months.
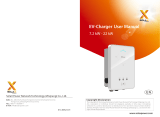
HV11550*1
Power cable*1
Power cable’*1
RS485 cable*1 Cover plate1*2 M4 screw*8
Packing List (T-BAT H 5.8 and HV11550)
I
Note: The quick installation guide describes installation steps briey.If you have any questions during
the installation, please refer to the User Manual for more information.
T-BAT H 5.8*1
CAN cable (+)*1
Series-connected cable*1 Cover plate1*2 M4 screw*8
Power cable (+)*1
Power cable (-)*1
Quick installation guide*1
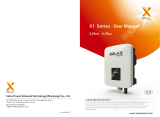
Quick Installation Guide
Triple Power Lithum-ion Battery
Wall bracket*1 M5 screw*1
Expansion bolt*5
Ring terminal*2
Power cable disassembleing tool*1
User Manual*1
Cover plate2*2
Triple Power Lithium-ion Battery
User Manual
50Ah
Copyright Declaration
The copyright of this manual belongs to Solax Power Network Technology(Zhe jiang) Co,. Ltd.
(SolaX Power Co.,Ltd.). Any corporation or individual should not plagiarize, partitially or fully copy
(including software,etc.), and no reproduction or distribution of it in any form or by any means. All
rights reserved. SolaX Power Network Technology (Zhe jiang) Co.,Ltd. (SolaX Power Co.,Ltd.).
reserves the right of fnal interpretation.
Quick installation guide*1
Quick Installation Guide
Triple Power Lithum-ion Battery
Expansion bolt*5
Ring terminal*2
Cover plate2*2 Wall bracket*1 M5 screw*1
T-BAT H 5.8
Hv11550
III
There are two installation ways, wall mounting and oor mounting.
I. Wall mounting
II. Floor mounting
- Lock the joint between hanging board and
wall bracket with M5 screw.
- Mark the position of the holes.
Bracket(377*140*69mm)
(for wall mounting)
- Drill five holes with a Φ10 drill bit.
- Depth: at least 50mm.
Height<350mm
- Hammer the expension tubes into the holes.
Note: To prevent the battery from becoming moist, it is recommended to place a foam cushion,
or other cushion made up of other materials, with a height of 3 cm to 4 cm, under the battery.
- Screw the expansion bolts. - Match the battery with the bracket.
235 mm< height < 240 mm
Wall bracket
- Lock the joint between hanging board and
wall bracket with M5 screw.
IV