Page is loading ...

1
JS5001CK
5 INCH REARVIEW CARAVAN CAMERA KIT
LED MONITOR, 2 CAMERAS + QUICK TRAILER CONNECT
INSTRUCTION MANUAL
SPECIFICATIONS
1) JS5001 MONITOR
- TFT Panel: New Grade A LCD
LED Backlight
- LCD Size: 125mm (5-Inch) Diagonal
- Display Format: 16:9
- Resolution: 800 x 480
- Brightness: < 450 CD/M2
- Viewing Angles: 90 Deg. Left/Right/Up/Down
- Video System: Auto PAL/NTSC Select
- Video Connections: 2 x 4-Pin (Female)
- Camera Display: Input Select and Reverse Trigger Override
- Reverse Trigger: Programmable Default Input (Cam 1 or 2)
- Monitor View: Normal/Mirror Image Select
- Guidelines: Selectable
- Audio: On Board Speaker
- Main Menu: Brightness/Contrast/Colour/Volume/Reset/Slideshow/Language/
Reverse Priority & Delay
- Temp Resistance: Fireproof ABS + PC Material Casing (Fireproof Rating UL94-V0)
- Power Input: 11-32V DC (Negative Ground)
- Dimensions: 136W x 102H x 25D mm (excluding brackets)
- Included: Stand Mount, U-Shape Mount, Remote Control
Power Cable Assembly, 4Pin/RCA Adaptor & Sunshade,
Optional: Glass Mount Bracket (BKT101)

2
SPECIFICATIONS
2) C20 CAMERA
- Image Device: 1/4” Full Colour CMOS
- Imaging Sensor: PC7070
- Eective Pixels: 704 x 576
- Lens: Full Glass
- Viewing Angle: 110° Wide Viewing Angle (Horizontal),
170° Wide Viewing Angle (Diagonal)
- Video Format: PAL/NTSC (Switchable)
- Parking Guidelines: Yes (Selectable), Type (Adjustable), Height & Width (Adjustable)
- One Button Control: Image Orientation Select, Video Mode Select, Guideline Type Adjust
Guideline Height Adjust, Guideline Width Adjust
- Image Orientation: Mirror, Normal, Upside-Down Mirror, Upside-Down Normal (Switchable)
- Minimum Illumination: 0.3 Lux
- Water/Dust Protection: IP67
- Power Input: 12/24V DC
- Mounting: Number Plate or In-Bumper
- Connection: RCA
- Dimensions: 16.5mm x 23mm (D)
- Included: Dual Mounting Heads (Buttery and Bumper Fit), Metal Hole Saw for
Bumper Fit Installation & 6m Camera to Monitor Lead
3) CC10 CARAVAN CAMERA
- Image Device: 1/3” Sony CCD
- Eective Pixels: 976H x 582V
- Resolution: 0.6MP, 700 TV Lines
- Viewing Angle: 120° (Diagonal)
- Video Format: PAL
- Sync System: Internal
- Image Orientation: Mirror/Normal (Selectable)
- Night Vision: Yes, LED
- Minimum Illumination: 0.1 Lux with IR on
- Water/Dust Protection: IP67
- Integrated Microphone: Yes
- Operating Temperature: -10 to 50°
- Power Consumption: 90-300mA
- Power Input: 12V DC
- Connection: Terminated 4-Pin Male
- Dimensions: 74W x 47H x 65D mm (Excl Bracket)
- Included: Mounting Bracket
4) TQC100 - TRAILER QUICK CONNECT
- Curly Cable Length: 0.5m (Original State), 4.0m (Elongated)
- Mounting Plate: 5-Pin (Male) Metal Plug with Weather Cover
- Brackets: 2 x Metal Plug Mounting Brackets
- Cable (Monitor Side): 10m Terminated to 4-Pin (Male) (To plug into Monitor)
(Camera Side): 15m Terminated to 4-Pin (Female) (To plug into Camera)

3
MONITOR (JS5001)
4m
15m
10m
Metal Plug
Mounting Brackets
4PIN (M)
4PIN (F)
AV1: Monitor 4Pin(F)
AV2: Monitor 4Pin(F)
MALEFEMALE
TRAILER QUICK
CONNECT (TQC100)
CAMERA (C20)
CARAVAN
CAMERA (CC10)
4-Pin Locking Socket (Female) Connection 4-Pin Locking Plug (Male) Connection
Denition: Connector Front View Denition: Connector Front View
VIDEO
POWER GROUND
AUDIO
4-Pin Locking Socket (Female) Connection 4-Pin Locking Plug (Male) Connection
Denition: Connector Front View Denition: Connector Front View
POWERGROUND
VIDEOAUDIO

4
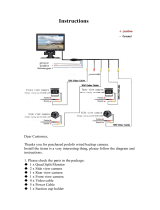
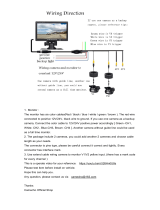
Thank you for choosing this versatile AXIS Caravan Monitor System!
Please take time to read through the simple instructions below.
CAUTIONS:
• Securely install the monitor in a location that will not hinder driver vision
or control.
• Keep the monitor away from moisture and heat sources
• Clean the display with a soft dry cloth. Do not use chemical cleaners.
MONITOR FUNCTIONS:
1. Remote Control Receiver
2. Decrease Button
3. Increase Button
4. Power On/Off
5. Menu Button
6. Camera Selection (to change between cameras)
REMOTE CONTROL:
• Aim directly at the reception window
• Replace battery (CR2025) if the range reduces or will not operate.
(1) Mute
(2) Power
(3) AV
(4) Menu
(5) Decrease
(6) Increase
(7) Orientation
[Up/Down/Left/Right]
P.P
MENU
AV
(to adjust settings in Menu)
}
2 3 4 5 6
Built-In
Speaker
1
1
5
7
2
6
3
4

5
CONNECTIONS:
Recommended wiring for optimal performance:
• Connect the C20 camera (vehicle camera) to the monitor’s video input (Reverse
trigger switches video input to display on monitor while reversing) and CC10
camera to video input (Caravan camera).
• Connect the reverse trigger wire (green) to the reverse light positive power.
Note:
1. Any input can be selected (CAM Button) when reverse trigger is activated.
2. Reverse trigger can be programmed as CAM 1 or CAM 2 in the menu
(Reverse Priority)
ACCESSORIES:
9 Pin Male
4 Pin Female Video V1
4 Pin Female Video V2
16:9/4:3
1
2
3
4
5
6
7
8
9
10
1. Mute button
2. Power On/Off
3. AV
4. Menu
5. Decrease Button
6. Increase Button
7.
Switch
8. Time switch
9. Display selection
Green - Reverse Trigger
Black - Ground
Brown - Dimmer Control
Red - 12 - 24V
Note: Cam 2 has reverse trigger control.
U-shape Mount Remote Control Sunshade Leads &
Adaptors
Bracket

6
CAR CAMERA
(C20)
INSTALLATION
1) Determine installation location (usually the centre-rear of vehicle).
a) Buttery Type - Mount on surface using double-sided tape or screws
b) Insert Type - Carefully drill hole (hole saw supplied) in bumper & insert camera
2) Connect RED cable to 12V+ power cable of Reversing Light circuit. (connect to
accessories for constant monitoring if required)
3) Connect BLACK cable to ground.
4) Connect signal extension cable. RCA / 4Pin (M) Patch Lead.
5) Connect RCA (Yellow) video cable to RCA to 4-PIN Adaptor.
6) Connect Adaptor to Monitor (4-Pin Connection)
CAMERA ASSEMBLY OPTIONS
The DUAL HEAD system included with your purchase allows for exible installation options, either
surface mount (eg number plate or boot lid) or stealth insert mount (eg bumper).
The RCA video cable simply connects with most aftermarket LCD monitors.
CAR REARVIEW CAMERA
CAMERA ASSEMBLY OPTIONS:
b) Insert Type - Carefully drill hole (hole saw supplied) in bumper & insert camera
16.5mm
CAR REARVIEW CAMERA
CAMERA ASSEMBLY OPTIONS:
See diagram below:
CABLE CONNECTIONS:
See wiring diagram below:
b) Bumper Fit Assembly
Camera
GND
+12/24V (Red Cable connect to rear lamp positive)
F
F
M
M
Monitor
+
One-Button
Control
ONE-BUTTON CONTROLLER OPERATION GUIDE:
1-click, enter with / without Guide Line switching mode;
THE FOLLOWING MODES MUST BE OPERATED UNDER THE MODE WITH GUIDE
LINE, operate to enter any mode you want 3 seconds after the previous mode.
2-quick-continuous click, enter Mirror / Non-mirror switching mode;
3-quick-continuous click, enter PAL / NTSC switching mode;
4-quick-continuous click, enter Guide Line Type selecting mode;
5-quick-continuous click, enter the Guide Line Width adjusting mode;
6-quick-continuous click, enter the Guide Line Height adjusting mode.
2
WARRANTY
- 12/24 Volt DC
- Dimensions: 16.5mm x 23mm (D)
b) Insert Type - Carefully drill hole (hole saw supplied) in bumper & insert camera
16.5mm
CAR REARVIEW CAMERA
CAMERA ASSEMBLY OPTIONS:
See diagram below:
CABLE CONNECTIONS:
See wiring diagram below:
b) Bumper Fit Assembly
Camera
GND
+12/24V (Red Cable connect to rear lamp positive)
F
F
M
M
Monitor
+
One-Button
Control
ONE-BUTTON CONTROLLER OPERATION GUIDE:
1-click, enter with / without Guide Line switching mode;
THE FOLLOWING MODES MUST BE OPERATED UNDER THE MODE WITH GUIDE
LINE, operate to enter any mode you want 3 seconds after the previous mode.
2-quick-continuous click, enter Mirror / Non-mirror switching mode;
3-quick-continuous click, enter PAL / NTSC switching mode;
4-quick-continuous click, enter Guide Line Type selecting mode;
5-quick-continuous click, enter the Guide Line Width adjusting mode;
6-quick-continuous click, enter the Guide Line Height adjusting mode.
CABLE CONNECTIONS:
See wiring diagram below:
Camera
GND
+12/24V
(Red Cable connect to rear lamp positive)
F
F
M
M
Monitor
+
One-Button
Control
Monitor Trigger Wire
4-Pin
Male
(Please insulate if not used)
Selectable - Guidelines, PAL/NTSC & Normal/Mirror Image
b) Insert Type - Carefully drill hole (hole saw supplied) in bumper & insert camera
16.5mm
CAR REARVIEW CAMERA
CAMERA ASSEMBLY OPTIONS:
See diagram below:
CABLE CONNECTIONS:
See wiring diagram below:
b) Bumper Fit Assembly
Camera
GND
+12/24V (Red Cable connect to rear lamp positive)
F
F
M
M
Monitor
+
One-Button
Control
ONE-BUTTON CONTROLLER OPERATION GUIDE:
1-click, enter with / without Guide Line switching mode;
THE FOLLOWING MODES MUST BE OPERATED UNDER THE MODE WITH GUIDE
LINE, operate to enter any mode you want 3 seconds after the previous mode.
2-quick-continuous click, enter Mirror / Non-mirror switching mode;
3-quick-continuous click, enter PAL / NTSC switching mode;
4-quick-continuous click, enter Guide Line Type selecting mode;
5-quick-continuous click, enter the Guide Line Width adjusting mode;
6-quick-continuous click, enter the Guide Line Height adjusting mode.
4-Pin
Female
CABLE CONNECTIONS

7
CAR REARVIEW CAMERA
CAMERA ASSEMBLY OPTIONS:
b) Insert Type - Carefully drill hole (hole saw supplied) in bumper & insert camera
16.5mm
CAR REARVIEW CAMERA
CAMERA ASSEMBLY OPTIONS:
See diagram below:
CABLE CONNECTIONS:
See wiring diagram below:
b) Bumper Fit Assembly
Camera
GND
+12/24V (Red Cable connect to rear lamp positive)
F
F
M
M
Monitor
+
One-Button
Control
ONE-BUTTON CONTROLLER OPERATION GUIDE:
1-click, enter with / without Guide Line switching mode;
THE FOLLOWING MODES MUST BE OPERATED UNDER THE MODE WITH GUIDE
LINE, operate to enter any mode you want 3 seconds after the previous mode.
2-quick-continuous click, enter Mirror / Non-mirror switching mode;
3-quick-continuous click, enter PAL / NTSC switching mode;
4-quick-continuous click, enter Guide Line Type selecting mode;
5-quick-continuous click, enter the Guide Line Width adjusting mode;
6-quick-continuous click, enter the Guide Line Height adjusting mode.
2
WARRANTY
- 12/24 Volt DC
- Dimensions: 16.5mm x 23mm (D)
b) Insert Type - Carefully drill hole (hole saw supplied) in bumper & insert camera
16.5mm
CAR REARVIEW CAMERA
CAMERA ASSEMBLY OPTIONS:
See diagram below:
CABLE CONNECTIONS:
See wiring diagram below:
b) Bumper Fit Assembly
Camera
GND
+12/24V (Red Cable connect to rear lamp positive)
F
F
M
M
Monitor
+
One-Button
Control
ONE-BUTTON CONTROLLER OPERATION GUIDE:
1-click, enter with / without Guide Line switching mode;
THE FOLLOWING MODES MUST BE OPERATED UNDER THE MODE WITH GUIDE
LINE, operate to enter any mode you want 3 seconds after the previous mode.
2-quick-continuous click, enter Mirror / Non-mirror switching mode;
3-quick-continuous click, enter PAL / NTSC switching mode;
4-quick-continuous click, enter Guide Line Type selecting mode;
5-quick-continuous click, enter the Guide Line Width adjusting mode;
6-quick-continuous click, enter the Guide Line Height adjusting mode.
CABLE CONNECTIONS:
See wiring diagram below:
Camera
GND
+12/24V
(Red Cable connect to rear lamp positive)
F
F
M
M
Monitor
+
One-Button
Control
Monitor Trigger Wire
4-Pin
Male
(Please insulate if not used)
Selectable - Guidelines, PAL/NTSC & Normal/Mirror Image
b) Insert Type - Carefully drill hole (hole saw supplied) in bumper & insert camera
16.5mm
CAR REARVIEW CAMERA
CAMERA ASSEMBLY OPTIONS:
See diagram below:
CABLE CONNECTIONS:
See wiring diagram below:
b) Bumper Fit Assembly
Camera
GND
+12/24V (Red Cable connect to rear lamp positive)
F
F
M
M
Monitor
+
One-Button
Control
ONE-BUTTON CONTROLLER OPERATION GUIDE:
1-click, enter with / without Guide Line switching mode;
THE FOLLOWING MODES MUST BE OPERATED UNDER THE MODE WITH GUIDE
LINE, operate to enter any mode you want 3 seconds after the previous mode.
2-quick-continuous click, enter Mirror / Non-mirror switching mode;
3-quick-continuous click, enter PAL / NTSC switching mode;
4-quick-continuous click, enter Guide Line Type selecting mode;
5-quick-continuous click, enter the Guide Line Width adjusting mode;
6-quick-continuous click, enter the Guide Line Height adjusting mode.
4-Pin
Female
CARAVAN CAMERA (CC10)
CABLE CONNECTIONS
A (40cm hook up cable)
Camera [Termination to 4-Pin (M)]
B (15 metre cable)
Camera Extension Cable [(4-Pin (F) to 5 Pin (M)]
MIRROR/NORMAL ADJUSTMENT
B
Connect to Trailer Quick Connect
Mirror Image (Default Setting)
(Tighten Screw)
Microphone
Normal Image
(Loosen Screw)
CCD Camera [Termination to 4-Pin (M)]
B
to 5 Pin (F)
Connect to Trailer Quick Connect
P
AUDIO
GROUND POWER
VIDEO

8
JS5001CK
/