M24STD-6 INSTALLATION INSTRUCTIONS
2
Installation Instructions 07610-003-26-13
Issued: 08-10-2006 Revised: N/A
Tools Required:
• Standard Allen wrench set
• Tube of food-grade silicon
• Silicon gun
• Rag
Time Requirements:
It is expected that it will take 30 minutes to
install the M24STD-6 dishmachine stand.
Notes:
• Ensure that the dishmachine stand is
level prior to placing the dishmachine
on the stand.
• Never attempt to lift a dishwasher on
your own. Always use other personnel
to help or the appropriate lifting devices
to prevent accident and injury.
Steps:
• Inspect the assembly to ensure that
there has been no freight damage. If
there is any damage, contact the
freight carrier immediately.
• Your package should contain the fol-
lowing:
• Stand platform weldment
• (4) legs
• Instructions
• If any of these items are missing, im-
mediately contact Jackson Technical
Service at 1-888-800-5672.
• Remove the items from the box.
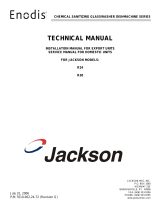
• Ensure that the set screws are located
within the leg sockets. If they are miss-
ing, immediately contact Jackson
Technical Service (See Figure 1).
• Verify that the foot of each leg can be
turned; this is how the stand will be ad-
justed in order to level it. Please note
that when assembled, there should be
a minimum of 6” (152.4mm) of space
between the bottom of the stand and
the finished floor.
• Place the legs fully into the leg sockets
of the platform and tighten down the
set screws to secure them in place.
(See Figure 2).
• Once all of the legs are tightly in place,
flip the dishmachine stand over and set
it down on all four legs. Ensure that the
legs are stable.
• If stable, take a small amount of silicon
and apply it to the set screw to cover
any exposed threads and to fill in the
hole for the Allen wrench. (See Figure
3). Note: do not use excessive
amounts of silicon; only enough to
complete the task.
Figure 1—Leg socket showing set screw
Figure 2—Tightening the legs