Page is loading ...

Ruckus Wireless
™
SmartZone
™
100
Getting Started Guide for SmartZone 3.5.1
Part Number 800-71518-001 Rev A
Published June 2017
www.ruckuswireless.com

SmartZone 100 Getting Started Guide for SmartZone 3.5.1, 800-71518-001 Rev A 2
Copyright Notice and Proprietary Information
Copyright 2017. Ruckus Wireless, Inc. All rights reserved.
No part of this documentation may be used, reproduced, transmitted, or translated, in any form or by any means,
electronic, mechanical, manual, optical, or otherwise, without prior written permission of Ruckus Wireless, Inc.
(“Ruckus”), or as expressly provided by under license from Ruckus.
Destination Control Statement
Technical data contained in this publication may be subject to the export control laws of the United States of America.
Disclosure to nationals of other countries contrary to United States law is prohibited. It is the reader’s responsibility to
determine the applicable regulations and to comply with them.
Disclaimer
THIS DOCUMENTATION AND ALL INFORMATION CONTAINED HEREIN (“MATERIAL”) IS PROVIDED FOR GENERAL
INFORMATION PURPOSES ONLY. RUCKUS AND ITS LICENSORS MAKE NO WARRANTY OF ANY KIND, EXPRESS
OR IMPLIED, WITH REGARD TO THE MATERIAL, INCLUDING, BUT NOT LIMITED TO, THE IMPLIED WARRANTIES
OF MERCHANTABILITY, NON-INFRINGEMENT AND FITNESS FOR A PARTICULAR PURPOSE, OR THAT THE
MATERIAL IS ERROR-FREE, ACCURATE OR RELIABLE. RUCKUS RESERVES THE RIGHT TO MAKE CHANGES OR
UPDATES TO THE MATERIAL AT ANY TIME.
Limitation of Liability
IN NO EVENT SHALL RUCKUS BE LIABLE FOR ANY DIRECT, INDIRECT, INCIDENTAL, SPECIAL OR CONSEQUEN-
TIAL DAMAGES, OR DAMAGES FOR LOSS OF PROFITS, REVENUE, DATA OR USE, INCURRED BY YOU OR ANY
THIRD PARTY, WHETHER IN AN ACTION IN CONTRACT OR TORT, ARISING FROM YOUR ACCESS TO, OR USE
OF, THE MATERIAL.
Trademarks
Ruckus Wireless, Ruckus, Bark Logo, BeamFlex, ChannelFly, Ruckus Pervasive Performance, SmartCell, SmartZone,
ZoneFlex, Dynamic PSK, FlexMaster, MediaFlex, MetroFlex, Simply Better Wireless, SmartCast, SmartMesh, SmartSec,
SpeedFlex, ZoneDirector, ZoneSwitch, and ZonePlanner are trademarks of Ruckus Wireless, Inc. in the United States
and other countries. All other product or company names may be trademarks of their respective owners.

SmartZone 100 Getting Started Guide for SmartZone 3.5.1, 800-71518-001 Rev A 3
Contents
About This Guide
Document Conventions . . . . . . . . . . . . . . . . . . . . . . . . . . . . . . . . . . . . . . . . . . . . . . . . . . 6
Related Documentation . . . . . . . . . . . . . . . . . . . . . . . . . . . . . . . . . . . . . . . . . . . . . . . . . . 6
Documentation Feedback. . . . . . . . . . . . . . . . . . . . . . . . . . . . . . . . . . . . . . . . . . . . . . . . . 7
1 Preparing to Set Up the Controller
Unpacking the Controller . . . . . . . . . . . . . . . . . . . . . . . . . . . . . . . . . . . . . . . . . . . . . . . . . 8
Verifying the Package Contents . . . . . . . . . . . . . . . . . . . . . . . . . . . . . . . . . . . . . . . . . . . . 8
Rack Mount Kit Contents . . . . . . . . . . . . . . . . . . . . . . . . . . . . . . . . . . . . . . . . . . . . . . . . 9
Before You Begin . . . . . . . . . . . . . . . . . . . . . . . . . . . . . . . . . . . . . . . . . . . . . . . . . . . . . . 10
Prepare the Required Hardware and Tools. . . . . . . . . . . . . . . . . . . . . . . . . . . . . . . . . . 10
Determine Which Controller SKU You Have . . . . . . . . . . . . . . . . . . . . . . . . . . . . . . . . . 11
Get to Know the Physical Features of the Controller. . . . . . . . . . . . . . . . . . . . . . . . . . . 12
2 Mounting and Powering the Controller
Before You Begin . . . . . . . . . . . . . . . . . . . . . . . . . . . . . . . . . . . . . . . . . . . . . . . . . . . . . . 16
What You Will Need . . . . . . . . . . . . . . . . . . . . . . . . . . . . . . . . . . . . . . . . . . . . . . . . . . . . 16
Mounting the Controller . . . . . . . . . . . . . . . . . . . . . . . . . . . . . . . . . . . . . . . . . . . . . . . . . 17
Powering On the Controller. . . . . . . . . . . . . . . . . . . . . . . . . . . . . . . . . . . . . . . . . . . . . . . 22
3 Preparing the Interface Settings and Administrative Computer
Preparing the Controller’s Interface Settings to Use . . . . . . . . . . . . . . . . . . . . . . . . . . . . 24
Preparing the Administrative Computer. . . . . . . . . . . . . . . . . . . . . . . . . . . . . . . . . . . . . . 25
4 Running the Setup Wizard and Logging On to the Web Interface
Overview of the Setup Wizard . . . . . . . . . . . . . . . . . . . . . . . . . . . . . . . . . . . . . . . . . . . . . 28
Step 1: Start the Setup Wizard . . . . . . . . . . . . . . . . . . . . . . . . . . . . . . . . . . . . . . . . . . . . 28
Step 2: Configure the Port Grouping. . . . . . . . . . . . . . . . . . . . . . . . . . . . . . . . . . . . . . . . 30
Step 3: Configure the IP Settings . . . . . . . . . . . . . . . . . . . . . . . . . . . . . . . . . . . . . . . . . . 31
If You Selected One Port Group. . . . . . . . . . . . . . . . . . . . . . . . . . . . . . . . . . . . . . . . . . 31
If You Selected Two Port Groups. . . . . . . . . . . . . . . . . . . . . . . . . . . . . . . . . . . . . . . . . 33
Step 4: Configure the Cluster Settings . . . . . . . . . . . . . . . . . . . . . . . . . . . . . . . . . . . . . . 36
If This Controller Is Forming a New Cluster . . . . . . . . . . . . . . . . . . . . . . . . . . . . . . . . . . 37
If This Controller Is Joining an Existing Cluster . . . . . . . . . . . . . . . . . . . . . . . . . . . . . . . 39

SmartZone 100 Getting Started Guide for SmartZone 3.5.1, 800-71518-001 Rev A 4
Step 5: Verify the Settings. . . . . . . . . . . . . . . . . . . . . . . . . . . . . . . . . . . . . . . . . . . . . . . . 40
Connecting the Controller to the Network . . . . . . . . . . . . . . . . . . . . . . . . . . . . . . . . . . . . 42
Logging On to the Web Interface . . . . . . . . . . . . . . . . . . . . . . . . . . . . . . . . . . . . . . . . . . 42
5 Ensuring That APs Can Discover the Controller on the Network
Is LWAPP2SCG Enabled on the Controller? . . . . . . . . . . . . . . . . . . . . . . . . . . . . . . . . . . 46
Obtaining the LWAPP2SCG Application. . . . . . . . . . . . . . . . . . . . . . . . . . . . . . . . . . . . 46
Enabling LWAPP2SCG . . . . . . . . . . . . . . . . . . . . . . . . . . . . . . . . . . . . . . . . . . . . . . . . 46
Method 1: Perform Auto Discovery of the Controller Using the AP Registrar . . . . . . . . . . 47
Configuring the AP Registrar . . . . . . . . . . . . . . . . . . . . . . . . . . . . . . . . . . . . . . . . . . . . 47
Important Notes. . . . . . . . . . . . . . . . . . . . . . . . . . . . . . . . . . . . . . . . . . . . . . . . . . . . . . 48
Completing the AP Registrar Configuration . . . . . . . . . . . . . . . . . . . . . . . . . . . . . . . . . 48
Method 2: Perform Auto Discovery on Same Subnet, then Transfer the AP to Intended
Subnet . . . . . . . . . . . . . . . . . . . . . . . . . . . . . . . . . . . . . . . . . . . . . . . . . . . . . . . . . . . . . . 49
Method 3: Register the Controller with the DNS Server . . . . . . . . . . . . . . . . . . . . . . . . . . 49
Method 4: Configure DHCP Option 43 on the DHCP Server . . . . . . . . . . . . . . . . . . . . . . 52
Method 5: Manually Configure the Controller Address on the AP’s Web Interface . . . . . . 55
What to Do Next . . . . . . . . . . . . . . . . . . . . . . . . . . . . . . . . . . . . . . . . . . . . . . . . . . . . . . . 56
Index

SmartZone 100 Getting Started Guide for SmartZone 3.5.1, 800-71518-001 Rev A 5
About This Guide
This SmartZone™ 100 Getting Started Guide for SmartZone 3.5.1 provides infor-
mation on how to set up the SmartZone 100 (SZ-100) appliance on the network.
Topics covered in this guide include mounting, installation, and basic configuration.
This guide is intended for use by those responsible for installing and setting up
network equipment. Consequently, it assumes a basic working knowledge of local
area networking, wireless networking, and wireless devices.
NOTE If release notes are shipped with your product and the information there
differs from the information in this guide, follow the instructions in the release notes.
Most user guides and release notes are available in Adobe Acrobat Reader Portable
Document Format (PDF) or HTML on the Ruckus Wireless Support website at
https://support.ruckuswireless.com/documents.

About This Guide
Document Conventions
SmartZone 100 Getting Started Guide for SmartZone 3.5.1, 800-71518-001 Rev A 6
Document Conventions
Tab l e 1 and Table 2 list the text and notice conventions that are used throughout
this guide.
Related Documentation
In addition to this Getting Started Guide, each SmartZone 100 documentation set
includes the following:
• Administrator Guide: Provides detailed information on how to configure the SZ.
The Administrator Guide is available for download on the Ruckus Wireless
Support website at http://support.ruckuswireless.com.
• Online Help: Provides instructions for performing tasks using the SZ web
interface. The online help is accessible from the web interface and is searchable.
• Release Notes: Provide information about the current software release, including
new features, enhancements, and known issues.
Table 1. Text conventions
Convention Description Example
monospace
Represents information as it
appears on screen
[Device name]>
monospace bold
Represents information that
you enter
[Device name]> set ipaddr
10.0.0.12
default font bold
Keyboard keys, software
buttons, and field names
On the Start menu, click All
Programs
.
italics Screen or page names Click
Advanced Settings. The
Advanced Settings page
appears.
Table 2. Notice conventions
Notice Type Description
NOTE
Information that describes important features or instructions
CAUTION!
Information that alerts you to potential loss of data or potential
damage to an application, system, or device
WARNING!
Information that alerts you to potential personal injury

About This Guide
Documentation Feedback
SmartZone 100 Getting Started Guide for SmartZone 3.5.1, 800-71518-001 Rev A 7
NOTE For a complete list of documents that accompany this release, refer to the
Release Notes.
Documentation Feedback
Ruckus Wireless is interested in improving its documentation and welcomes your
comments and suggestions. You can email your comments to Ruckus Wireless at:
When contacting us, please include the following information:
• Document title
• Document part number (on the cover page)
• Page number (if appropriate)
For example:
• SmartZone 100 Getting Started Guide for SmartZone 3.5.1
• Part number: 800-71518-001
• Page 88

SmartZone 100 Getting Started Guide for SmartZone 3.5.1, 800-71518-001 Rev A 8
1
Preparing to Set Up the
Controller
In this chapter:
• Unpacking the Controller
• Verifying the Package Contents
• Before You Begin
Unpacking the Controller
Follow these steps to unpack the controller.
1 Open the controller package, and then carefully remove the contents.
2 Return all packing materials into the shipping box, and then put the box away
in a dry location.
3 Verify that all of the items listed in Verifying the Package Contents (below) are
included in the package. Check each item for damage. If any item is damaged
or missing, notify your authorized Ruckus Wireless sales representative
immediately.
Verifying the Package Contents
A complete controller package contains all of the items listed below:
• One SmartZone 100 appliance
• One Category 6 (Cat 6) Ethernet cable (5 ft.)
• One rack mount kit (see Rack Mount Kit Contents below)
• Service Level Agreement/Limited Warranty Statement sheet
• Regulatory Statement sheet
•This Getting Started Guide
NOTE The AC power cable (part number 902-0174-XX00, where XX is the two-
character country code) is not supplied with the SmartZone 100 appliance and may
be ordered separately.

Preparing to Set Up the Controller
Verifying the Package Contents
SmartZone 100 Getting Started Guide for SmartZone 3.5.1, 800-71518-001 Rev A 9
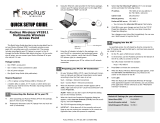
Rack Mount Kit Contents
The rack mount kit contains the following items:
• Mounting brackets x 2
• Rack cabinet mounting screws x 4
• Small screws x 10
Figure 1. Contents of the rack mount kit

Preparing to Set Up the Controller
Before You Begin
SmartZone 100 Getting Started Guide for SmartZone 3.5.1, 800-71518-001 Rev A 10
Before You Begin
Before installing and setting up the controller, Ruckus Wireless recommends that
you first complete the following pre-installation tasks.
Prepare the Required Hardware and Tools
You must supply the following tools and equipment:
• A switch or router for connecting the controller to the backbone network. If you
purchased SKU P01-S124-WW10 (see Determine Which Controller SKU You
Have), which has two (2) 10GBASE-X (SFP+) ports, Ruckus Wireless recom-
mends using a switch or router that has 10GbE interfaces.
• A Phillips #1 screwdriver
• A flat head screwdriver
• An administrative computer (desktop or laptop) running Windows 8/7/Vista/XP
or Mac OS X, containing a minimum RAM of 15G, with a web browser installed
(Google Chrome recommended). Supported web browsers include:
• Google Chrome 15 (and later)
• Safari 5.1.1 (and later)
• Mozilla Firefox 8 (and later)
• Microsoft Internet Explorer 9.0
• A grounded electrical power strip or surge suppressor to protect from circuit
overload
• A standard EIA 19-inch wide rack with an available 1RU space
NOTE At the beginning of each procedure, this guide lists the specific tools,
accessories, or equipment that you will need to complete that procedure.

Preparing to Set Up the Controller
Before You Begin
SmartZone 100 Getting Started Guide for SmartZone 3.5.1, 800-71518-001 Rev A 11
Determine Which Controller SKU You Have
The SZ-100 has two stock keeping units (SKUs) available:
• SKU P01-S104-WW10 has four (4) 1000BASE-T (RJ-45) ports.
• SKU P01-S124-WW10 has four (4) 1000BASE-T (RJ-45) and two (2) 10GBASE-
X (SFP+) ports
Figure 2. SKU P01-S124-WW10 has two 10GBASE-X (SFP+) ports, which
SKU P01-S104-WW10 does not
SKU P01-S104-WW10 does not have
these two SFP+ ports

Preparing to Set Up the Controller
Before You Begin
SmartZone 100 Getting Started Guide for SmartZone 3.5.1, 800-71518-001 Rev A 12
Get to Know the Physical Features of the Controller
The following sections identify the physical features of the controller that are relevant
to the installation and mounting instructions that this guide provides. Before you
begin the installation process, Ruckus Wireless strongly recommends that you
become familiar with these physical features.
Front Panel
Figure 3 shows the controller’s front panel with the bezel installed. For descriptions
of the numbered parts, refer to Tabl e 1.
Figure 3. The front panel of the SmartZone 100 (SKU P01-S124-WW10)
3
4
8
9
10
12
5
2
1
6
7
11
13

Preparing to Set Up the Controller
Before You Begin
SmartZone 100 Getting Started Guide for SmartZone 3.5.1, 800-71518-001 Rev A 13
Table 1. Front panel parts
Number Description
1 10G Ethernet link LED (see LEDs on the Front Panel)
2 10G Ethernet speed LED (see LEDs on the Front Panel)
3 Two 10GBASE-X (SFP+) ports (
SKU P01-S124-WW10 only)
4 F/D (factory default) button. Press this button for at least 10 seconds to
reset the controller to factory default settings.
5 Status LED (see LEDs on the Front Panel)
6 1000BASE-T link LED (see LEDs on the Front Panel)
7 1000BASE-T status LED (see LEDs on the Front Panel)
8 Four 1000BASE-T (RJ-45) ports
9 Console (RJ-45 serial) port. Use the supplied console cable (or any rollover
cable, also known as Cisco™ serial RJ-45 cable) to connect this port to
another device.
10 Two USB ports
11 Power LED (see LEDs on the Front Panel)
12 HDD LED (see LEDs on the Front Panel)
13 Reset button. Press for 5 seconds to restart the SZ-100.

Preparing to Set Up the Controller
Before You Begin
SmartZone 100 Getting Started Guide for SmartZone 3.5.1, 800-71518-001 Rev A 14
LEDs on the Front Panel
Tab l e 2 describes the behavior of the LEDs on the front panel.
Table 2. LED behavior
LED Description
10G Ethernet link
LED
• Green: Operational
• Flashing: TX/RX data
• Off: Not operational
10G Ethernet
speed LED
• Blue: Operating at 10Gbps
• Yellow/Orange: Operating 1Gbps
• Off: Not operational
Status • Green: System operational/no fault
• Red: System fault
• Blinking red: Starting up or shutting down
• Slow flashing red: System shut down
1000BASE-T link
LED
• Green: Operational
• Flashing green: TX/RX data
• Off: Not operational
1000BASE-T
speed LED
• Green: 1000Mbps
• Amber: 100Mbps
• Off: 10Mbps
Power • On: Power available
• Off: No power
HDD • On: Disk I/O (usually blinking)
• Off: No disk I/O

Preparing to Set Up the Controller
Before You Begin
SmartZone 100 Getting Started Guide for SmartZone 3.5.1, 800-71518-001 Rev A 15
Rear Panel
Figure 4 shows the rear panel of the SmartZone 100. For descriptions of the
numbered parts, refer to Tab l e 3.
Figure 4. Rear panel of the SmartZone 100
Table 3. SmartZone rear panel parts
Number Description
1 Power switch
2 High efficiency (80+) power supply (110-220 VAC)
1
2

SmartZone 100 Getting Started Guide for SmartZone 3.5.1, 800-71518-001 Rev A 16
2
Mounting and Powering the
Controller
In this chapter:
• Before You Begin
• What You Will Need
• Mounting the Controller
• Powering On the Controller
Before You Begin
Before installing the controller onto a server rack, verify that all package contents
(see Unpacking the Controller) are included and ensure that you have prepared all
the required hardware and tools.
What You Will Need
• 3/8-inch hex driver or wrench
• Phillips (crosshead) screwdriver, #1 and #2 bits
• Anti-static wrist strap and conductive foam pad (recommended)

Mounting and Powering the Controller
Mounting the Controller
SmartZone 100 Getting Started Guide for SmartZone 3.5.1, 800-71518-001 Rev A 17
Mounting the Controller
Follow these steps to mount the controller onto a server rack.
1 Unpack the rack mount kit that is included in the SZ100 package that you
received. Refer to Rack Mount Kit Contents and verify that the rack mount kit
contents are complete.
Figure 5. Rack mount kit contents
2 Find a flat and surface (such as a table) and place the SZ100 unit on top of it.
Figure 6. Place the SZ100 on a flat, dry surface

Mounting and Powering the Controller
Mounting the Controller
SmartZone 100 Getting Started Guide for SmartZone 3.5.1, 800-71518-001 Rev A 18
3 Take one mounting ear, and then use a Phillips to secure it to the right side of
the chassis with the supplied mounting ear screws.
Figure 7. Secure the mounting ear to the right side of the chassis

Mounting and Powering the Controller
Mounting the Controller
SmartZone 100 Getting Started Guide for SmartZone 3.5.1, 800-71518-001 Rev A 19
4 Take the remaining mounting ear, and then repeat the above procedure on the
left side of the chassis.
Figure 8. Secure the other mounting ear to the left side of the chassis
NOTE: One of the bottom screw holes on each side of the chassis is unusable – it
is used to secure the chassis cover to the chassis. Therefore, you can only use up
to four mounting ear screws on each side. Ten mounting ear screws are supplied.
So you may have two or more mounting ear screws left (depending on how many
you use) when you finish.

Mounting and Powering the Controller
Mounting the Controller
SmartZone 100 Getting Started Guide for SmartZone 3.5.1, 800-71518-001 Rev A 20
5 Using the supplied four rack mounting screws, secure the SZ-100 chassis to
the rack. Use two screws on each side of the chassis.
Figure 9. Use the supplied screws to secure the mounting ears to the rack
/