Page is loading ...

Ruckus Wireless, Inc. | QS_ZF2925_070329 — vABC]
QUICK SETUP GUIDE
Ruckus Wireless ZF2925
MediaFlex Hotspot
Access Point
This Quick Setup Guide describes in step-by-step detail how to
set up a Ruckus Wireless ZF2925 Access Point (AP), serving users
in a wi-fi hotspot. The process includes reconfiguring your PC/
laptop to connect to the Ruckus AP through the Ruckus Wireless
Web Admin Interface. At the conclusion of setup, you can place
and connect your hotspot AP at your site and put it in use.
Package Contents
• One ZF2925 Access Point
• One 1-meter/3-foot Cat5 Ethernet cable
• One AC power adapter
• One wall-mounting kit, plus printed instructions
•One Quick Setup Guide (this publication)
Required Equipment
• A PC or laptop running Windows 2000 or Windows XP
• A modem (DSL or cable), E1/T1 router, or other device pro-
vided by your Internet Service Provider, that brings web
access to your site.
• A network switch or a VLAN-capable DSL/Internet gateway
device that supports the 802.1Q VLAN-tagging protocol.
1 After unpacking your Ruckus Wireless AP from the package,
place it next to your PC/laptop.
2 Temporarily disconnect your PC/laptop from any local net-
work (if connected).
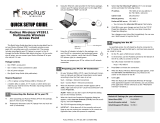
3 Using the Ethernet cable provided in the Ruckus package,
connect your PC/laptop network port to one of the four
LAN ports on the AP.
• Do not connect the cable to the AP WAN port. Instead,
connect it to any of the other ports (labelled “1-4”) on
the back of the AP—as shown below.
4 Using the AC adapter included in the package, con-
nect the AP to a convenient (and protected) power
source. After a minute, verify that the AP’s Power
LED (shown right) is a steady green.
1 On your Windows 2000 or XP PC, open the Network Con-
nections (or Network and Dial-up Connections) control
panel according to how the Start menu is set up:
Start-> Settings-> Network Connections
Start-> Control Panel-> Network Connections
2 When the Network Connections window appears (XP or
2000), right-click the icon for “Local Area Connection” and
choose Properties.
ALERT!—Make sure you don’t open the Properties dialog
box for the wireless network.
3 When the Local Area Connection Properties dialog box
appears, select Internet Protocol (TCP/IP) from the scroll-
ing list, and click Properties.
The TCP/IP Properties dialog box appears.
4 IMPORTANT— Write down all of the currently active set-
tings so you can restore your computer to its current con-
figuration later (when this process is complete).
5 Select Use the following IP address (if it’s not already
active) and make the following entries:
IP Address 192.168.0.22 (or any address in
the 192.168.0.x network)
Subnet mask 255.255.255.0
Default gateway 192.168.0.1
Preferred DNS server 192.168.0.1
•You can leave the Alternate DNS server field empty.
6 Click OK to save your changes and exit first the TCP/IP
Properties dialog box, then the Local Area Connection
Properties dialog box.
Your changes are put into effect immediately.
As specified earlier, the AP should be directly connected to
your PC/laptop (through one of the LAN ports), and have been
powered up, ready for setup.
1 On the PC, open a web browser window.
2 In the browser, type this URL to connect to the AP:
https://192.168.0.1
3 Press Enter to initiate the connection.
4 When a security alert dialog box appears, click OK/Yes to
proceed.
5 When the Ruckus Wireless Admin login page appears, enter
the following:
Username super
Password sp-admin
6 Click Login.
Important!
ALERT! Before starting this process, inspect your net-
work switch and confirm that it supports the 802.1Q proto-
col. The Ruckus Wireless Hotspot Access Point requires a
VLAN-capable (802.1Q) switch.
1 Connecting the Ruckus AP to your PC
2 Preparing your PC for AP Setup
3 Logging into the AP
Default AP Settings (for your reference)
Network Names (Seeds) Hotspot1—Hotspot4
Security (Encryption method) Disabled for each hotspot
Default Management IP Address 192.168.0.1
VLAN mapping Wireless Hotspot 1 = 11
Wireless Hotspot 2 = 21
Wireless Hotspot 3 = 31
Wireless Hotspot 4 = 41
Management = 51

Ruckus Wireless, Inc. | QS_ZF2925_070329 — vABC]
When the Ruckus 2925 Multimedia Hotzone Wireless AP
management application appears in the browser, you can
proceed. [This application will be referred to as the “Web
Admin interface” hereafter.]
If your computer cannot connect to the AP...
• Disconnect the AP from the power source, wait 5 seconds,
then reconnect it—and wait 60 seconds before attempting a
reconnection.
• Disconnect and reconnect the AP and the PC.
• Replace the Ethernet cable with a new one if the relevant LAN
port LED is not illuminated. (LEDs in each port light up during
a successful connection.)
1 In the left-hand menu column of the Ruckus Web Admin
interface, choose Wireless (under Configuration).
The Configure::Wireless::Common options appear.
2 Verify that the following options are active:
Wireless Mode “Auto-select” must be selected
Channel “SmartSelect” must be selected
Country Code If not in the United States, select the
current country.
3 Click Update Settings if you made any changes.
4 Click any of the four “Wi-Fi Hotspot” tabs.
5 Delete the text in the SSID field and type the name of your
network. (If your network doesn’t have a “name”, type a
short name that will help your users identify the AP in their
wireless network connection application.
6 Click Update Settings.
7 Repeat the preceding steps with each Wi-Fi Hotspot tab.
8 [-Steps 8–11 Optional-] To switch from DHCP (the default)
to Static IP, choose Internet (under Configuration).
9 Click the button by Static IP.
10 Fill in the IP Address and Mask fields.
11 Click Update Settings.
12 Click Logout to exit the Ruckus Web Admin interface.
13 When the Web Admin login page reappears, you can exit
your browser.
14 Disconnect the AP from the PC and from the current power
source, and restore your PC to the normal network connec-
tions.
To restore the network settings for your PC/laptop, do one of
the following first steps, according to which OS your PC/laptop is
using:
1 Click Start and choose Settings-> Network Connections.
(If Windows 2000, click Start and choose Settings->Network
and Dial-up Connections.)
2 When the Network Connections window appears, right-
click the icon for the “Local Area Connection” designated
for your home network and choose Properties.
3 When the Local Area Connection Properties dialog box
appears, select Internet Protocol (TCP/IP) from the scroll-
ing list, and click Properties.
The TCP/IP Properties dialog box appears.
4 Replace the recent AP connection entries with the entries
from your standard network configuration.
5
Click OK to save your settings and exit first the TCP/IP
Properties dialog box, then the Local Area Connection
Properties dialog box.
Your PC/laptop is now ready for normal network use.
1 Disconnect the AP’s power adapter from the power outlet.
2 Move the AP to its permanent location (accessible to both
AC power and ISP connections). TIP: Use the wall-mount
bracket to help secure the AP in an advantageous location
on the wall or ceiling.
Follow these guidelines:
• Place the AP as close to the center of the room, and
away from any physical obstructions.
• Place the AP on a shelf or other elevated location where
the user’s wireless networking devices are in line-of-
sight access.
• Avoid any sources of electromagnetic interference.
• Avoid placing the AP near large metal or glass surfaces.
3 Use an Ethernet cable to connect the WAN port of the AP to
the appropriate device:
• The ISP’s 802.1Q-capable modem or gateway device
• The VLAN switch that is connected to the ISP’s device
4 Connect the AP power adapter to the AP, then to a conve-
nient power source.
5 Verify that the WAN port LED is lit (shown right),
along with the activity LEDs on the front of the AP.
After a short pause to re-establish the Internet connection,
you can test the AP.
1 Using any wireless-enabled computer or mobile device,
search for and select the wireless network you’ve previ-
ously configured.
2 If you can connect, open a browser and link to any public
web site.
Congratulations! Your wireless network is active and ready
for use.
You can now use the wireless network to log in to the AP with
the Web Admin Interface. Use this tool to review and fine-tune a
wide range of settings and options, to make your hotspot opera-
tions more secure and more efficient.
See the separate Ruckus Wireless User Guide (downloadable
from the Ruckus support web site) for all the details, or open and
browse the Help window in the Web Admin interface for topical
assistance.
4 Customizing Wireless Settings
Important!
If you anticipate logging into the AP to regularly perform
monitoring or maintenance (once it is in place), you may want
to consider assigning a static IP address to the AP. This would
simplify connections made to the AP for all post-installation
maintenance.
In a default AP configuration, the AP uses a DHCP-assigned
IP address. Any post-installation connections require (1) a
reverse ARP lookup or (2) logging into the DHCP server, to
determine which IP address is in effect in the AP.
See the Ruckus Wireless ZF2925 AP User Guide for more
information on IP address assignment options and logging into
the AP through either a static IP or dynamic IP address.
5 Restoring your PCs Network Settings
6 Placing the AP in Your Site
7 Testing the Ruckus Wireless AP
** For More Information
/