Page is loading ...

Ruckus Wireless
™
ZoneFlex
™
7761-CM Dual Band 802.11n
Outdoor Access Point
with Integrated Cable Modem
ZF7761-JP22 for Japan Markets
Installation Guide
Part Number 800-70290-002 Rev A
Published August 2012
www.ruckuswireless.com


i
1 About This Installation Guide . . . . . . . . . . . . . . . . . . . . . . . . . . . . . . . . . . . . . . . . . . . . . . . . 1
Related Documentation . . . . . . . . . . . . . . . . . . . . . . . . . . . . . . . . . . . . . . . . . . . . . . . . . . . 1
Using ZoneDirector to Manage the CMAP . . . . . . . . . . . . . . . . . . . . . . . . . . . . . . . . . . . . 1
Terms Used in This Guide . . . . . . . . . . . . . . . . . . . . . . . . . . . . . . . . . . . . . . . . . . . . . . . . . 2
Documentation Feedback . . . . . . . . . . . . . . . . . . . . . . . . . . . . . . . . . . . . . . . . . . . . . . . . . 2
2 Unpacking the CMAP . . . . . . . . . . . . . . . . . . . . . . . . . . . . . . . . . . . . . . . . . . . . . . . . . . . . . . . 3
Package Contents . . . . . . . . . . . . . . . . . . . . . . . . . . . . . . . . . . . . . . . . . . . . . . . . . . . . . . . . 3
3 Finding the Access Point and Cable Modem MAC Addresses . . . . . . . . . . . . . . . . . . . . . 5
4 Preparing for Installation . . . . . . . . . . . . . . . . . . . . . . . . . . . . . . . . . . . . . . . . . . . . . . . . . . . . 6
Preconfiguring the Access Point (Standalone Only) . . . . . . . . . . . . . . . . . . . . . . . . . . . . 6
Step 1: Prepare the Administrative Computer . . . . . . . . . . . . . . . . . . . . . . . . . . . . . . . . 7
Step 2: Supply DC Power to the CMAP . . . . . . . . . . . . . . . . . . . . . . . . . . . . . . . . . . . . 10
Step 3: Log Into the Access Point’s Web Interface . . . . . . . . . . . . . . . . . . . . . . . . . . . 11
Step 4: Configure the Wireless Settings . . . . . . . . . . . . . . . . . . . . . . . . . . . . . . . . . . . . 12
Step 5: Disconnect the CMAP from the Administrative Computer . . . . . . . . . . . . . . 15
Step 6: Restore the Administrative Computer’s Network Settings . . . . . . . . . . . . . . 15
Pointing the CMAP to ZoneDirector . . . . . . . . . . . . . . . . . . . . . . . . . . . . . . . . . . . . . . . . 17
Use SSH to Set the ZoneDirector IP Address on the CMAP . . . . . . . . . . . . . . . . . . . . 17
Configure Option 43 on the DHCP Server (ZoneDirector Management Only) . . . . . 18
5 Hardware Features . . . . . . . . . . . . . . . . . . . . . . . . . . . . . . . . . . . . . . . . . . . . . . . . . . . . . . . . 31
Weight and Dimensions . . . . . . . . . . . . . . . . . . . . . . . . . . . . . . . . . . . . . . . . . . . . . . . . . . 34
Connectors . . . . . . . . . . . . . . . . . . . . . . . . . . . . . . . . . . . . . . . . . . . . . . . . . . . . . . . . . . . . 34
Ethernet/PoE-Out Port . . . . . . . . . . . . . . . . . . . . . . . . . . . . . . . . . . . . . . . . . . . . . . . . . . . 34
LEDs . . . . . . . . . . . . . . . . . . . . . . . . . . . . . . . . . . . . . . . . . . . . . . . . . . . . . . . . . . . . . . . . . . 35
Reading the CMAP LEDs . . . . . . . . . . . . . . . . . . . . . . . . . . . . . . . . . . . . . . . . . . . . . . . . 36
Supported Power Sources . . . . . . . . . . . . . . . . . . . . . . . . . . . . . . . . . . . . . . . . . . . . . . . . 39
Heaters . . . . . . . . . . . . . . . . . . . . . . . . . . . . . . . . . . . . . . . . . . . . . . . . . . . . . . . . . . . . . . . . 39
Contents

ii
6 Cable Modem Operation. . . . . . . . . . . . . . . . . . . . . . . . . . . . . . . . . . . . . . . . . . . . . . . . . . . 40
Logging Into the CM Web Interface using Dynamic IP . . . . . . . . . . . . . . . . . . . . . . . . . 40
Logging Into the CM Web Interface using the CMAP Ethernet Port . . . . . . . . . . . . . . 40
Viewing the Software Status . . . . . . . . . . . . . . . . . . . . . . . . . . . . . . . . . . . . . . . . . . . . . . 41
Viewing the Connection Status . . . . . . . . . . . . . . . . . . . . . . . . . . . . . . . . . . . . . . . . . . . . 43
Configuring the Downstream Frequency . . . . . . . . . . . . . . . . . . . . . . . . . . . . . . . . . . . . 45
Administering the Cable Modem . . . . . . . . . . . . . . . . . . . . . . . . . . . . . . . . . . . . . . . . . . 45
Viewing the SNMP Event Log . . . . . . . . . . . . . . . . . . . . . . . . . . . . . . . . . . . . . . . . . . . . . 47
7 Before You Begin Installing the CMAP . . . . . . . . . . . . . . . . . . . . . . . . . . . . . . . . . . . . . . . . 47
Prepare the Required Hardware and Tools . . . . . . . . . . . . . . . . . . . . . . . . . . . . . . . . . . 47
Perform a Site Survey . . . . . . . . . . . . . . . . . . . . . . . . . . . . . . . . . . . . . . . . . . . . . . . . . . . . 48
8 Powering the CMAP . . . . . . . . . . . . . . . . . . . . . . . . . . . . . . . . . . . . . . . . . . . . . . . . . . . . . . . 49
Using DC Power (Staging or Debugging Only) . . . . . . . . . . . . . . . . . . . . . . . . . . . . . . . 49
Using Power Over Cable (Actual Deployment) . . . . . . . . . . . . . . . . . . . . . . . . . . . . . . . 49
9 Verifying Access Point Operation . . . . . . . . . . . . . . . . . . . . . . . . . . . . . . . . . . . . . . . . . . . . 50
10 Verifying Cable Modem Operation. . . . . . . . . . . . . . . . . . . . . . . . . . . . . . . . . . . . . . . . . . . 51
11 Switching LEDs to Cable Modem Mode. . . . . . . . . . . . . . . . . . . . . . . . . . . . . . . . . . . . . . . 53
Using the AP’s Web Interface to Switch LEDs to CM Mode . . . . . . . . . . . . . . . . . . . . . 54
Using SNMP to Switch LEDs to CM Mode . . . . . . . . . . . . . . . . . . . . . . . . . . . . . . . . . . . 55
12 Resetting CM and AP to Factory Default Settings Simultaneously . . . . . . . . . . . . . . . . . 56
Using the Reset Switch on the DC Power Supply . . . . . . . . . . . . . . . . . . . . . . . . . . . . . 56
Using the Reset Shunt . . . . . . . . . . . . . . . . . . . . . . . . . . . . . . . . . . . . . . . . . . . . . . . . . . . 57
13 Resetting the AP Only to Factory Default Settings . . . . . . . . . . . . . . . . . . . . . . . . . . . . . . 58
14 Resetting the CM Only to Factory Default Settings. . . . . . . . . . . . . . . . . . . . . . . . . . . . . . 59
15 Remotely Rebooting the AP . . . . . . . . . . . . . . . . . . . . . . . . . . . . . . . . . . . . . . . . . . . . . . . . 60
16 Mounting the CMAP. . . . . . . . . . . . . . . . . . . . . . . . . . . . . . . . . . . . . . . . . . . . . . . . . . . . . . . 61
Grounding the CMAP . . . . . . . . . . . . . . . . . . . . . . . . . . . . . . . . . . . . . . . . . . . . . . . . . . . . 63

iii
17 Installing the Antennas . . . . . . . . . . . . . . . . . . . . . . . . . . . . . . . . . . . . . . . . . . . . . . . . . . . . . 65
18 What to Do Next . . . . . . . . . . . . . . . . . . . . . . . . . . . . . . . . . . . . . . . . . . . . . . . . . . . . . . . . . . 67
Change the Administrative Password . . . . . . . . . . . . . . . . . . . . . . . . . . . . . . . . . . . . . . . 67
Configuring Advanced Settings and Features . . . . . . . . . . . . . . . . . . . . . . . . . . . . . . . . 67
Read Related Documentation . . . . . . . . . . . . . . . . . . . . . . . . . . . . . . . . . . . . . . . . . . . . . 67
19 Troubleshooting . . . . . . . . . . . . . . . . . . . . . . . . . . . . . . . . . . . . . . . . . . . . . . . . . . . . . . . . . . 68
Retrieving the CM’s MAC Address . . . . . . . . . . . . . . . . . . . . . . . . . . . . . . . . . . . . . . . . . 68
Retrieving the CM’s MAC Address using the CM CLI . . . . . . . . . . . . . . . . . . . . . . . . . 68
Retrieving the CM’s MAC Address using the AP CLI . . . . . . . . . . . . . . . . . . . . . . . . . 69
How Radio Frequency Scanning Works . . . . . . . . . . . . . . . . . . . . . . . . . . . . . . . . . . . . . 70
Contacting Ruckus Wireless Support . . . . . . . . . . . . . . . . . . . . . . . . . . . . . . . . . . . . . . . 71

iv

1
1 About This Installation Guide
This Installation Guide provides information on how to set up the Cable Modem Access
Point (CMAP) for Japan markets on your network. Topics covered in this guide include
installation, basic configuration, operation and mounting.
This guide is intended for use by those responsible for installing and setting up network
equipment. Consequently, it assumes a basic working knowledge of local area networking,
cable modem setup and configuration, wireless networking, and wireless devices.
NOTE: The cable modem and access point each has its own independent firmware load
that is updated independently.
Related Documentation
In addition to this guide, each Cable Modem Access Point documentation set includes
the following:
■ User Guide: Provides detailed information on how to configure the functions of the
unit. The User Guide is available for download on the Ruckus Wireless Support Web
site at
http://support.ruckuswireless.com/documents
■ Ruckus Wireless External Antenna Mounting Reference Sheet: Provides instructions for
mounting compatible Ruckus Wireless external antennas onto the strand interface for
the Cable Modem Access Point.
■ Release Notes: Provides late-breaking information about the current software release,
including new features, enhancements, and known issues. If the information in the
Release Notes differs from the information in this guide, follow the instructions in the
Release Notes.
■ Online Help: Accessible from the CMAP’s Web interface, the Online Help provides
information that helps you configure the device from the Web interface.
Using ZoneDirector to Manage the CMAP
If you are planning to use a Ruckus Wireless ZoneDirector to manage the CMAP, this guide
describes the required steps that enable the access point to report to and communicate
with ZoneDirector successfully. Refer to “
Configure Option 43 on the DHCP Server
(ZoneDirector Management Only)” on page 18.

2
About This Installation Guide
Terms Used in This Guide
Terms Used in This Guide
Before continuing, Ruckus Wireless recommends that you become familiar with the
following terms:
■ Access Point (AP): The Wi-Fi component of the Cable Modem Access Point (CMAP).
■ Cable Modem (or CM): The cable modem component of the Cable Modem Access
Point (CMAP).
■ Cable Modem Access Point (or ZF7761-CM): The whole unit, which includes the CM
and AP, as well as the power supply.
Documentation Feedback
Ruckus Wireless is interested in improving its documentation and welcomes your
comments and suggestions. You can email your comments to Ruckus Wireless at
When contacting us, please include the following information:
■ Document title
■ Document part number (on the cover page)
■ Page number (if appropriate)
For example:
■ Ruckus Wireless ZoneFlex 7761-CM Dual Band 802.11n Outdoor Access Point with
Integrated Cable Modem Installation Guide
■ Part number: 800-70290-002
■ Page 60

3
Unpacking the CMAP
Package Contents
2 Unpacking the CMAP
1. Open the CMAP package, and then carefully remove the contents.
2. Return all packing materials to the shipping box, and put the box away in a dry location.
3. Verify that all items listed in Package Contents
below are included in the package.
Check each item for damage. If any item is damaged or missing, notify your authorized
Ruckus Wireless sales representative.
Package Contents
A complete ZoneFlex 7761-CM package contains all of the items listed below:
■ ZoneFlex 7761-CM unit
■ Service Level Agreement / Limited Warranty Statement
■ Regulatory Statement
■ Reset shunt
■ Hard line-to-RG11 cable adapter
■ This Installation Guide
NOTE: The CMAP supports up to three external antennas: two vertically-polarized
antennas and one horizontally-polarized antenna. These antennas are not included in the
CMAP package. To order these three antennas contact an authorized Ruckus Wireless
reseller and order:
Part Number 911-0636-VH02, which includes one horizontally- and one vertically-
polarized antenna, and
Part Number 911-0636-VP01, which includes one vertically-polarized antenna.
NOTE: The CMAP comes preinstalled with the cable strand interface, which you will use
to mount the assembly onto the cable strand. You only need to attach three external
antennas (sold separately) to the cable strand interface (after mounting the CMAP on the
strand) to complete the assembly. See “
Installing the Antennas” on page 65 for more
information.

4
Unpacking the CMAP
Package Contents
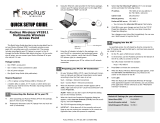
Figure 1. The CMAP comes preassembled with the cable strand interface
Cable Strand
Interface
Access Point
Vertically-polarized antennas
Horizontally-polarized antenna

5
Finding the Access Point and Cable Modem MAC Addresses
Package Contents
3 Finding the Access Point and Cable
Modem MAC Addresses
The CMAP has separate MAC addresses for the internal AP and Cable Modem (CM). See
Figure 2
for the location of the AP MAC address label. See Figure 3 for the CM MAC
address label location.
Figure 2. Access Point MAC address label location
Figure 3. Cable Modem MAC address label location

6
Preparing for Installation
Preconfiguring the Access Point (Standalone Only)
4 Preparing for Installation
This section describes the tasks that you need to perform before proceeding with the
installation. The required tasks depend on whether you are deploying the access point as
a standalone device or as a ZoneDirector-managed device.
■ Preconfiguring the Access Point (Standalone Only)
■ Configure Option 43 on the DHCP Server (ZoneDirector Management Only)
NOTE: A standalone access point refers to a device that is not managed by Ruckus
Wireless ZoneDirector or Ruckus Wireless FlexMaster.
Preconfiguring the Access Point (Standalone Only)
If you are deploying the access point as a standalone device, Ruckus Wireless strongly
recommends that you preconfigure (or “stage”) the unit before mounting it. It is more
convenient to connect the administrative computer to the access point and configure the
device in the lab than when the device is already mounted on the cable strand.
Preconfiguring the access point requires the following tasks to be completed:
■ Step 1: Prepare the Administrative Computer
■ Step 2: Supply DC Power to the CMAP
■ Step 3: Log Into the Access Point’s Web Interface
■ Step 4: Configure the Wireless Settings
■ Step 5: Disconnect the CMAP from the Administrative Computer
■ Step 6: Restore the Administrative Computer’s Network Settings
Before starting, prepare the following requirements:
■ DC power supply (see DC Power Supply in “Connectors” on page 34)
■ One Ethernet cable
■ An administrative computer (any computer running Windows that you can use to
preconfigure the access point)

7
Preparing for Installation
Preconfiguring the Access Point (Standalone Only)
Step 1: Prepare the Administrative Computer
■ “On Microsoft Windows 7” on page 7
■ “On Microsoft Windows XP” on page 8
NOTE: The following procedures are applicable if the administrative computer is running
on Windows 7 or Windows XP. If you are using a different operating system, refer to the
documentation that was shipped with your operating system for information on how to
modify the computer’s IP address settings.
On Microsoft Windows 7
NOTE: Before you start this procedure, make sure that all system firewalls are turned off.
1. Click the orb, and then click Control Panel.
2. Double-click Network and Sharing Center.
3. On the left menu, click Change Adapter Settings. The Network Connections page
appears and displays the available network interfaces on the computer.
4. Look for the network connection icon labeled Local Area Connection.
5. Right-click Local Area Connection, and then click Properties. The Local Connection
Properties dialog box appears.
6. Under This connection uses the following items, look for Internet Protocol Version 4
(TCP/IPv4), and then double-click the item. The Internet Protocol Version 4 (TCP/IPv4)
Properties dialog box appears.
7. Write down all of the currently active network settings. You will need this information
later when you restore your computer to its current network configuration.
8. On the General tab, Click Use the following IP address, and then configure the IP
address settings with the values listed in Tab le 2
. For a sample configuration, refer to
Figure 5
.
Table 1. Configure your computer’s IP address settings
IP address 192.168.100.77 or any address on the 192.168.100.x network
except:
- 192.168.100.2 which is already used by the access point, or
- 192.168.100.1 which is already used by the cable modem.
Subnet mask 255.255.255.0

8
Preparing for Installation
Preconfiguring the Access Point (Standalone Only)
9. Click OK to save your changes and close the Internet Protocol Version 4 (TCP/IPv4)
Properties dialog box.
10. Click OK again to close the Local Area Connection Properties dialog box.
Windows saves the IP address settings that you configured.
Figure 4. Sample configuration in the Internet Protocol Version 4 (TCP/IPv4)
Properties dialog box
On Microsoft Windows XP
1. Click Start > Control Panel > Network Connections.
2. When the Network Connections window appears, right-click the icon for Local Area
Connection, and then click Properties.
NOTE: Make sure that you configure the Local Area Connection properties, not the
Wireless Network Connection properties.
3. When the Local Area Connection Properties dialog box appears, select Internet
Protocol (TCP/IP) from the list, and then click Properties. The Internet Protocol (TCP/
IP) Properties dialog box appears.
4. Write down all of the currently active network settings. You will need this information
later when you restore your computer to its current network configuration.

9
Preparing for Installation
Preconfiguring the Access Point (Standalone Only)
5. Click Use the following IP address, and then configure the IP address settings with
the values listed in Tab le 2
. For a sample configuration, refer to Figure 5.
6. Click OK to save your changes and close the Internet Protocol (TCP/IP) Properties
dialog box.
7. Click OK again to close the Local Area Connection Properties dialog box.
Windows saves the IP address settings that you configured.
Figure 5. Sample configuration in the Internet Protocol (TCP/IP) Properties dialog box
Table 2. Configure your computer’s IP address settings
IP address 192.168.100.77 or any address on the 192.168.100.x network
except:
- 192.168.100.2 which is already used by the access point, or
- 192.168.100.1 which is already used by the cable modem.
Subnet mask 255.255.255.0

10
Preparing for Installation
Preconfiguring the Access Point (Standalone Only)
Step 2: Supply DC Power to the CMAP
In this step, you connect the CMAP to the administrative computer, and then you power
it on using 12 VDC power.
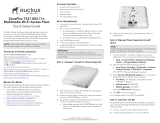
The customer provides a separate 2A 12 VDC power supply (Figure 6
) from a local or online
electronics supply store. The power supply, which is designed to be used by a CCTV or
similar application, includes a 2.5mm inner-diameter, 5.5mm outer-diameter center plug.
Figure 6. Typical CMAP customer-supplied DC power supply
Contact your authorized Ruckus Wireless reseller for a reset pushbutton assembly for the
CMAP, similar to the one shown in Figure 7
.
Figure 7. Typical CMAP reset pushbutton assembly, part number 902-0103-0000
Use the following to connect the CMAP to the administrative computer and then power
it on using 12 VDC power.
1. Connect one end of an Ethernet cable to the Ethernet port on the CMAP, and then
connect the other end to the administrative computer’s Ethernet port.
2. Remove the protective cap from the DC connector on the CMAP.
3. Connect the power adapter assembly to the DC connector on the CMAP.
4. Connect the DC power supply to the barrel of the power adapter assembly.
5. Connect the DC power into an AC power outlet.
The CMAP is now powered by DC, and you can press the reset button on the power
adapter assembly to reboot the CMAP.

11
Preparing for Installation
Preconfiguring the Access Point (Standalone Only)
Step 3: Log Into the Access Point’s Web Interface
1. On the administrative computer, open a Web browser window.
2. In the address or location bar, type the following address:
https://192.168.100.2
3. Press <Enter> on the keyboard to connect to the access point’s Web interface. A
security alert message appears.
4. Click Yes or OK (depending on the browser) to continue. The access point’s login page
appears.
Figure 8. The ZoneFlex Access Point login page
5. In User name, type super.
6. In Password, type sp-admin.
7. Click Log In. The Web interface appears, displaying the Device page.
8. Continue to “
Step 4: Configure the Wireless Settings”.

12
Preparing for Installation
Preconfiguring the Access Point (Standalone Only)
Step 4: Configure the Wireless Settings
To complete this step, you need to configure the settings on the Common tab and at least
one Wireless # tab. These are the essential wireless settings that enable wireless devices
on the network to associate with the access point.
NOTE: The CMAP has one 2.4GHz radio and one 5GHz radio. The wireless settings for
each radio need to be configured separately on the Web interface (except for the country
code setting, see note in Tab l e 3
). To configure the 2.4GHz radio settings, click
Configuration > Radio 2.4G. To configure the 5GHz radio settings, click Configuration
> Radio 5G.
For your reference, the default wireless settings on the access point are listed in Ta ble 3 .
Configure Common Wireless Settings
1. On the left menu of the Web interface, click Configuration > Radio 2.4G. The
Common page appears.
Figure 9. The Configuration > Radio 2.4G > Common tab
Table 3. Default wireless settings
Setting Default Value
SSID (network name) Wireless 1 to Wireless 8 (8 WLANs)
Encryption (security) Disabled on all WLANs
Default management IP address 192.168.100.2

13
Preparing for Installation
Preconfiguring the Access Point (Standalone Only)
2. Verify that the common wireless settings are configured as listed in Table 2.
3. If you made any changes to the Common tab that you want to save, click Update
Settings.
4. Repeat Step 1 through Step 3 for Configuration > Radio 5G.
5. Continue to Configure Wireless # Settings
.
Table 4. Common wireless configuration
Setting Recommended Value
Wireless Mode Auto-select
Channel SmartSelect
Channel Width 20MHz or 40MHz
Country Code
• If you purchased the access point outside of the United States, verify
that the value is set to your country or region. Selecting the correct
country code ensures that the access point uses only the radio
channels allowed in your country or region.
• If you purchased the access point in the United States, this value is
fixed to United States at the factory and is not user-configurable.
NOTE: The two radios on the CMAP are always configured with the
same country code setting. If you change the country code for Radio
2.4G, for example, the same change is automatically applied to Radio
5G.

14
Preparing for Installation
Preconfiguring the Access Point (Standalone Only)
Configure Wireless # Settings
1. Click one of the Wireless # tabs.
Figure 10. The Configuration > Radio 2.4 > Wireless 1 tab
2. In Wireless Availability, click Enabled.
3. In Broadcast SSID, click Enabled.
4. Clear the SSID box, and then type a unique and descriptive name that you want to call
this wireless network.
For example, you can type Ruckus Wireless AP. This SSID is the name that helps
users identify this wireless network in their wireless network connection application.
NOTE: You may also configure other wireless settings on this and other Wireless # tabs
(in addition to the settings described above), although it is not necessary for completing
the access point installation.
/