==============================================================================================
SUBJECT: Part #7311-7313 JK Tube Flares Install Sheet
1. Begin by removing your factory flares. In the front, there are bolts holding the flare and inner fender liner in place.
Remove them all with a 10mm wrench or socket, and unplug your marker light. The attachment of the flare to the
body is done with plastic clips. You remove the flare by starting at one end and simply pulling them out. Most of
the plastic clips will break; they are not intended to be re-used. In the rear, the removal is the same…simply pull.
2. With the flares removed, remove any additional clips from the body. This is easily done with a screwdriver or
needle nose pliers.
3. If you’re going to re-use your inner fender liners, you can now separate them from the factory flares, and trim
them to fit into the fender wells. The new flares mount to the body surface only, so as long as you are trimmed
behind that surface, they should not interfere.
Front Installation:
1. Begin by cutting the metal tab on the front as shown in the images here. Use touch-up paint to cover the bare
metal surface. To do this, a small jigsaw with a metal blade works very well.
2. In your kit you will find a length of rubber trim shaped like a “P”. Install this trim onto each flares mounting plate
using the adhesive backing already on the trim. When installing it, The very top of the “P” should be sitting on the
top edge of the flare mounting plate. You want to run this trim along the entire length of the flares mount plate
from end to end. You may need to make some small relief cuts in the trim to get it to bend around the corners
more easily.
3. Hold your flare into place and begin starting bolts through the existing holes in the flare and in the Jeep. Start all
bolts before tightening any.
4. Once all bolts are started, start from the rear of the flare and work your way forward tightening bolts. This order is
not entirely crucial, but you must be sure that you are tightening the front most two bolts last.
5. With all bolts tight, your front flares are installed. If you ordered our #2731 marker light kit, install the marker light
brackets and lights now. This bracket bolts into the two bolts closest to the front of the tube of the flare. Image
below. Refer to the LED light wiring information sheet included with the #2731 kit for information to help you wire
the lights.
Warrior, Inc.
11100 SW Industrial Way
Tualatin, Oregon 97062
(503) 691-8915 Main
(503) 692-0364 Fax
(888) 220-6861 Toll Free
techsupport@warriorproducts.com

Rear Installation:
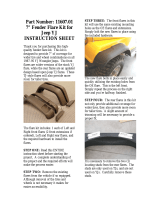
1. Begin by drilling out the holes for the expansion nuts. These nuts measure 5/8” (.625”). You will want to drill
these slightly smaller so they are tough to press into the holes. Using a step drill bit works very well for being
accurate when drilling the holes. The holes you see below are the ones you will want to drill. Ignore the ½” drill
size on this photo, use the arrows for location reference only.
2. Install the supplied expansion nuts into these 5 holes on each side. Simply push the expansion nut into the hole
until the large shoulder is flush with the body metal.
3. In your kit you will find a length of rubber trim shaped like a “P”. Install this trim onto each flare mounting plate
using the adhesive backing already on the trim. When installing it, The very top of the “P” should be sitting on the
top edge of the flare mounting plate, or slightly above the top edge. You want to run this trim along the entire
length of the flares mount plate from end to end. You may need to make some small relief cuts in the trim to get it
to bend around the corners more easily.
4. When installing the driver side, you will notice that the flare overlaps the gas filler plastic trim ring slightly. The
flare will sit over this ring and the P-trim will cover any gap issues. If you would like, the filler trim ring can be
marked and trimmed for an even better fit. This is at your discretion and is not required to complete installation.
5. Use three of your 2½” long bolts with a flat washer to bolt the flares onto the Jeep at the 3 front most expansion
nuts. Do not tighten bolts.
6. Use your 2” long bolts with flat washers to bolt the flares onto the Jeep at the 2 rear most expansion nuts. Do not
tighten bolts
7. Use the remaining two 2½” bolts with nuts and flat washers to bolt into the two open backed holes along the top of
the flare. Once all bolts are started, tighten all bolts.
8. You do not want to tighten the expansion nut locations too tight, they will end up pulling out of the holes. Watch
them closely as you tighten the flares.
9. This completes the installation.
Thanks for purchasing Warrior Products! Please see our other Jeep accessories at www.warriorproducts.com
If you need further assistance installing your product, please contact us by email at techsupport@warriorproducts.com or
call us at (888) 220-6861.
1/2